ZBrushCentral

Soldier 2027

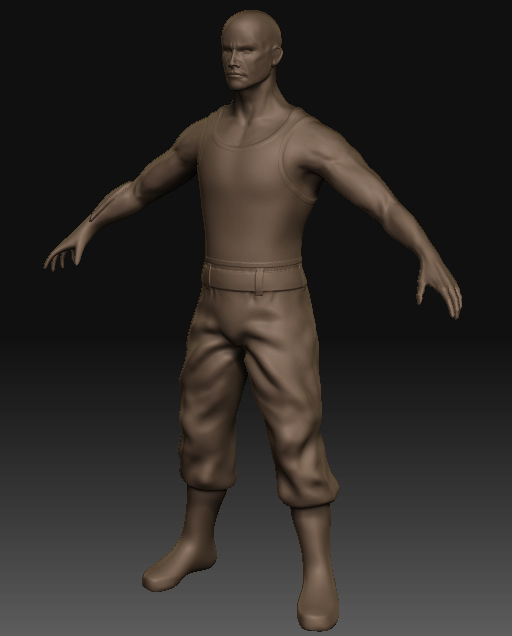
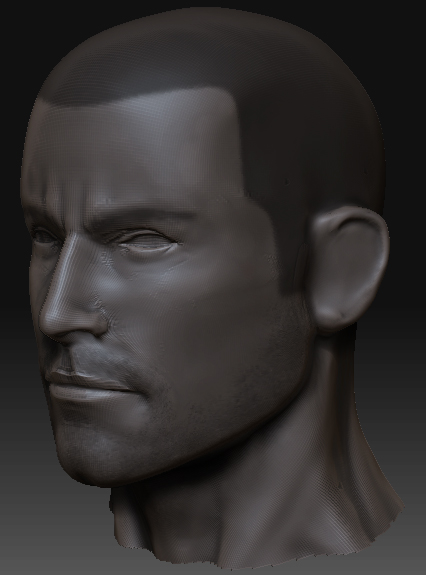
hey guys! I’m doing a new character. It’s going to be a soldier of the future type thing. I’ll be showing off some zbrush renders later. But first of all, I need you to concentrate on his head. I’m having a tough time here. I know something is wrong. Something is really wrong this his mouth, but I can’t figure out what it is. I’m not really convinced with the overall shape of the head. I do really need some help here lol.

And this is really embarrasing… I tried to make him look a bit like "Mass Effect"s main character. See here. lmao!

Anyway, I would be glad if somebody could point out, what is really wrong with this guy.

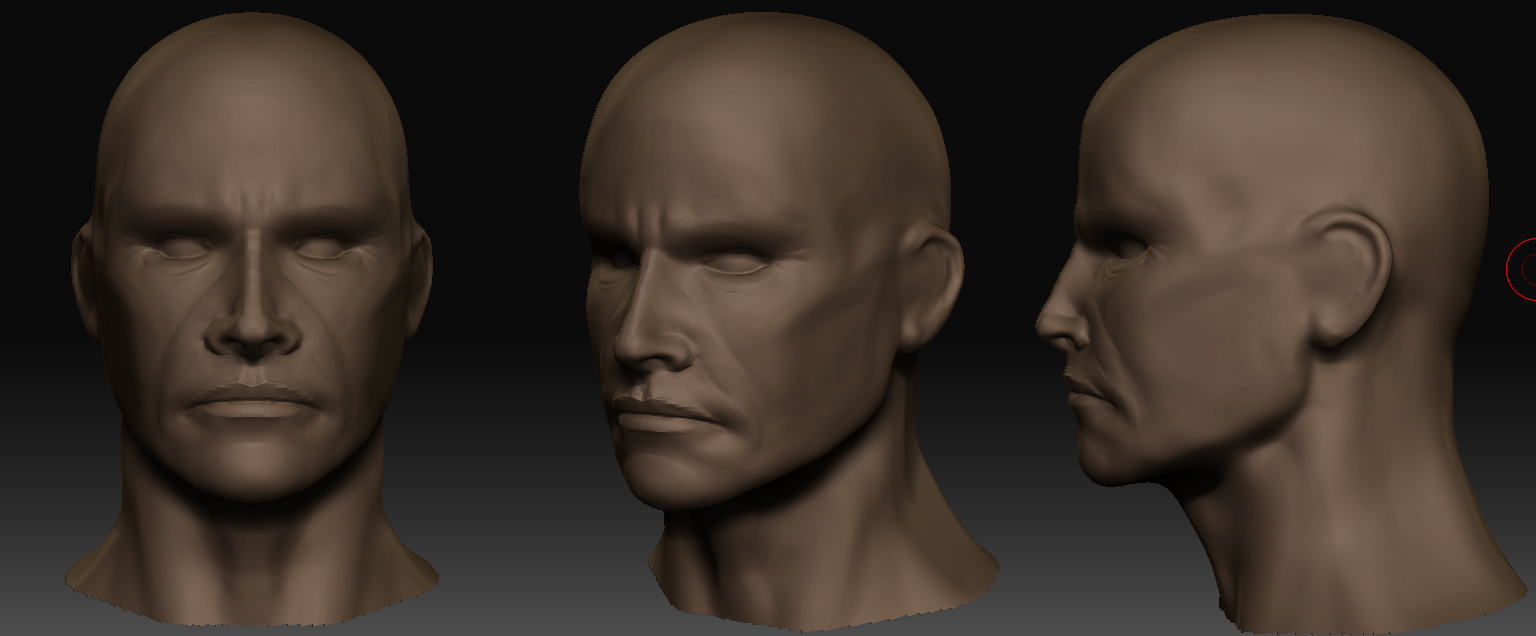
EDIT: Did, some changes. He looks better now. But far from perfect :frowning:

02.jpg

Hi!,

On your question about the character you're working on and what is going on in the mouth area, what seems like the issue is the degree of thiness of the lips. If you take a look at most people, the lips, especially the lower lip are much thicker than one might think (I get zapped on this and have to fix it regularly). I also think there may be a bit too much width for the nostrils (there is some variability on this but they usually stay somewhat inside a line drawn down from the beginning of the eyewhite/coruncle area of the eye. A really good reference on all this stuff is to take a look at Ryan Kingslien's head modeling video (it's here somewhere at ZBC) and really take an especially good look at how he works the bone masses that sit under the facial tissue. He has a very elegant approach to dealing with the mouth in general by first creating the jaw/mandible area, then adding the obicularis ori tissues and then building the lips over that combination of the bone and tissue structures). Please don't take any of this as criticism, you have a solid beginning to what could be a very solid model, and probably have already been checking a bunch of anatomy stuff and planning how to proceed, the Ryan K. head sculpting film may just make life a little easier in figuring out how to make the software do what you have in mind a little faster and may take you "outside" your project so you can get a clearer look at it and can see where to go next. Please keep updating this as you go along, it will be very interesting to see the final product.

look forward to seeing where you go with this,

Johannes Huber

wow! Thanks a lot! I’ll be checking that video tomorrow and I’ll definitely post some updates. I’m going to sleep now. Once again, thanks a lot for the C&C, I really appreciate them! :smiley:

johannes is right about what he said! but wrong at the same time, you should take it as criticism cuz it is. a healthy one though. a crit is a good thing and this forum is full of nice people. at least your not sculptingf a bloby alien:) reality is best then move on to creatures. wish i was 18 and sculpting like you!:slight_smile: 
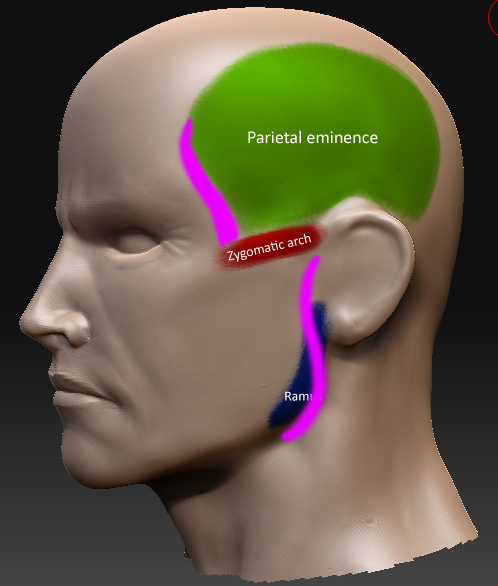
the main problem is that you havnt defined the skull/under structure of the character. reference george bridgeman books (they are excellent) for your main blocking your form. the lips are basically your face folding outside in, so they are over the skull/mandible forms. you are just sculpting lips! i usually create a barrel shaped form under the nose to represent the skulls mouth then mask off the bottom sculpt the toplip then vice versa. check out clay sculpting tutorials. same principal. your lips are flat. they have a good width the corner ending at mid to 1/4 eye but have no draft. carry the arc of the lips back ro mid eye or so. from the side as you did the front.
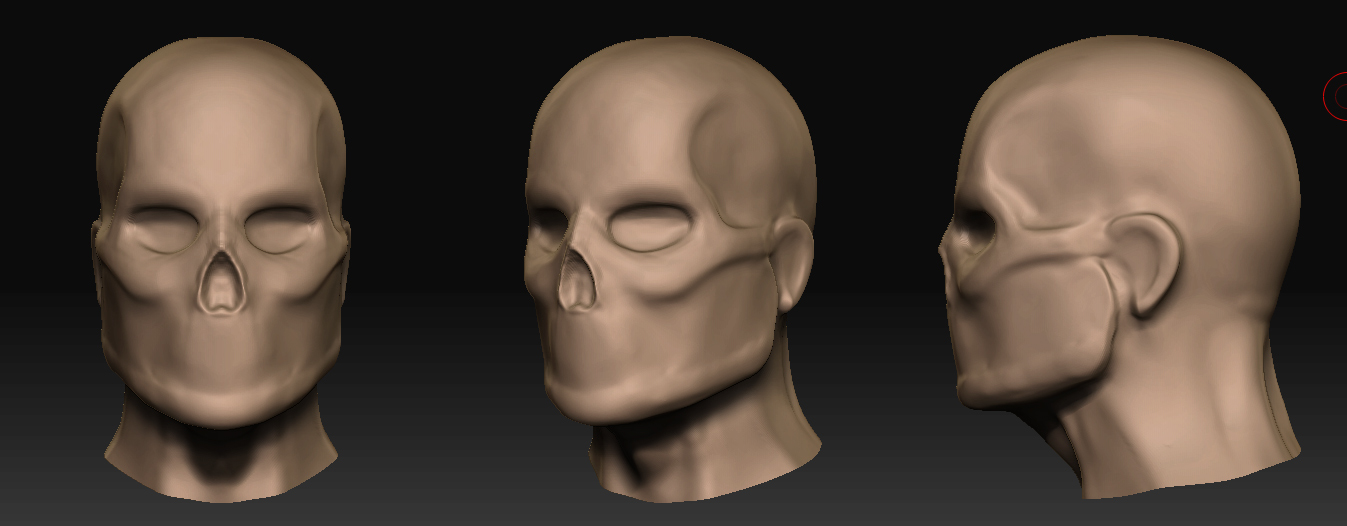
rotate around your sculpt as you work and you will find yourself in a better place. as i said it is a great start rework your bony points in the model and it will ‘pop’. ie zygomatic, mandible, brow etc identify the parts that dont move then fill in the fatty tissue and muscle. hope it helps
mm

Criticism is always welcome, as long as it helps me improve. That’s the reason I’m posting here. I am following your indications, and after some tests, I have decided to go ahead and apply the same workflow to my character. Thanks Johannes and monkeymuscle!

Here is the skull “layer”
I’m not 100% sure if it’s good enough to proceed. Did I miss something? Once again C&C are welcome!

[03.jpg]

Allright! I followed the same workflow, and draw the muscles and the skin over the skull. The results were ah… great, but, the guy just looked totally different. It’s like… I don’t have real control over the guys look. I just draw the muscles and I guess I’m just not able to forsee how he will look like after I draw the skin over the whole thing.
So I went back to original model, and tried to accentuate the bones and some muscles. I think I get pretty nice result, obviously not perfect, yet :wink: . Don’t know how I got the lips right, tho. lol
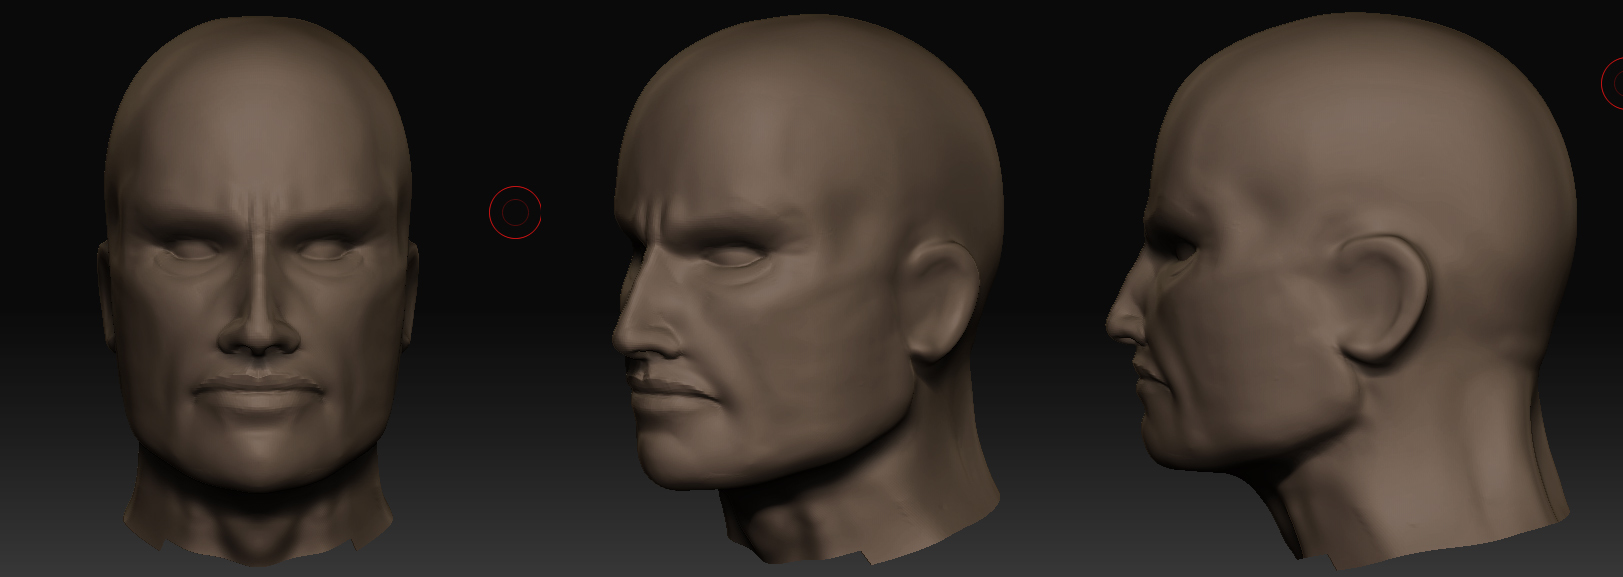
Anyway, here are the screens. Oh, btw, let me apologize for my english.

EDIT: hmmm… I think there is something wrong with the overall shape. The guy looks somewhat strange from a front view.

[04.jpg]

wow! My soldier is looking way better than before! I mean, look at the first render and compare it this:

[05.jpg]06.jpg

Btw, are the images to big?

Buy the way as an artist you will never be totally happy lol:) get used to it! as a pro you learn to never fall in love with your stuff! just keep working and moving ahead. the more you do the better you get. I think he is looking great. a vast improvement! keep it up! as for the head only a few minor things. the nose bridge may be too thin. and his ears are pinned. pull em out a bit. remember reference reference reference! besides that you are on the right track!
Great job and enthusiasm!!!

In fact, I’m very nitpicky with 3D stuff. As you said, I’m never happy, there is always something to improve.! Thanks for the criticsm, I’ll work on it right away! :smiley:

Yes, I think his head was too square before. Looking much better now.

By best guesses from your latest pix? Cheekbones need more definition, nostrils too wide, bridge of the nose too straight and should dip in just before it joins with the forehead.

Getting yourself some anatomy reference photos off the web will go a long way towards helping you out.

All this with a grain of salt, please!? I’m new to ZBrush, and just trying to point out what I think as best I can from my very skimpy knowledge of anatomy. And I mean VERY skimpy. :slight_smile:

Hi!,

Very nice improvements on the model! First let me say that the work on the temporal depression on the side of the head and the temporal muscle that "fills" the depression are very well done. This is a really hard area for a lot people since it's hard to believe how "deep" the depression really is towards the front of the head. The glabella area is also very nice, this region is quite complex since so many curves in the upper skull meet up here. The body is also going very well, I especially like the way you are incorporating the twisting that occurs in the upper forearm muscles, it's a tricky area and you pulled it off very nicely - also: very nice beginning on the hand- it has a real feel of the bones underneath and the strength of the character. Going back to the head, there are a couple of subtle things I notice with the bone structure that might give you some headaches later, especially when you tackle the ears. It looks a little like the Zygomatic arch (cheek bone) is as wide or wider than the parietal eminance at the rearward upper sides of the skull. This may be based on whether the renders are in perspective or orthographic mode, so I could be totally off on this. If it is correct that this is the case, that doesn't mean it is "wrong" but rather, it is much more common for the parietal eminance (widest part of the cranium) to be wider than the Zygomatic arch (widest part of the face). The reason a wide zygomatic structure can be a headache with modeling the ear is that the bottom/back end of the Zygomatic bone structure is what locates the "hole" of the ear and if the arch is very wide then it can be tricky to make the ear stand out as much as it actually does in the front view without making it look odd at other angles. The other thing is that the angle the "corner" of the jaw (the ramus of the mandible) might be a little too vertical and far back, crowding the ear, and it may get in the way of the ear being modeled easily to look right in all views, there is usually at least a little bit of rounding at the corner of the jaw - again this is only what is common, and not by any means absolute even in actual life, let alone in art. I definitely agree with Monkeymuscle's advice on the subject of reference, even if one decides to work in a stylized manner, it always is good to have it at hand when working. If you are looking for a good reference, Eliot Goldfinger's "Human Anatomy for Artists" is one I personally find very helpful. The book is expensive (I think $65 US at the moment) but it's very good for the details of anatomy and when combined with a more general book such as "Bridgeman's Complete Guide to Drawing from Life" by George Bridgeman, it makes for a very potent combination of references. There are, of course also a ton of other anatomy books and internet reference, but whichever ones you prefer, it definitely helps to have the reference visible while you are actually working - Also I can definitely recommend the John Brown sculpting videos, and Zack Petroc's Zbrush videos from Gnomon, Scott Spencer also has some excellent videos at gnomonology.com (disclosure: I am a Gnomon alumni and Mr. Brown and Mr. Spencer were among my teachers so I'm probably biased;) ).. Sorry this response turned out so long, but your work is really looking good! Please keep updating it as you go. Look forward to seeing where this goes next.

Johannes you are really helping out a lot! Thank you very much! I’m not sure if I understood everything you said, tho. It’s probably my fault, as I’m not perfect with english. I have sketched a bit over the model to make sure I understood correctly. In the first picture I just painted the different parts so that everybody can identify them easier. In the second image, the pink parts, are the parts I think you advised me to change. The partial eminence should begin where the zygomatic arch does and the rasmus should have some curving. I took this as a reference:

[08.jpg]07.jpg

I also think the ear should be a little bit higher.

i too am a gnomon alumni, getting the dvds or vids is a great idea. its always advantagous to see othe peoples work process on thw way to developing your own. not to mention inspiring. well worth the money. mine are almost worn out completely:) your on the right track!

Hi!,

Norman3d, actually the problem may be my english, it's only my second language so I sometimes forget the grammar structures;) . I was going to ask if it would be all right to do a couple of screen grabs of the skull underwork image that you did and the latest face renders; there are somethings that just are easier to show than to describe, but I want to be sure it's ok with you first. I also should apologize for using all the medical terminology but when I studied with Mr. Spencer, he pointed out that it establishes a very precise language for communicating about a sculpt ("parietal eminance" is generally more understandable than "this thingy here...";), once one has the vocabulary) and thus aids in communication between artists. I also want to compliment you for doing so much work on this model; and being so open to critiques about it. It's a rare gift and one that is incredibly important for doing this work professionally (that's one of the things I am most fond of at ZBCentral: the support and openmindedness of its community of artists.) Talk to you soon,

Johannes Huber

P.S. Monkeymuscle; I’m glad I’m not the only one who’s almost worn out his Gnomon dvds;)

I didn’t notice at all! I thought you probably were American, since your profile says you are from L.A.

Absolutely! Do whatever you want with them. :wink:

At first I was kinda shocked. :lol: But I’m quickly getting used to it. As you say, it does make sense to name the things properly.

I just love 3D, and every new thing I learn makes me love it even more. So I am open for critiques. I need them and I like them. Monkeymuscle and you are making me a better artist, so let me thank you once again! (I’ll never get tired of this) Can’t wait to hear from you (or anyone else) soon!

Edit: Btw, are you German? Johannes sounds pretty German to me :stuck_out_tongue:

I have left the head to the side for now, and have taken some time to design the bionic arm. I quickly mocked something up. Actually, I’m pretty happy with my drawing skills. I thought I didn’t have any at all!

[arm_concept.jpg]

Do you think I should model this in Zbrush or 3dsmax?

Hi!,

I think what you need to do is to decide what sort of "world" your soldier is living in: Is it a post apocalyptic disaster area, is it a nice shiny future, a dystopic future where everything is good on the surface but evil lurks beneath or some other story. That will dictate the forms that the design will take and their final level of wear, tear and so forth, and may also feed ideas of what else to do with the character accessories. Until you do this, it is very hard to avoid the design "cliches" that we all tend to want to avoid but frequently don't. This was an exercise in design process that we did regularly at Gnomon in our various classes and I think it adds tremendously to the "reality" of the final product of anyone using it. It may also lead to the generation of an entire story, multiple characters and in some few cases even to a viable intellectual property that may be able to be marketed down the road. The other thing I might do is do a Google (or other) image search for both modern and ancient forms of armor and use these as reference, just as you would the anatomy references for the character body, and let those "inform" your artistic decisions (as an example a european suit of plate armor but made with modern resistant fabrics and plates with holders for modern equipment like firearms, explosives etc. instead). I frequently force myself to do many design iterations before deciding on one because, from experience, I know anything less is likely to leave me with a design I will later be unsatisfied with (I went through approximately 50-75 thumbnail ideas (many of which were, as they should be, just awful as ideas), 15 different concept sketches and then 4 final illustrations before reaching the design on the "Metaluna Mutant" redesign I posted on ZBC a few weeks back and I still view that sculpt as a "concept sculpt" not a finalized design and am busy figuring out what I can do using the suggestions of the people kind enough to critique it. I guess what I am trying to say is to take the time to really play with all the crazy possibilities before settling on a final design and worrying about how to build it. Take your idea and make it more than just a "soldier from the future", find out who he is, where he works/lives, why he does what he does, and who are his enemies/opponants and really have some fun making the character your own rather than trying to hurry along to final product without those answers. In actual production, it's very rare to really have time to do all that stuff to the degree we want, so take advantage of the time luxury that you have on a personal project to really work those things out. On the idea of what program to build the hard surfaces like the bionic arm, you really can do that in either ZB or MAX, but I find that ZB offers a better environment for me to "play" without worrying about edge loops, poly count or anything and lets me just concentrate on design, then I'll go back and do a retopologizing in either ZB or Maya (or whatever other program) and then bring it back to ZB and play with the fine details of it, again focussing only on design, and retopologizing later, if needed. Other people work out everything in their 3d program and then port it in, and that also works very well. I think you should try both ways and see which is easiest for you.

Talk to you soon,

Johannes

hehe, I knew somebody would come up with this. It is definatly my fault, as I didn’t specify what exactly I was going to do. The soldier I’m doing won’t have any armor, I wanted to do a little scene, really basic. Let me explain to you…
Have you seen Black Hawk Down? There is a scene where a soldier is playing Baketball at the base during his free time. I wanted to do something similar. I just wanted to pose him, standing quite still, with the basketball under his left arm looking at the horizon, as if something was approaching and he didn’t recognize it very well (maybe an alien ship or something, haven’t decided yet.) By doing such a scene, I’m transmiting a familiar image, like as if nothing had really changed. Basketballs still look the same, and it’s not the end of the world (not yet atleast.) But at the same time I could show a glimps into the future. The human race has evolved in a fashion way. Not only is the tecnology awesome, but design is always more and more important. I was probably inspired by Dubai. You look at that city, and it’s just great. They have achived an awesome style. It looks both, futuristic and beautiful. So the arm was going to represent the future and the basketball would represent no big change at all. The soldier himself should “rerpresent” both concepts, that’s why I’m going to put him some slightly futuristic clothes. I was also thiking of adding some kind of future fighters in the background flying to the direction the soldier is looking, in order to create some dynamism.
I’m not a fan of the whole post apocalyptic thing. I think the idea has been used too much… specially with Mad Max in the 80s. What do you think?

Hi!,

Sorry to take a bit of time getting back to you, but I had to finish a model and render it so I could post it before people came and picked up my main workstation for repairs and upgrading (yay!). Blackhawk Down is a movie I only saw once because it gets a little too close to reality (I used to work in military stuff...) but it's an excellent movie for getting the "feel" of some parts of the military wartime experience (good and bad) and the basketball image you mention is very much a part of that "touch of reality" that works in the film. I agree that using Dubai as a source of ideas for a landscape at once familiar and different works really well. You may also find some other interesting buildings and sketches if you google search under the name "Zaha Hadid" who is a middle eastern architect with very interesting ideas on form and light. Also check out some of the newer architecture in Riyadh, there are several recent additions to the skyline that are also very unique in their approach. Hope to see more of your work soon,

Johannes

So here is a little update. Been busy rendering my Darth Maul model for my demo reel.

I think it’s starting to look the way I imagined. I’m having some trouble with the eyes, tho.

[[10.jpg](javascript:zb_insimg(‘71084’,‘11.jpg’,1,0))
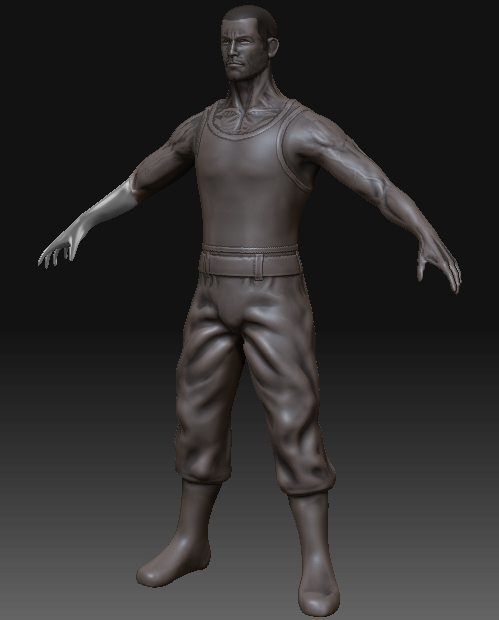
Attachments

11.jpg