I love this piece. Great work!
Stunning work mate.
Perfect 10!
Great piece of art you made here.Many questions but I will keep it short, Did you model the background or is it a photo? … asnd what program was the render done in? TopRow small_orange_diamondsmall_orange_diamondsmall_orange_diamondsmall_orange_diamond
Love this, really great done!
100% modeled dude! heh! =) I’ve posted the wire in the first page! Everything was made in 3ds max, vray and (of course) zbrush! Color correction and DOF made in Photoshop! =D
Got some time to share my light setup! Still preparing the shaders print! hehe!

amazing work ! I mean top raw I guess.
I love every detail of this peace, amazing work, top row for sure!!
so is that you? post a picture of yourself hahaha
Nice work Victor.
What you used for hair?
I like the render. thought it was maxwell, not vray btw!
I don’t know why you never get Top Row. Next to EOF, you’re my favorite artist here. This is an amazing piece. Great job!
In your previous illustrations, you would seem to do a character sculpt first and then retop the character in 3dSmax…
is that how you worked out this piece as well or did you completely model your self portrait without any retopology taking place.
Hello my friend!
This very well done your job, as always better than the other!
Congratulations!
There you go! hehe! Please feel free to ask you want to see any other shader! =D
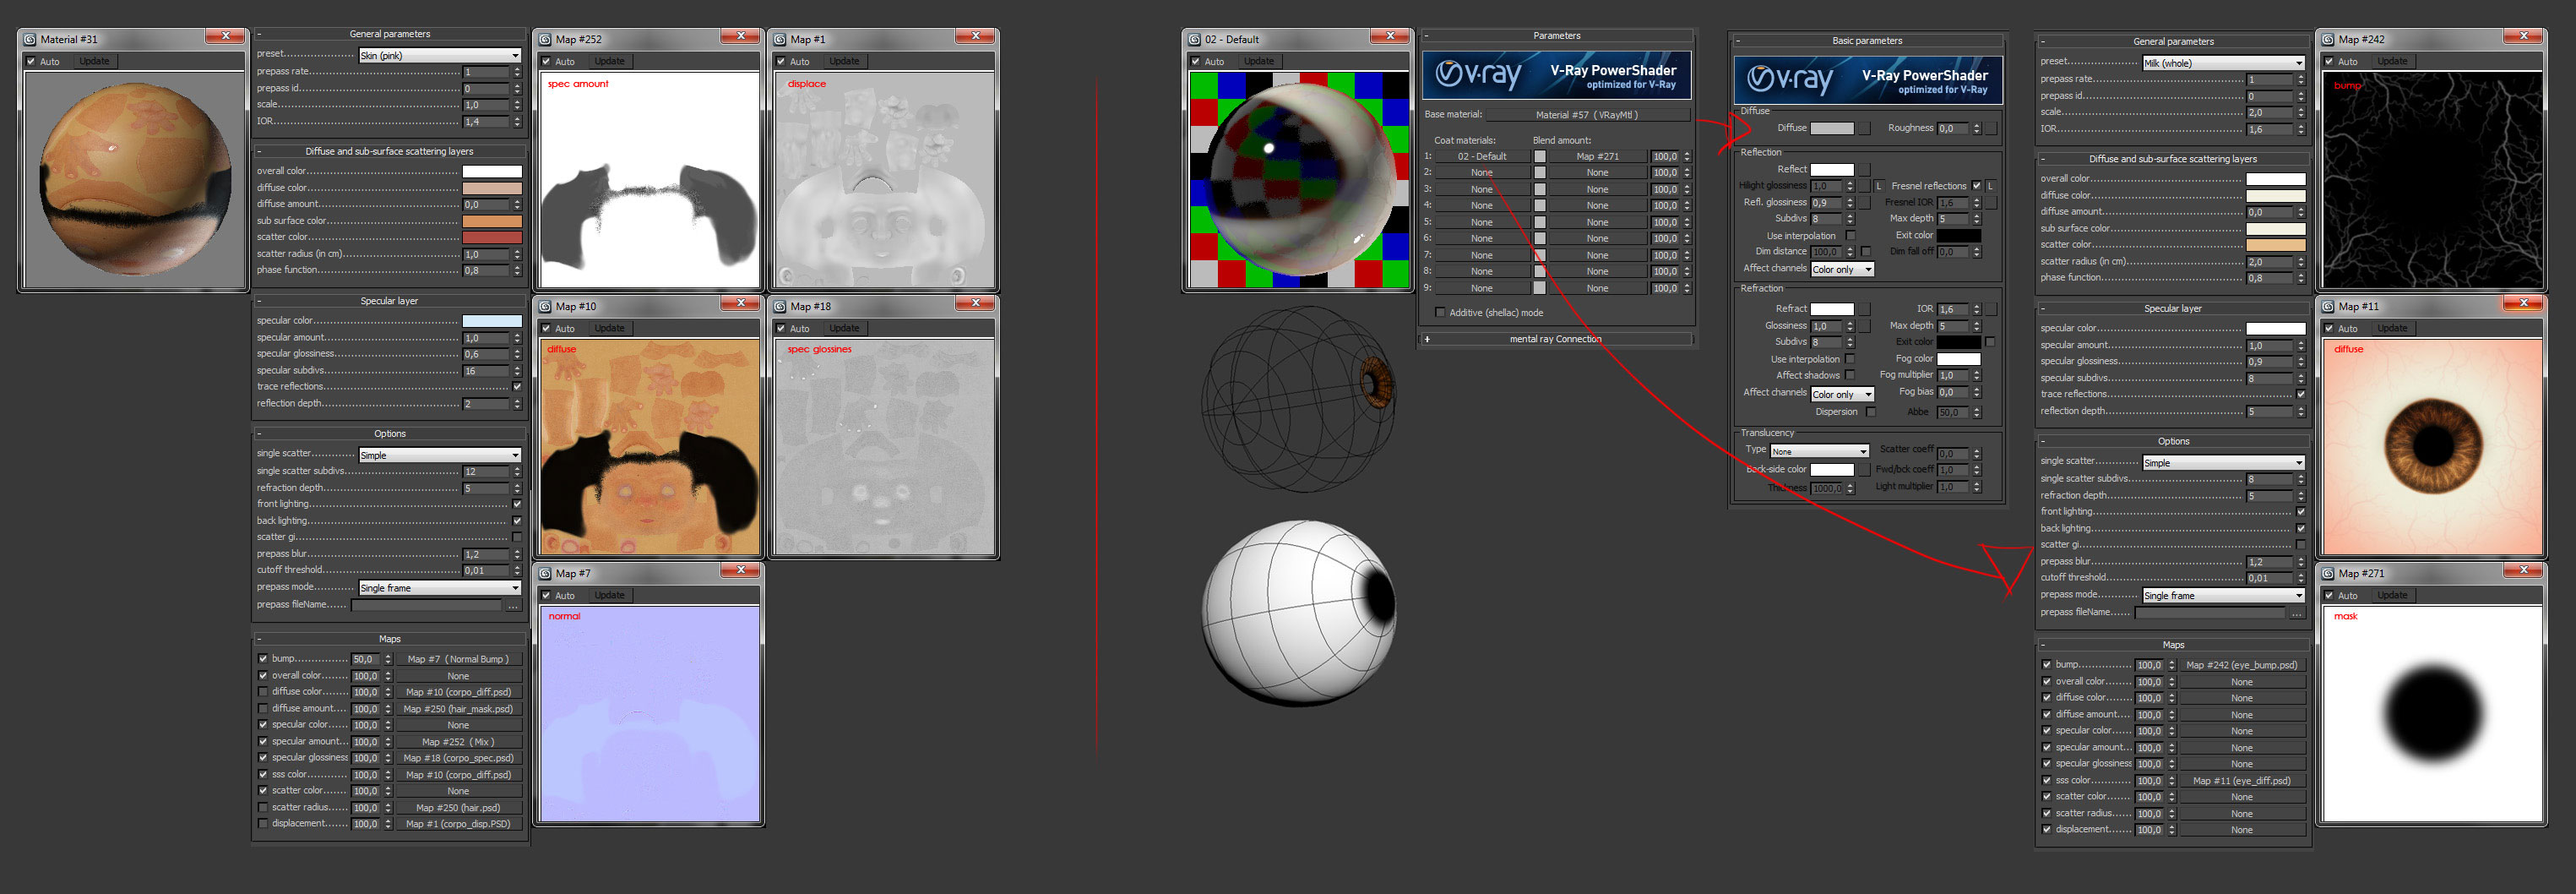
Ornatrix! It’s an awesome plugin and works perfect with vray! Here’s how I’ve created:
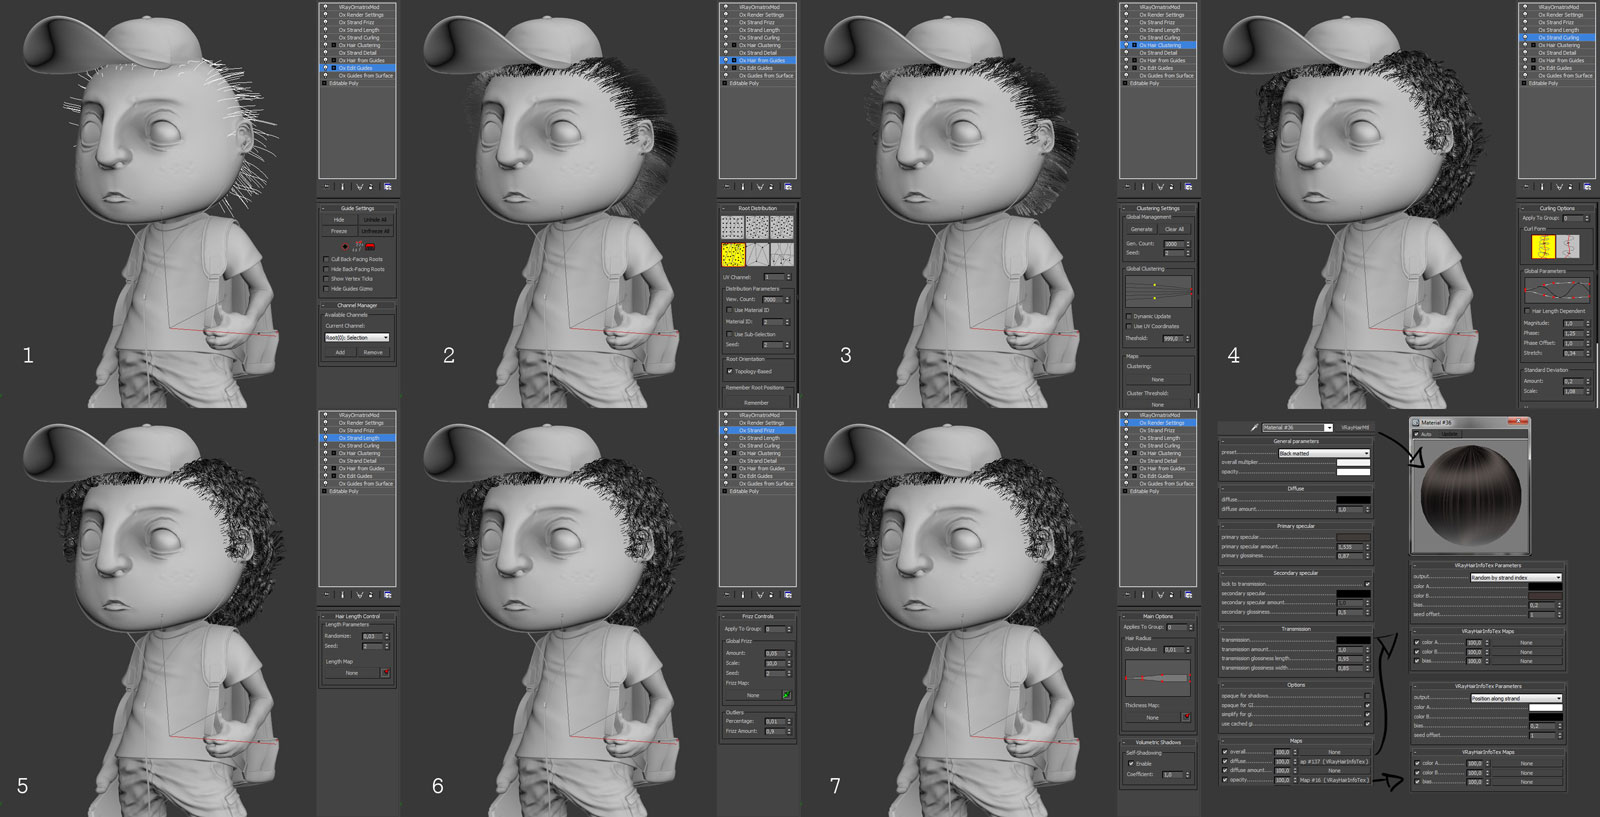
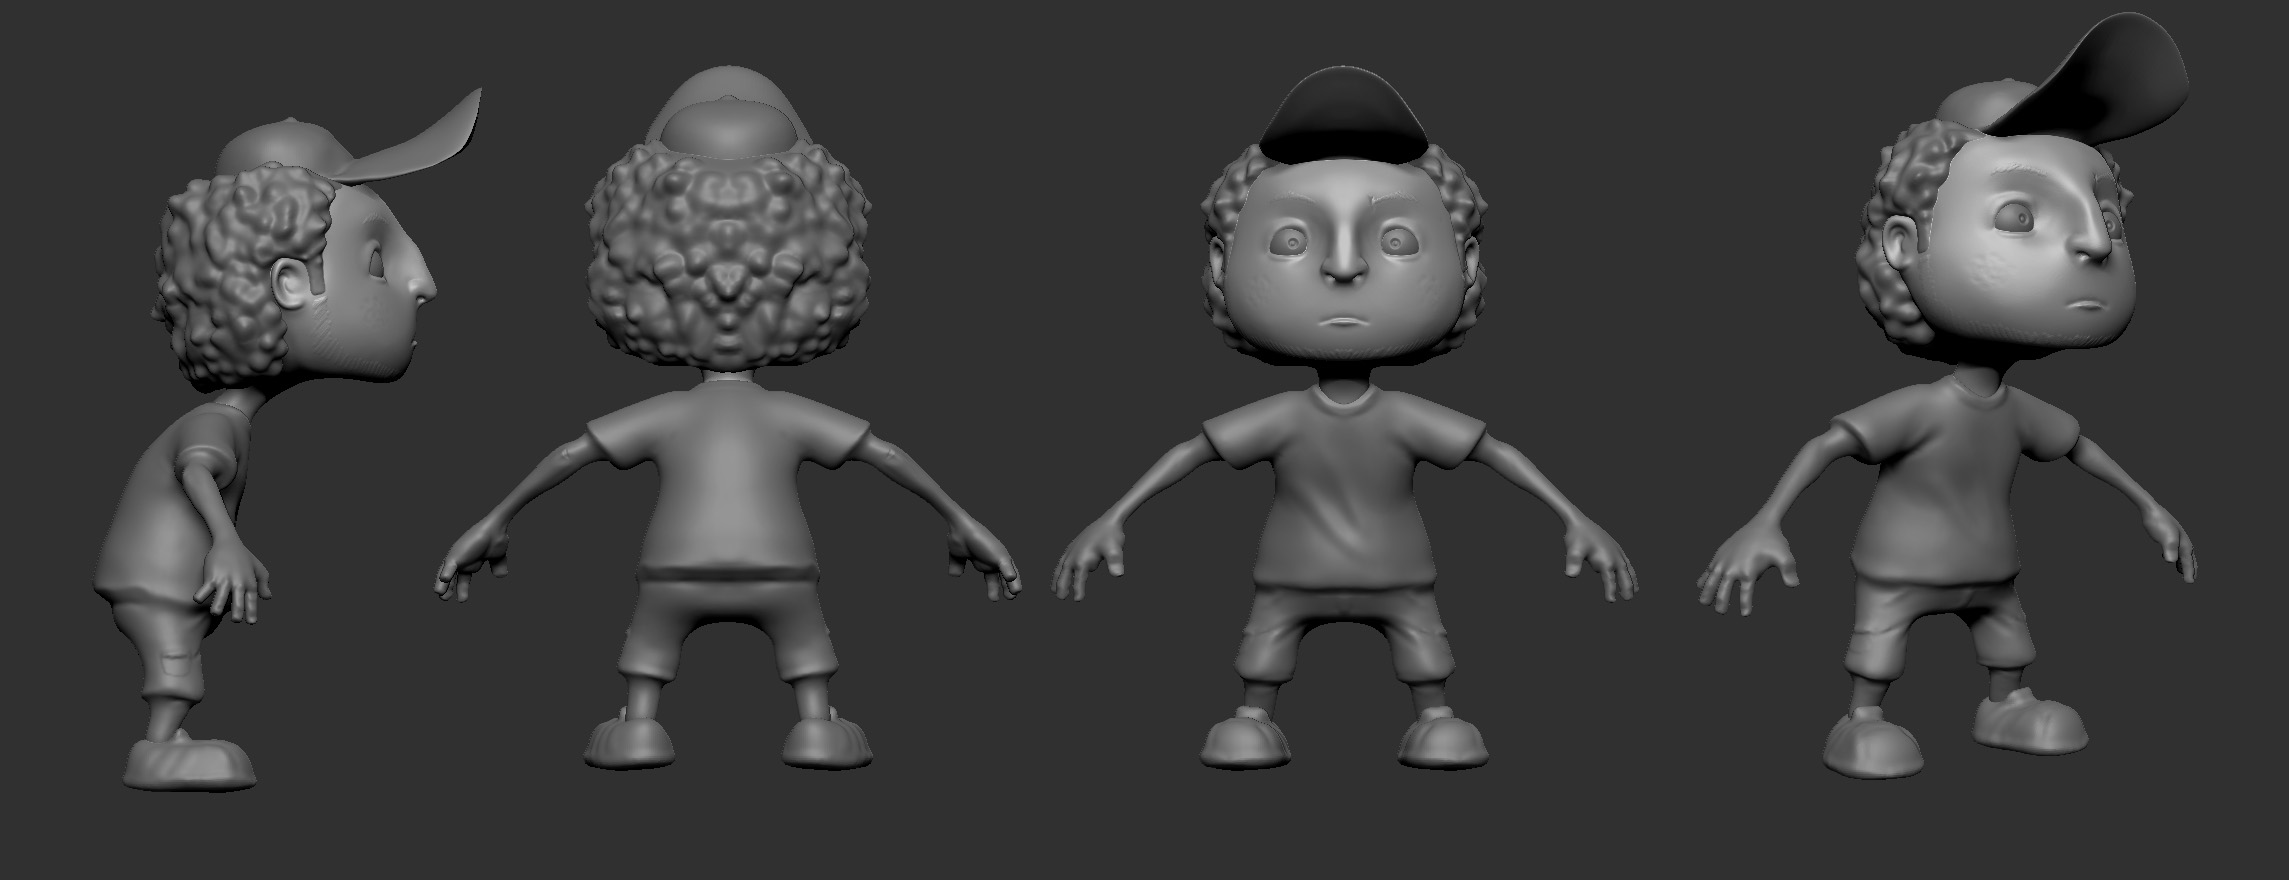
I’ve used zbrush for detailing, but also did the first overall sketch on zbrush! I’ve used dinamesh for it (awesome tool! hehe!) and exported to 3ds max for retopology! Here’s the sketch!
Thank you so much for sharing. This thread should be top row already!
I have a couple of questions or requests if you will!
The eye is only one sphere model or one for the Iris and another for the Sclera? I’m wondering because the iris seems to go inward in the image you shared!
The other thing I would love to see the shader setup for the cloth as well if you are willing to share that as well.
Thanks again for sharing. Excellent job
What an awesome work dude!!!
I have a lot of questions about your work I hope you wouldn’t mind 0.0
Why could you preview the high poly model in max? I mean your work which in the max were low-poly model , but it seems very smooth and with many details like bump , the cloth … How did you do that @@?
I tried added turbosmooth on my low poly model to smooth them but the numbers of poly would get high @@ How did you deal with that?
sorry about so many questions but I really want to know ***714;_>***715; THX!!!
wow first of all - thanks a million for sharing all these infos…agree totally with the others here for the toprow …
im really a render noob so thanks again and please if you dont mind shy i would like to know the settings for the metal parts on the train (door and the bars) and the big plastic beige-colored parts
thanks you soo much for helping and sharing these great infos …
AWESOME mate , just love the render, it has so much character in it!
Definantly TopRow potential and I can just concur with everybody else,
thanks for sharing so much information about the render and your shader settings, I totally suck in rendering^^ so this would help me out big time!
Keep it going mate and wishing you all the best!
Happy zbrushing,
- Kenny


Haha, probably isn’t in top row because my model isn’t a complex one! But thanks! heh!=)
About the eye, it’s an sphere for the sclera and a convex for the iris - but only for the iris - the transition to the refractive part is made with a mask in the shader(vrayblend)! Here’s a comparison between the “usual” way and this one:

About the cloth, there isn’t much secret - I’ve overlayed a lot of dirt maps and a cavity map in photoshop! The only trick it was on the shorts texture - I’ve scanned my own shorts! heheh! =) about the shader, no specular or reflections… just an fallof on the diffuse! =)

Heh! Thanks dude! About the visualization, it’s just a displacement on viewport - I really avoid vraydisplacement… instead I do prefer the “Displacent” modifier from 3ds max, who loads the displacemente without subdiving it like the vraydisp! =)
hahah! Thanks O/MI! don’t need to thanks, man! There’s no reason for “hiding” that kind of stuff - one of best way to learn new things is sharing knowledge! =)
The metal parts are pretty simple! I’ve used an brushed metal map for anisotropy, simple like that! heh! And all those plastic parts are full reflective shaders with “fresnel” turned on and a random dirt map on the glossines slot, got it? (if you want a printscreen of it, don’t be shy and ask, ok?! hahaha! heh!) =)
haha! Thanks for your kindly words, Kenny, but like I said before, my model it’s too simple for a top row IMO! =)
If you have any question about my scene, please, feel free to ask! =)
Awesome!