hello
i just downloaded ring master and the toolbar is showing but the result is not a ring
please help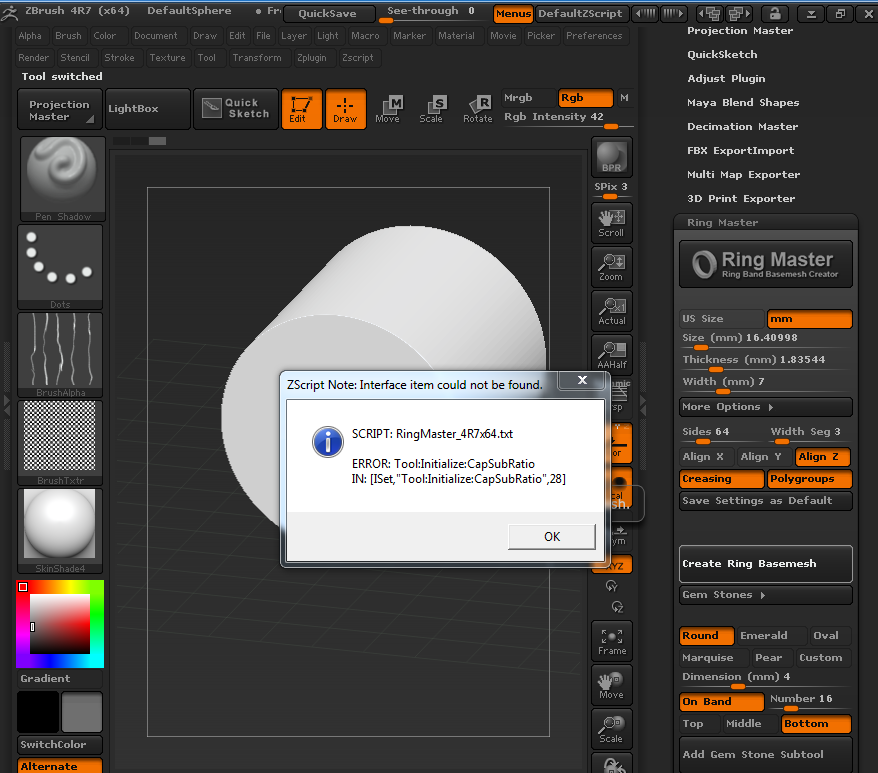
Thanks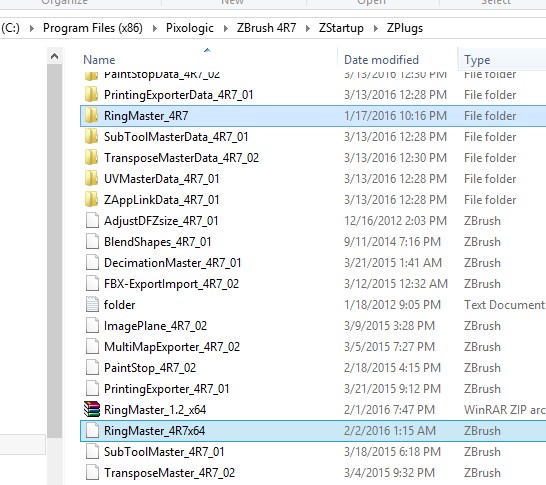
its very helpful for jewelry designers , good job !
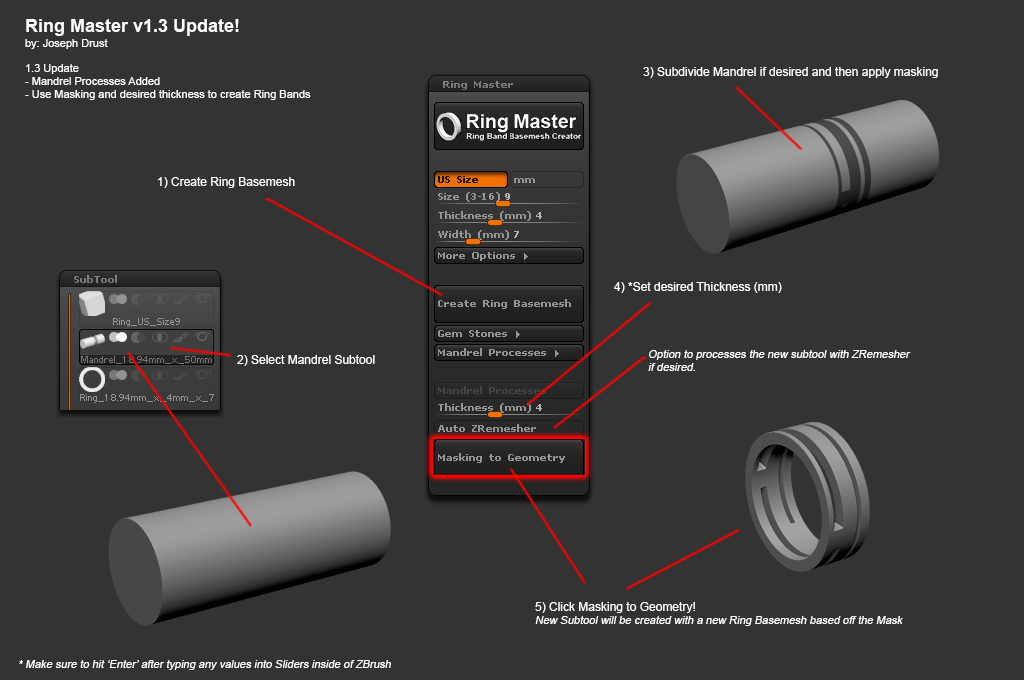
Ring Master!
[CLICK HERE TO GET CURRENT VERSION]
(Version 1.3 Updated 03/25/2016)
by: Joseph Drust
Ring Master allows you to quickly create Ring Band Basemeshes at a precise size for Jewelry creation
This plugin is unofficial.
Main features
- Creates a Ring Band Basemesh at a precise mm size, thickness, and width
- Exports out to scale via *.obj
- Great for using with the ZModeler Brush and Dynamesh to create rings
- No need for an external application to create a precise ring band for use in ZBrush.
Usage
Video Tutorial:
//youtu.be/pD0hB5gPAPk
Installation
**** Make sure you have updated to ‘ZBrush 4R7 P3’ or later! *****
ZBrush 4R7 32bit:
UnZip the RingMaster_v1.3_x32.ZIP file to your \Pixologic\ZBrush 4R7\ZStartup\ZPlugs\ folder.
Restart ZBrush.
Ring Master will be located under the Zplugin tab.
ZBrush 4R7 64bit:
UnZip the RingMaster_v1.3_x32.ZIP file to your \Pixologic\ZBrush 4R7\ZStartup\ZPlugs64\ folder.
Restart ZBrush.
Ring Master will be located under the Zplugin tab.
**** Make sure you have updated to ‘ZBrush 4R7 P3’ or later! *****
*The plugin will create a new tool that contains a 1in(25.4mm) cube, a precise mandrel, and the ring band.
*Use *.ZTL when saving any created ring files (The creation process uses multiple tools to generate the band that can cause *.ZPR bloating.)
*As always, remember to save before using!
Change Log
v1.0: Initial GumRoad Public Release
v1.1: Added US Half Sizes, Increased MM values for creating Bracelets, Added Config options, Added Gem Stones
v1.2: Added the ability to align gemstones on the band. Added Array functionality, and Custom gem stones using InsertMesh Brushes. Thanks to @][-][4Z4R][)) for the recommendations and idea 
v1.3: Added the ability to create band with precise thickness from masking using the mandrel subtool. Fixed the Perspective issue reported. Added checking for ZBrush 4R7 P3. If you do not have P3 installed you will receive an error message now with information on how to fix.
Notes
Finally had some time to post this update I added some Mandrel Processes that hopefully will be useful. This will allow you to create new ring bands by applying masking to the mandrel subtool. If you are not updated to ZBrush 4R7 P3 (or you are using a cracked copy of ZBrush…) this plugin will not work for you
If you have already purchased Ring Master from GumRoad you should receive an email with a link to this updated version. Check your spam folders Link my GumRoad site to download if you haven’t already purchased: https://gumroad.com/piggyson#
Any update may have issues; so if you run into any post them here and I’ll attempt to fix them
Finally if you are looking for additional plugins dealing with scale inside of ZBrush check out Calipers Master by Fran Hazard: http://www.zbrushcentral.com/showthread.php?199136-Calipers-Master-v2-Real-size-measuring-tools-Unnoficial-Plugin
-Joseph
Wow, thank you for this update. This tool is getting better and better. Thank you. I wonder if you can consider placing some prongs, also a drill (for a later boolean substraction) with the stones… well, just an idea. Thank you for the update! 
@Sflores: If you activate ‘Custom’ for the Gem Stones it will use the current InsertMesh brush you have selected. So if you create an IMM brush of Prongs and Drill Subtraction parts it will use those models instead. The Dimension (mm) slider will then scale the IMM in the longest dimension.
-Joseph
I just downloaded and installed the latest version of Ringmaster.
i) For some reason it isn’t showing the Icon for the About/Splash Screen
And when I click on it, it just brings ups a blank dialog box
ii) When I set up the dimensions for a ring and hit “Create Ring Basemesh” I dont get anything.
The only thing that happens is that I can drag on the screen and it drags out a cylinder.
Can anyone tell me whats going on ? I’m wondering if there is some kind of glitch happening
THanks !
@Foxjaw: Can you check to see if the folder is extracted with it’s contents from the Zip file? (If the About image is not showing up it’s usually related to the plugin not finding the image in the RingMaster_4R7 folder. )
For the x64 version the install directory should be:
\ZBrush 4R7\ZStartup\ZPlugs64RingMaster_4R7_x64.zsc
\RingMaster_4R7
[INDENT=2]AboutImage.psd
[INDENT=2]Emerald.GoZ
[INDENT=2]Marquise.GoZ
[INDENT=2]Oval.GoZ
[INDENT=2]Pear.GoZ
[INDENT=2]RingMaster.psd
[INDENT=2]RingMasterState.mem
[INDENT=2]RingSizes.txt
[INDENT=2]Round.GoZ
[INDENT=2]ZFileUtils.dll
[INDENT=2]ZFileUtils.lib
[INDENT=2]ZFileUtils64.dll
Let me know if that helps 
-Joseph
That got it Joseph.
Thanks
Brett
I created a ring in ringmaster. Set it to a size 7 with a thickness and width of 1.5mm square
create the basemesh.
Pulled out caliper master and measured the width in mm. It was astronomical ! Not sure what is going on. Tried it twice with the same result.
Can anyone give me a heads up on whats happening ?
thanks 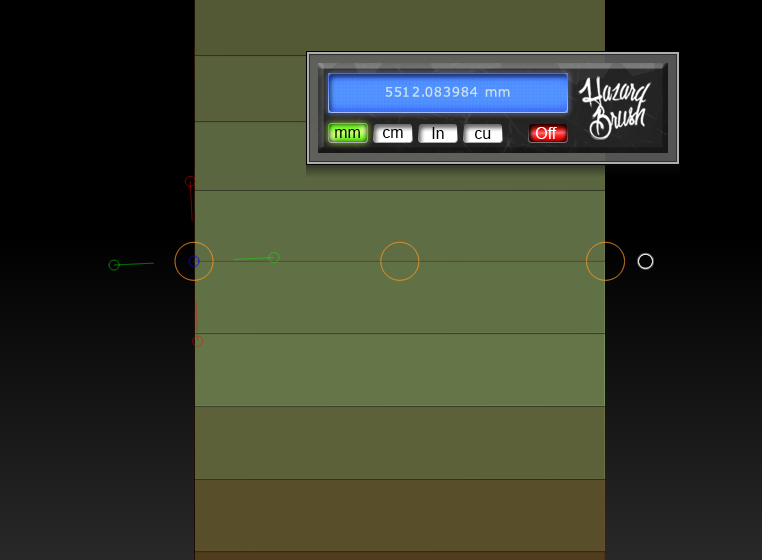
I have been trying to use ring master but am continuing to have problems with it.
After creating a ring base mesh I then try to smooth with increasing the subdivision levels and it wont engage any smoothing. (even on other things not created in Ring master.
I remove the plugin and everything starts working normally again.
This was the only 3rd party plugin I have installed when re testing this
Really disappointed
@Foxjaw: Sorry to hear about your troubles with this. As long as you press ‘Enter’ after typing in the desired values in the Ring Master it should generate the correct scale. ][-][4Z4R][)) here on ZBC is the author of Calipers Master he would have more information for you on how to get the transpose options setup there.
For the smoothing it could be related to having Dynamic Smoothing active. Inside of ZBrush if you just press ‘D’ it will active dynamic smoothing. This can visually be seen at [Tool:Geometry:Dynamic Subdiv] Having this active could possibly make your model appear as thou it is not smoothing.
The smoothing issue could also be related to creasing. By default the geometry created with the ring master plugin will generate creasing on the mesh. This will hold the edges and keep them harsh no matter how many times you smooth. You can disable this in the [ZPlugin:Ring Master:More Options:Creasing]
-Joseph
Thanks
Finally got it sorted.
Everything is working properly now
Is an 4R8 version coming? I tried the 4R7 version but the width segment doesn’t seem to work beyond 2.
i have a quick question. on the ring master demo, at one point boolean is used and substracts the forms desired. after when playing with the array settings with the gizmo, it creates shapes that are locked on the ring. my problem is when i move my move gizmo that is locked on mesh center, my array is moving in different positions. i know im missing something but i cannot figure it out.
kinda new to all this aswell.
Can I try the original version of RingMaster?
I moved the plugin folder for Ring Master 1.5 into the zbrush 2018 plugin folder and that is how I usually transfer it to newer versions of zbrush. This time I don’t see it in zbrush 2018. Is it not compatible? How to I get it to work in zbrush 2018? By the way, I love this plugin. Thanks for creating it.
Will there be a Ringmaster for Zbrush 2019?
Joseph or anybody that knows the answer… zbrush 2019 with latest Ringmaster.
After creating a ring basemesh, how do you go about getting the size scale that’s under Geometry to match the tool size? Transpose sees it right as does Transpose Master, but I can’t figure out how to get it to match in Geometry (I like using this as a quick-view reference for size).
There’s a scale setting under export that I tried setting to 1 per a video I found online but that didn’t seem to solve it either.
Love Ringmaster but the mismatch is really picking at my inability to let seemingly insignificant things go…
Edit: Would love a simpler way but I just stumbled onto something.
After creating the ring base mesh.
1 - Set the Scale slider under Tool | Export to 1
2 - Save and close the project (this may not be necessary)
3 - Reopen the project, open Scale Master and Set Scene Scale
4 - I used the mandrel since it had a simple length of 50 - change the tool scale in Scale Master
5 - Ensure “All” is selected (this was on by default) and click “Resize Subtool”
Again, that may be a convoluted way of doing it, but it worked.