ZBrushCentral

Retopology query

Hey guys,

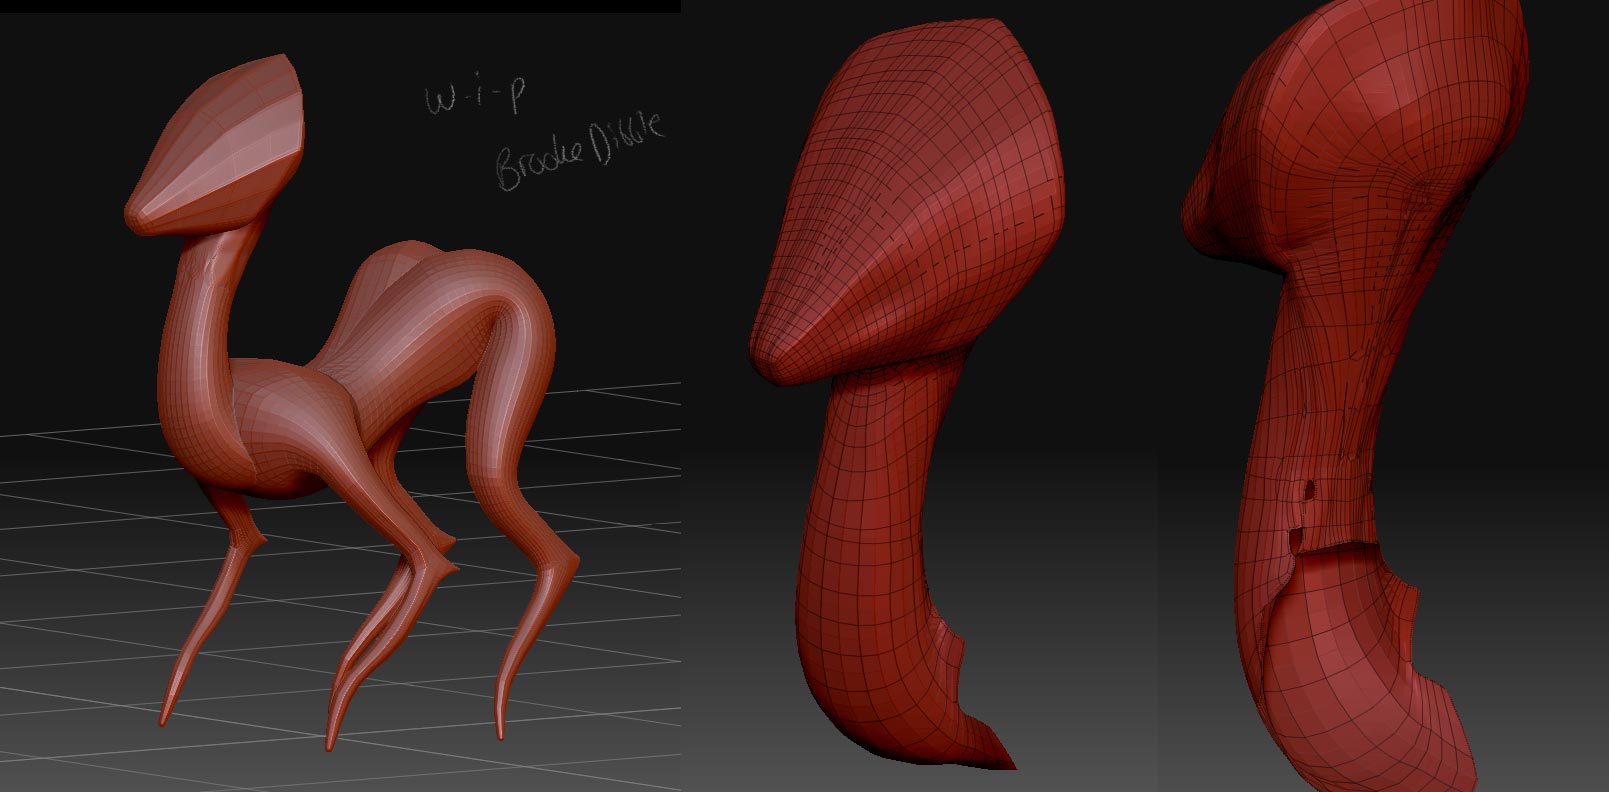
I’m pretty new to all this 3D stuff (as you’ll be able to tell!) - i’ve been attempting to retopologise a basic sculpt before continuing to sculpt on it, as I create it with ZSpheres and it’s not quite right…

A) How do you attempt to work out where to draw the edge loops? Do you draw basic lines in first and then go in further to add bits where detail will be?

B) I tried doing a rough version and then appending it to the cloned tool, and projecting it on to the mesh (following the Pixologic instructions), and it didn’t work, it just made a very weird looking mess :s

Thank you in advance for your help!

Brooke x

Attachments

Screen-shot-2011-02-27-at-01.47.jpg

hi Brooked,
set your zsphere model to lowest density > adaptive skin > preveiw > density 1 > make adaptive skin > select zsphere > topology > select topo (your model skin) > edit topology > alt click the loops you dont want (in >transform activate x symmetry) connect the dots >preveiw > make adaptive skin then select it > tweek with move brush > divide(geometry) and sculpt hope this helps ;)the topo tool is very disipline check for tris and x’s in the topo control z is your best freind here !! :lol:http://www.zbrushcentral.com/showthread.php?p=789341#post789341 http://www.zbrushcentral.com/showthread.php?t=106218

Hi Brooke, personally i prefer to retopo in 3ds max using graphite´s polydraw. i don´t know if you use that application though, but check this:

Z

http://www.youtube.com/watch?v=-Fdog0y9jVQ

MAX

http://www.youtube.com/watch?v=-o8NgLJ1MJ0

Thanks guys - I have Maya if that helps, but don’t know how to use it very much…

I’ve watched a ton of videos about retopology now and have been trying to draw out a rough version of the layout of the lines - however, as my mesh still has quite a low subdivision level, when I try to paint the lines on, it doesn’t work/goes blotchy and isn’t clear at all.
When I try to subdivide, as the neck in particular is completely messed up, it just goes even weirder and I definitely can’t paint lines over it…

Help! :S

Brooke x

Attachments

Screen shot 2011-02-27 at 13.33.57.jpg

I know at the beginning may be a bit difficult, but just follow Thomas Mahler video steps and you will get it done, is not necessary to pre layout your topo drawing lines for a mesh that simple, just begin to retopo following the video´s guidelines and you will succeed. Your polypainted lines will look weird with that topology because isn´t an evenly spaced mesh, perhaps you subdivided having a selection and that subdivided just that part, because that you have weird polygroups and different densities, but if you just begin to retopo all that will be solved. Good Luck.

Thank you for your help guys!!!
Right, I did it :slight_smile: 
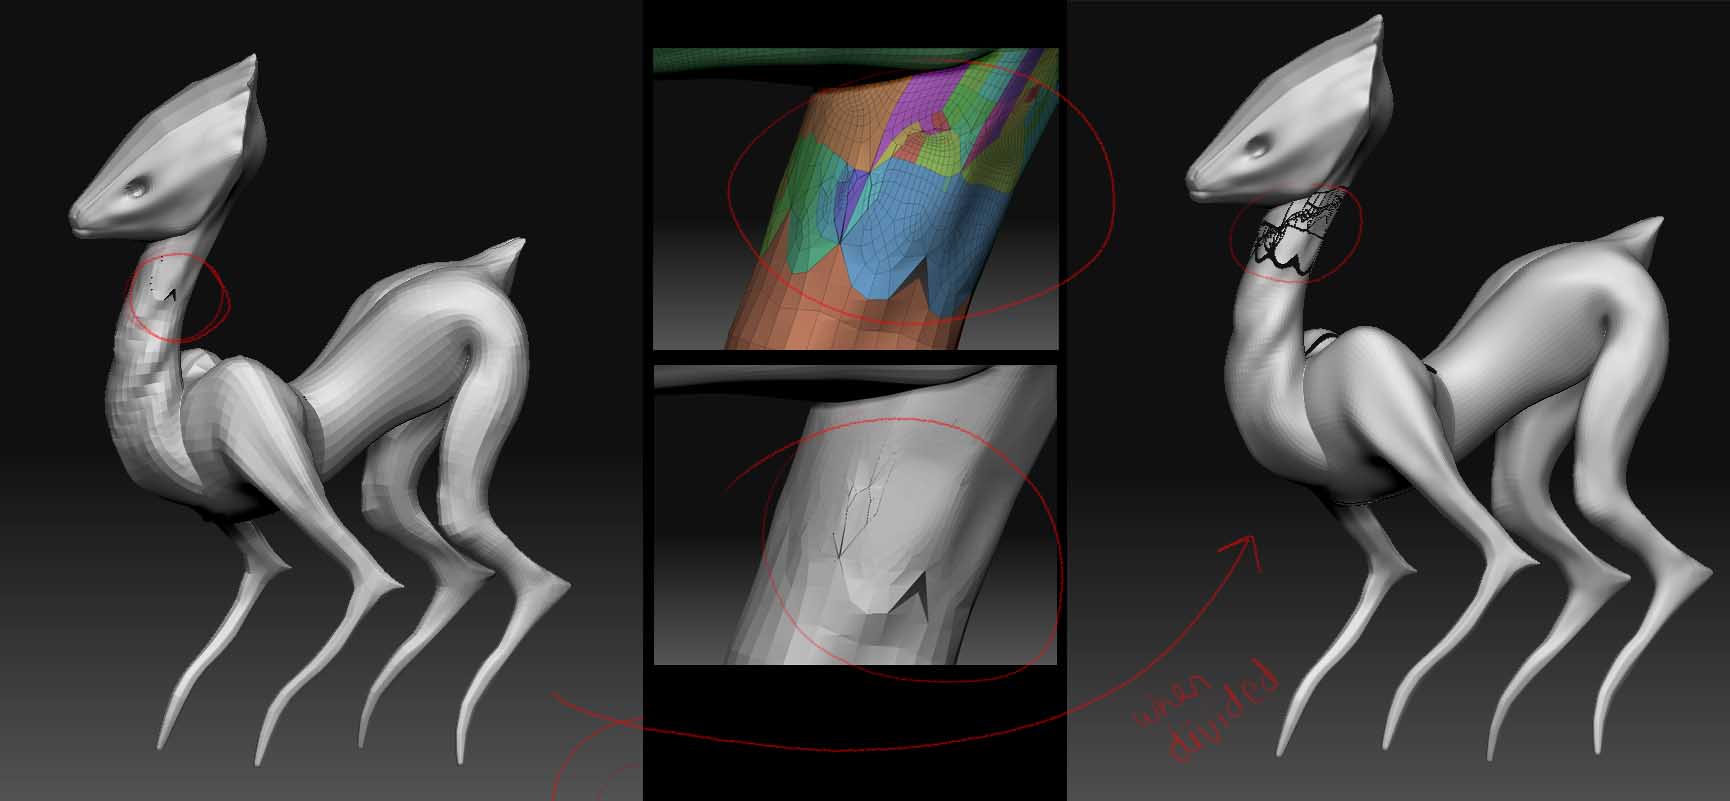
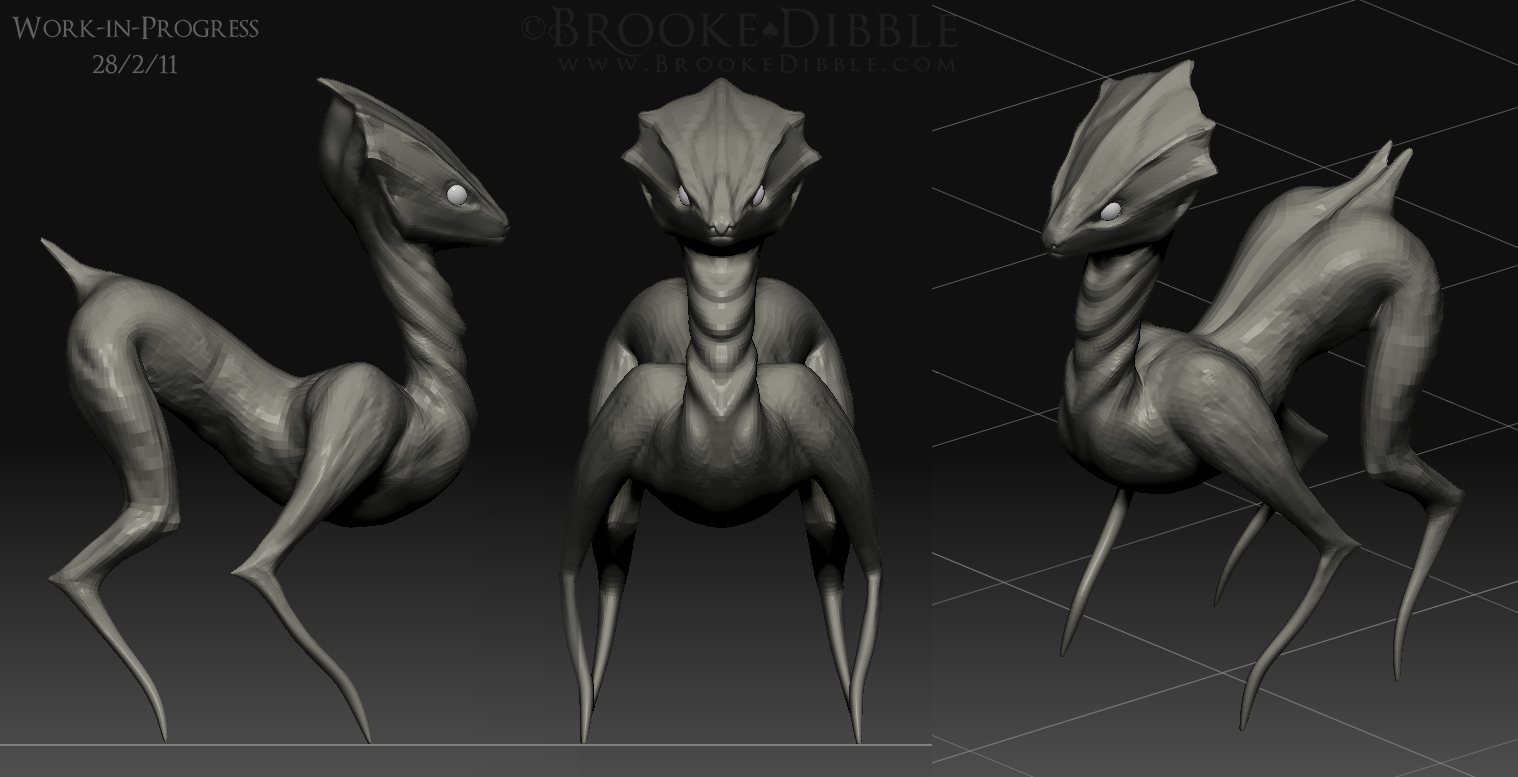
Well, a very crap first retopo but at least it’s enabled me to continue sculpting on the neck etc :slight_smile:

Thank you! x

Attachments

2wip Screen shot 2011-02-28 at 14.33.20.jpg

Great man, keep posting the milestones.

Good luck.

Thanks for your encouragement :slight_smile:

Still got SOOO much to learn, but I hope you like what i’ve come up with so far :slight_smile:

Next I need to work out how to pose properly (whenever I try to use the transpose tools, it looks ridiculous)

All the best,

Brooke

Attachments

Sculpt composite 1 merged BrookeDibble.jpg

That was fast!, very nice, very good color scheme. If you have any doubts about transposing your model just fire.

Thank you! :smiley:

I’m going to attempt to pose it today, I will let you know how it goes!

Brooke x

Hello again!

Right, i’ve installed the UVMaster plugin - as my understanding goes (please correct me if i’m wrong), a UV map is necessary to map the texture/colour and other maps to the model if it’s exported to Maya etc.

SO… i’ve already polypainted the model, without any UVs etc set up…

  1. How do I save my polypaint and then attach it to the UV map? Having read the UVMaster manual, I think it’s going to delete my polypainting when I make the UV maps… I don’t want to lose the painting!

Thank you!

Brooke x

If you havn’t used UV Master before, then there is a series of tutorials in ZClassroom that you should watch. Creating a UV map with UV Master won’t destroy your Polypainting.

Once you have your UV map, to create your texture, you can go to Tool > Texture Map and click ‘New From Polypaint’ . Then click ‘Clone Txtr’ which will put it in the Texture palette and you can then Export your texture map.

Hi, ok, Zber2´s latest post is the right way to do it.

A good UV map is actually just to "map", that said, is a way to cut and layout in a clean way your geometry on a plane, so you can use the channels in an external program and edit your textures/channels in an external painting program like Photoshop, painter etc. Also is a plugin called Zapplink to bridge Z and PS, but i prefer just the manual way to do it. A quick and dirty way to do some quick tests in an external program is to use an automatic UV (not usable, those are very dirty and unorganized, but may help to do temp/quick tests). You can find those uv mapping tools in Tool-UV Map, there you have your chips to generate your chips (because those uv maps just looks like chips). Once you have picked your crappy uv map you hit MorphUV to check the uv layout. Once again this is for quick tests only, the right way to UV map inside Z is UVmaster.

Ok cool, thanks again guys, sorted out my maps and managed to get it all over into Maya :slight_smile:
I think for this one i’m going to render it straight out of zbrush as a composite.
I want to include two differently posed creatures in one final image, what’s the best way to do this? I’ve tried appending the second pose into the first ztool and moving it, but the eyes (subtools) don’t come with it as well…
I want it to look something like the attachment…

Also, i’m wondering whether to make some kind of 3D sculpted flooring for them to stand on and to merge with a photo background, as then their shadows will be cast on it and they will blend better with it…?

Any ideas?

Brooke

Attachments

Screen shot 2011-03-01 at 21.50.07.jpg

Merge the eyes and body on the second one before you Append it. If you want, you can do a Groups Split to seperate them again after it’s Appended.

Ok, you have a few ways to do it.

  • First you can just merge the body and the eyes with the “merge down” command in the subtools palette or with “subtool master” plugin merge command so you will be able to control your models and subtools like one entity. Then you can copy your model with subtool master´s mirror command or just append it.

  • You can also do the eye stuff with transpose master, it´s better to illustrate this with the help of Cesar Dacol Jr.

http://www.pixologic.com/zclassroom/homeroom/tutorial.php?lesson=cesar

For the eyes check part 7 min 4:30. Yeah, a floor may look cool and yes casting shadows in a surface is the way to visually make contact with surfaces and not have them floating there.

Best wishes.

Aha :slight_smile: Thank you! I’ve managed to get them all into the same sort of scene now, using the merge down option as suggested :slight_smile: The eyes have lost their toy plastic material, but I assume I will get that back in the final piece by rendering a layer pass in that material…

Attached is a verrry rough mock-up/draft of the sort of thing I was thinking of doing. I’d love to use Vue to do the background but wouldn’t know how to render the different passes in that. (also i’ve got the learning edition, meaning it won’t render very large anyway and has a big watermark. Boooo)

I’m thinking of sculpting some plants and twigs and bits and bobs for the scene as I want it to look as photorealistic as possible and not just combine it with background photos. This piece (when it’s done) is going to set the precedent for a lot of future images in a similar style of presentation, and I want them to look as good as possible!

Any hints for rendering stuff photorealistically? Or even sculpting plants etc? I looked briefly at XFrog for Maya but i’m still very much a beginner with that program so will probably stick to ZBrush for now…

Brooke x

Attachments

test-Screen-shot-2011-03-02-at-00.06.35-2.jpg

Regarding the eyes that lost the ToyPlastic material. You can refill them with material and color.

They should still be different Polygroups so you can do a ‘Groups Split’ (in SubTool palette) to seperate them again then select the eye subtool, select the ToyPlastic material and whichever color your using (I presume black). Turn on ‘Mrgb’ button then go to ‘Color’ menu and click ‘FillObject’.

Ahhh ok, thanks, that’s good to know! :smiley: I will have another play with that… still working out what sort of background I want and how best to achieve it…