ZBrushCentral

Rendering successful displacement in Maya 2008

yeah well 4K will always have “more” in it…but consider the following;

1.Take your map and tune its tonal range within photoshop using curves.
Basically place a point at a mid point of the range, black near one edge and the same with white.
What this does is expand the values of details which were all bunched up around mid grey.

  1. Generate two maps, one for course/big details and the other for fine/small details, combine the two in your 3d app via a shader network.
    For this you would have needed to worked your mesh into layers to extract seperate maps…however see the alternative below

2 Alt. Generate a map for each subd level. You will use the lowest subd level map for your disp. The other maps you can edit in photoshop.
Overlay the maps over each other, this new map will retain details but will have “muted” larger details…Now either apply it as a bump or following the above example this new map would be the fine/small detail.

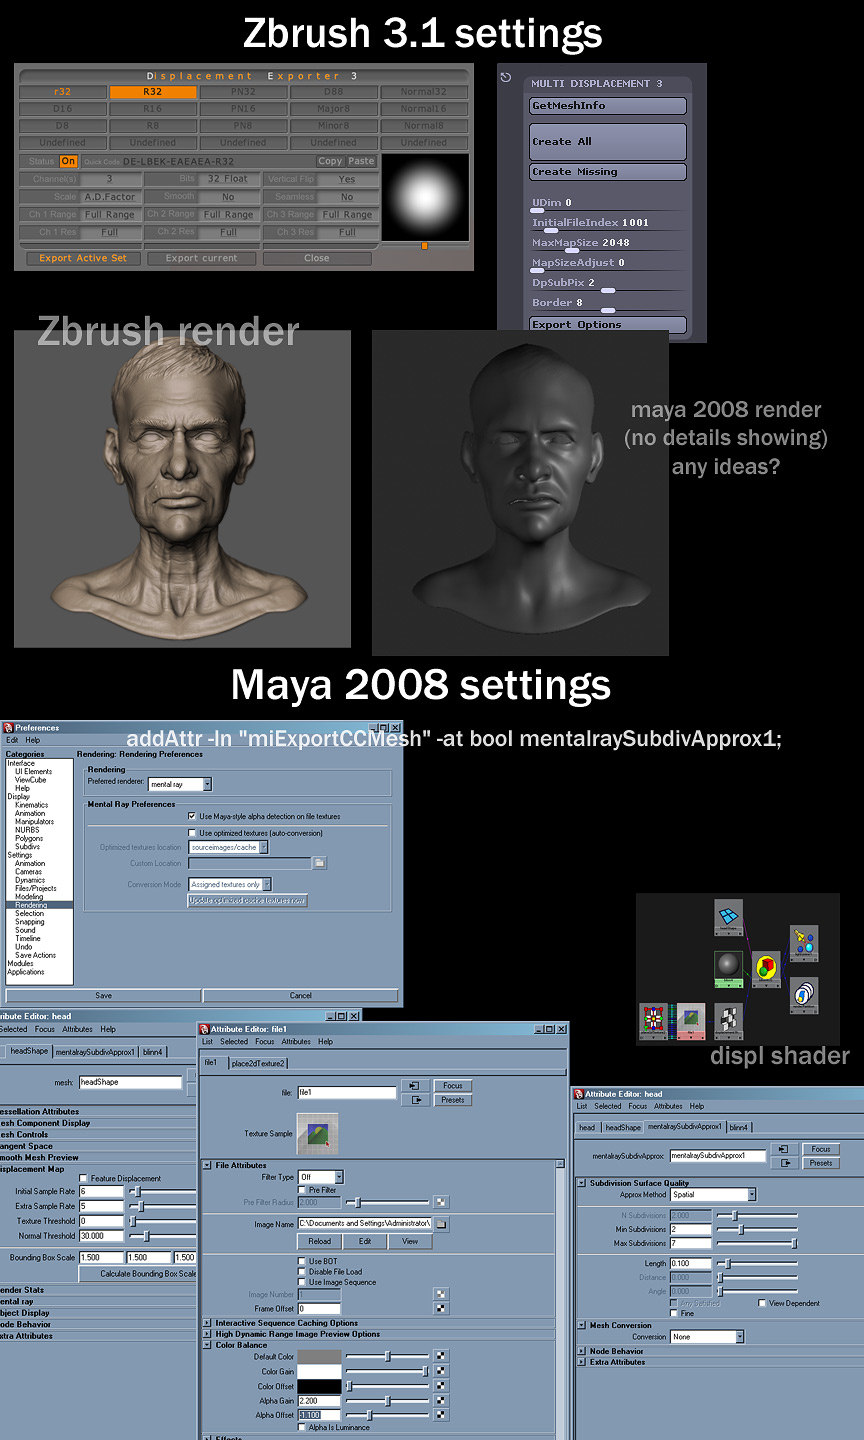
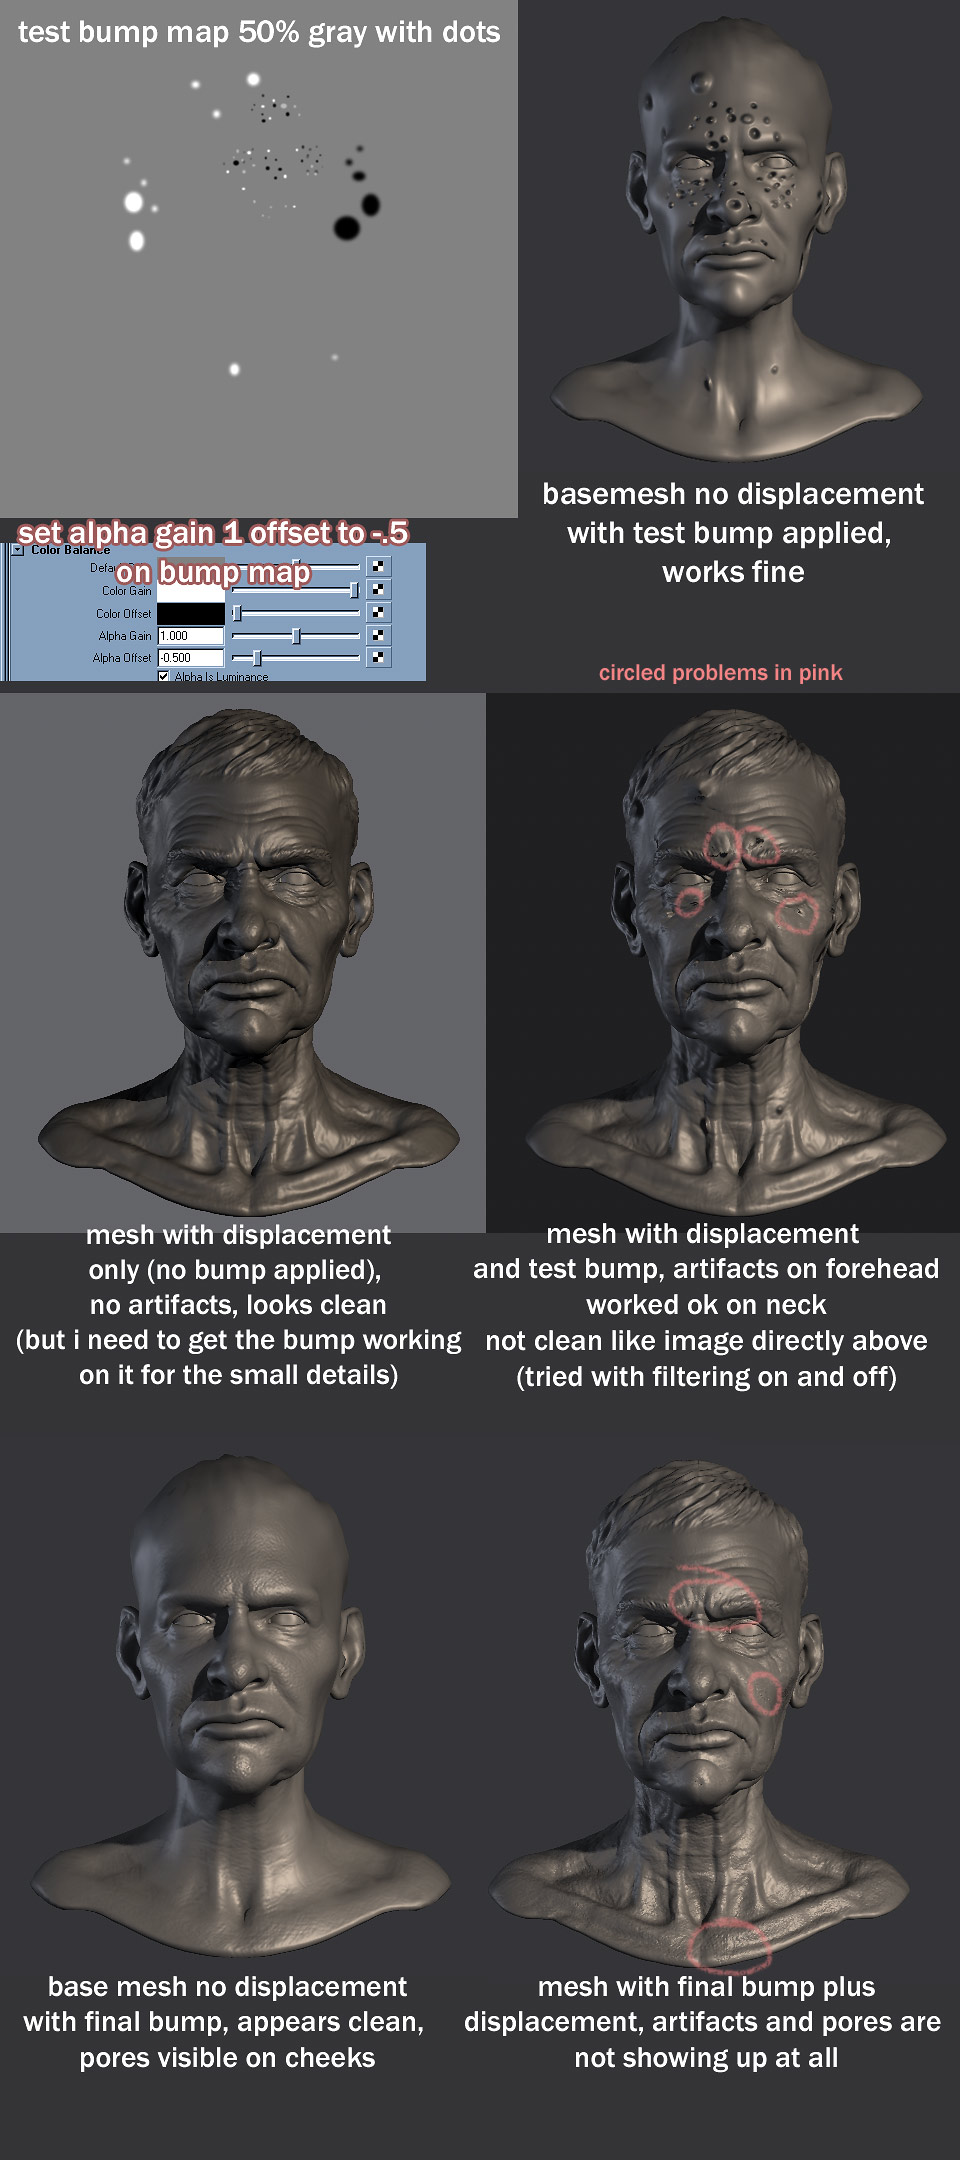
[The Alpha gain 2.2 and alpha offset -1.1, represents the tonal range. Therefore take any alpha gain and divide by -2 to get the offset…its that simple.]

Tip: With envirnoment you can strategically spilt the geo apart therefore allowing you to use 2K maps on smaller pieces, giving you more texture space.

cheers:D

Thank you for taking time to help. I haven’t had time to do more tests yet, but I hope to improve my results with the advice given.

“The 32-bit floating point maps generated in ZBrush should not be edited in an external editor - doing so may alter the map in undesired ways”

Straight out of Scott’s book, which is awesome by the way and well worth every penny.

Unless Im doing something wrong (which I probably am) Photoshop won’t allow the 32-bit maps to be edited by adjusting the curves anyway.

From what I can tell by playing around in Maya 2009 the past couple weeks, cranking up the alpha gain & offset results in more visable details that are “hidden” in the map so to speak. I tried it on a couple of my models but it only seems to bloat the mesh more in places that shouldnt be displaced as much.

Curves.jpg

[i]“The 32-bit floating point maps generated in ZBrush should not be edited in an external editor - doing so may alter the map in undesired ways”

[/i]Yes your right…but the method I use is 16bit which is fine to edit in PS.
I think for 32bit editing you may want something like “nuke” or possibly HDRIshop.

You could also re-map the values inside maya with a node, but personally I prefer editing the texture itself.

The reason for editing the map itself and not your alpha gain and offset is due to expanding the tonal range of the displacement, instead of multipling it (which will bring out more of the map however it still remains narrow as far as the tonal range is concerned). Think of it as a black and white photo…more contrast won’t reveal more form.

hope this helps:+1:

Hello,

It took me a while to assemble this post so I hope someone responds.

I’m trying to render a head mesh in mentalray for maya in maya 2008 and I can’t get it to work properly.

I used the 32 displacement guide settings along with script that Scott Spencer uploaded to ZBC for the CCmesh. (I copied the script into a text editor then copy pasted that into maya and ran it before rendering)

http://www.zbrush.info/docs/index.php/ZBrush_To_Maya_Displacement_Guide#Displacement_Maps_and_the_ZBrush_Alpha_Displacement_Exporter

http://209.132.96.165/zbc/showthread.php?t=56061&page=1&pp=15

For some reason I render with mray production settings and it’s as if there is no detail on the mesh at all.
Any ideas?

Zbrush 3.1 Settings
R32 set in the Displacement exporter box quick code: DE-LBEK-EAEAEA-R32
MD3 settings are:
1001 initi file index
maps size adjust 0 (also tried at 100)
2048 size
dpsubpix 2 (also tried it at 0)
Border 8

Maya 2008 settings:
I tried rendering as a .map and a .tif
I also set my alpha offset to -1.1 alpha gain to 2.2
alpha is luminance is unchecked
I haven’t scaled anything in maya, i just exported my level 1 mesh from zbrush and assigned the displ shader to it in maya.
imported multiple objects false.
Subdiv approximation settings are:
spatial
min sub 3 max 6 length .1
feature displ is off view dep is unchecked
set use maya-style alpha detection in prefs
My Uvs are all in 0 to 1 space non overlapping.
Mesh is all quads, ran maya cleanup script on it with no errors.
I also couldn’t get maya 2008 to show progress messages, under translation they didn’t have the progress message tab anymore.
I didn’t open the original displ map in photoshop I did however open a copy just to see if it worked and I saw some detail on it after adjusting the levels (I didn’t save anything from photoshop just opened a copy of the original)

Am I missing anything?

Thanks for any help, I’m losing my mind. Screenshot attached.

Darrell

Attachments

troubleshoot.jpg

abnoid,

I would suggest first mastering a 16bit displacement…32bit is used for high end film and game…did i mention high end.

  1. check alpha is luminance, this is critical it will tell maya to calculate your map.

  2. The multi disp 3 settings are there for exporting to particular programs, if you don’t know what to use go with the code found on the scott spencer thread… personally for 16 bit i go with DE-HBEK-EAEAEA-D16

  3. 32bit RGB and floating point is huge…check my previous posts.

  4. 2.2 and -1.1 ARE NOT EXACT VALUES!!! This bold this not to point out your inexperience but rather to highlight the fact that this information has been gven so many times in this thread and others for the past couple of years. Having said that the way to truely determine the correct Alpha gain and alpha offset values is to begin at 2.2 and -1.1 then increase or decease as needed. This is how to get good displacement, sorry there is no magic number or equation.
    Each mesh is so different that tuning is the only way to get it…So you may find you need to boost these values if you haven’t edited your disp map to increase its tonal range…I mean comn’ lets face it zbrush spits out maps which contain all the info needed for disp, but it doesn’t spit out a map ready to use raw…it needs tuning itself, the map that is.

So 2.2 may become 44 and -22 or .08 and -.04 get it? Just remember to keep the values as multiples of the 2.2 and -1.1 relationship which means take a number, any number and divide it by -2, 44 divided by -2 equals -22.

You have these values because zbrush calculate mid grey as zero and maya calculates it at black…so what you are doing essentially is shifting these values.

  1. This one is the most important of them all…displacement is dependant on the geometry of your base mesh.

A mesh polycount of 1000 will not work/look right if you try to displace up to 6 000 000, because even though you are adding a subdivision node to the mesh it is only an approximation. You can get away with this sort of thing for games because they requires normal maps.

The best way to check what you level you need as a base mesh is to inspect the silhouette of the object… when it looks close to the final hirez model then you know.

I think a common misconception regarding displacement maps is that a 32bit map will some how add all the detail back to a base model. Why not consider that a higher poly count will reduce the amount of render calculation and produce a displacement you know is going to work because the base mesh is high enough to contain all the major and some mid forms.

Anyways hope that helps:cool:

MorphDiv,

I’m a character artist but I am trying to get a grasp of the process for highend film rendering of meshes.
Thanks for the response. I figured out if I turned in the Adaptive button in the tool pallate and set DPsubpix to 0 in MD3 (left all my other settings the way they were in my last post) the map works in maya.

I’m doing render tests now. I sculpted all my details into my zbrush mesh including pores. I’m thinking this might be the wrong way to go. Because when i render i get tiny artifacts in pore areas/areas with lots of fine details.

I guess I should paint a bump map for those super fine details, which means I guess i gota step back to Zbrush 2.0 to use the bump viewer material. Sucks I’m gona have to smooth out the pores and do seperately unless someone else has a suggestion?

Also I checked alpha is luminance in maya and did a render with and without it, did not see any visible difference.

Thanks for pointing out 2.1 and -1.1 are nto exact values, just a good starting point. For my render i had to step it back alittle to 1.5.

I’m rendering displacement on a reasonably dense mesh, around 40k for the head, all the major and most medium forms are in the geo itself.

Thanks for the comments

The details you want are usually done with either bump or normal maps.

There are methods in zbrush 3.1 to paint the details “resolution independant”, however some character artists prefer mudbox for this reason as it lets you paint (not sculpt) 32bit norm maps…personally in production I find mudbox 2009 to be unstable and prefer to add the details to my norm map in zbrush, by filling my canvas with the norm map and using projection master to add fine details… that way you can throw it back onto your model.

Another way is to seperate your mesh and up rez to paint the map then fix seems by merging all the parts with zmapper through its projection feature.

zbrush 3.1 does have a bump viewer and norm material, if for some reason you don’t simply go to your zb2 materials folder and copy the materials you want into the zb 3 materials folder.

I have gotten awesome disp in maya by using two disp maps plugged into one disp node and tuning the seperate alpha attributes to get all the detials, even close to camera.

I think its probly time i make a tut as no one seems to have tried this before and therefore don’t consider it to be a production method.

Those tiny artifacts may disapear if you set your edge length to something like .001 but this will increase render time, then again theres only so much mental ray can do with disp, consider using renderman.

btw the highend film productions also come with highend render farms. :wink:

would be good to see your results.:cool:
cheers

I’m still working on the same project I posted earlier (using Maya 2008 on xp pro 32bit) , only now I got displacement working great, and the bump map is causing issues when used in conjunction with displacement.
My bump map is done on a 50% gray background with the alpha gain set to 1 offset to -.5 in the color balance slot (also tried on default settings)

When I render a bump map on a model with no subdiv approximation and no displacement it comes out clean, but once i add a bump map to the bump channel of a shader that also has good displacement with a parametric subdiv approximation, the bump map doesn’t really show up at all, and causes artifacts. Screenshot attached. I really need this bump map to get the pores and tiny wrinkles goin on this model before I can call it done.

Any idea what I’m doing wrong?

Attachments

bumpmap_problem.jpg

Okay so the problem I am having is a new one I think.

I have 2 objs in my scene and each has their own SubD Approx. and a Disp. Approx.

At First only one of them would render but it looked really nice.

I used the Script you gave us scott and they both rendered with Disp! I was sooo happy!

But they only render in Maya Software. And one of them has wierd swirly lines all over it.

When I try to render in Mental Ray which I really wanna do I just get a drey screen after 1 second. Doesnt even start to render. every time. ???

Brownie3703
make sure you turn off “feature displacement” and the approximation nodes are related to mental ray… which means you can’t render in software with these nodes.

abnoid
At a guess would you need to set your bump alpha gain and offset to the exact settings as your disp?

Also just curious what advantages, if any, does parametric have over spatial?

(i haven’t had this issue and usually paint with black as a base for bumps…thats how maya likes it)

Hey there. So I went in to both objects and made sure “feature displacement” was turned off and when I hit render it goes straight to a grey screen and says render took 1 second. I get this in the output message…

SURF 0.0 error 391081: invalid topology, quad face 192
SURF 0.0 error 391081: invalid topology, quad face 193
SURF 0.0 error 391081: invalid topology, quad face 196
SURF 0.0 error 391081: invalid topology, quad face 197
SURF 0.0 error 391081: invalid topology, quad face 208
SURF 0.0 error 391081: invalid topology, quad face 209
SURF 0.0 error 391081: invalid topology, quad face 212

but I didnt get that before…

Recently I have had rendering issues where I go to use Mental Ray and all I get is a black screen. Usually this is some kind of geometry issue. I have been solving it by simply running cleanup (mesh>Cleanup) once or in some cases twice (?!?). This cleans up the bad geo and usually allows me to get a usable render.

Maybe that will help?

Scott

PS the sdvantages of parametric is fewer options and less to mess with. The more you know the better you can be with the other approximation styles. Not being a rendering guru myself I opt for the one with less options :wink:

Hey abnoid, did you ever get your render working? Email me and LMK.

S

I wouldn’t call myself a render guru, but I do like tuning my renders with more options available, spatial i find gives enough control without the headache.

I need to mention that if anyone has tried tuning their maps in versions of photoshop prior to CS4, you probly will get bit depth banding in your displacements…The work around and most likely more trust worthy method is to connect your file node via “colour R out” to a “remap uv cord V” and the output toyour disp node, then crush the levels…i.e make sure white is at top and black at bottom then bring them together to tune…this will expand your zb maps.

So whats the feeling here on 16 vs 32?
I mostly work in TVC, but I have worked with people from film that didn’t neccessarily consider 32bit a standard option for ever render.

imo the amount of data in a 32bit map is huge, and sends render times up which is why i prefer 16bit for most things…but has anyone found that with mental ray 32bit actually is giving visablly better results with a raw zb map?

Most studios have migrated to renderman and the disp are beautiful, plus i tune/remap my maps within maya sometimes photoshop as well, so the result with 16bit tends to match the zb hirez model quite accurately.

anyways just asking…I would also like to see how the disp have turned out

cheers:+1:

Most studios I have worked with requested 32bit maps and only fell back on 16 when the overhead was too much or other extenuating circumstances. The difference in quality as well as the ease of use make them a million miles above 16 bit in my opinion. Just consider the fact you only need two set values to replicate the same level of detail from ZB. Compared with the endless tweaking of alpha gain vs scale vs approximation settings that comes with 16 bit.

The fact the realworld scale is baked into the 32bit map is what makes this wonderful streamlined approach possible.

S

good point with regard to real world scale :+1: however it can be multipled with accuracy if need be.

I would have to agree with you, 32bit is ‘billions’ of miles above 16bit.
Then again I heard even ILM decided to use 16bit open exr over 32bit which can give a floating point value.

Maybe 32bit was an industry standard before…maybe not, but it seems to be 16bit floating point exr nowadays.

Horses for courses, but I must say after tuning a 16bit map compared against a 32bit, personnally I have yet to visually see the need to go that extra billion miles, then again it does involve tweakin and if thats not your cup o tea then maybe 32bit is appealing.

Also I use renderman which requires less tweakin than mental ray to achieve the same results.

cheers
Ash

Hey guys so I cleaned up my geometry and that must have had something to do with it because now it starts to render instead of giving me the grey screen. But now i get this in the output window…

GEOM 0.3 info : 1479820 tris in 39094.5 ms from chestLowPoly:polySurfaceShape1 [1]
GEOM 0.3 info : performance warning: object chestLowPoly:polySurfaceShape1 [1]: displacement shader returned values up to 0, please check whether max displace 1.60611 could be reduced

What does that mean?

Displacement test

both images rendered in mental ray, maya 2008
(with default production quality settings)

Settings

*use maya style alpha detection is on

*Mental ray Subdiv approx node settings the same for both

*Approx method = Spatial

min subdiv = 3
max subdiv = 5
length = 0.01

*file node settings for both images
alpha gain = 2.2
alpha offset = -1.1

  • feature displacement is off

  • Alpha is luminance is on

displacement map settings in zbrush

for 16bit, quick code = DE-HBEK-EAEAEA-D16

for 32 floating point, quick code = DE-LBEK-EAEAEA-D32

Both maps where generated at 2048 x 2048 with a DPSubPix of 2

Both maps took 54 sec to render. The 16bit actually displays more detail.

Please note the settings I used for this test are as standard as can get, there was no time spent looking for the right balance between settings, hence why I used 2.2 and -1.1 for the alpha gain and offset.

Note: Both renders in my opinion have a ‘softness’ which is a dead ringer for cg characters.
Although the 16bit has more detail it is far from what I would call done.

Remember this test was done in a clean scene with nothing but a model and its shading network. I wouldn’t expect the same results with regard to time if it was for production.

I think the only reason too consider 32float is;

  1. Zbrush doesn’t yet support 16bit open exr (which is floating point)
  2. You want a decimal based value range, not an integer
  3. You consider pain is sweet and take your daily dose from mental ray
  4. You are a dedicated zbrush fanatic and refuse to use mudbox to generate 16bit open exr displacement maps
  5. You know better than people like Morph Division, who does he think he is?

honestly though good discussion, its made me probe the whole displacement question and although I jest, I would not think this debate is over

cheers
:D:D:D

Attachments

16bit_disp.jpg

32bit_disp.jpg

Thanks for this awesome script Scott. I have troubled to take renderings for a time. But I get over this problem owing to this wonderful script :slight_smile: Thanks again. Great job. The result is:

lionSideview1_mentalray.jpg

Attachments

lionSideview2_mentalray.jpg