Small but vital update, fixed the front framing borders via panel loops. Then added some ding and scratches on the front and back.


Small but vital update, fixed the front framing borders via panel loops. Then added some ding and scratches on the front and back.
Very nice details.
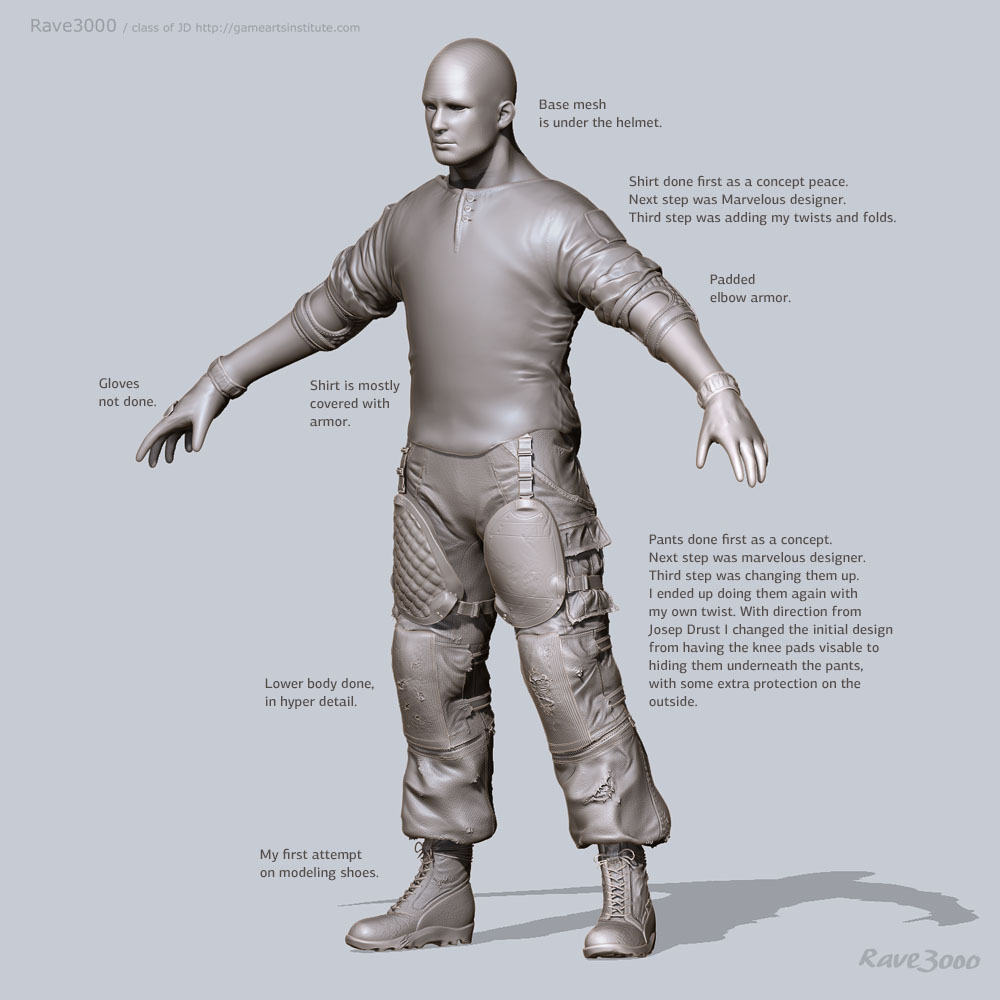
Just finished of my character boots. I’m a bit of a sucker for details 

Amazing, Love it. 
This is so great… Love all the tiny details!!
Great job! I am always amazed at your attitude to detail. Very much done!
Now for the kneepads. I’m tearing up one knee to break up the symmetry.

I would very much like to see a break down of how that distressed cloth is being achieved. That’s some amazing detail there.
Excellent work, Raven. I would also like to know how you are tearing up that cloth.
Is it similar to the method shown here? http://www.zbrushcentral.com/showthread.php?177722-Torn-Cloth-Tutorial
Are you using MicroMesh, or actual geometry? Have you had success with getting this kind of torn cloth detail into a normal map?
Thanks!
Great details! May I ask you how did you make the stitches? I have to do something similar and I have no idea how to do it. Thank you!
I’ll do a quick simple explenation of my steps later, but it’s really really easy.
Hi, no this is really basic sculpting. The only thing that might be deceptive how I achieve depth and textures.
I had the pants around 3.5 million polly’s and I didn’t want to go higher, though I needed more geometry for my details in this area.
I pondered about this, and my solution was to break things up.
I created the outer shell as a protection material to the pants - but really it was a way to create more geometry for my details.
I used noisemaker to create the basic texture/pattern, then I used my standard brush with a noise alpha to draw in masks where I wanted
my tears to be. Then I changed the mask to a new pollygroup, hid it and deleted it.
Now I got a hole in my protection peace.
My next step is to create the second layer with enough geo to make the detailed ripping underneath.
I copy my pants choose areas to cover the holes in the protection layer - from beneath and delete the rest of the pants.
Then I subdivide the geo I have - so I have enough resolution for the detailing.
Then on it’s just sculpting with the snake brush with a noise alpha, standard brush with textures etc.
I run the standard brush really small to create threads going over the surface to give even more depth to the surface.
My last process is to use noisemaker for the cloth textures and using masking to exclude areas where I don’t want texture.
Basic stuff really
Thanks for the reply. Have you had success with baking this detail, from all the separate subtools, into a normal map?
Wow, that clothing is amazing! Great job
Good question, we will see in a few days.
I don’t think there should be a problem, because it’s like everything else you do in modelling.
One more progress shot. I was in the process of splitting up my model. It’s about 40 million polygons now, need to get it down a bit.
The details are cool but making things heavy.
I thought it was cool to see beneath the chest armour. I didn’t notice the detail I had put in the every little corner until I started stripping down the sub-tools.
Hope you enjoy these posts, not sure if I’m spamming you

Hi guys. I’ve had some questions on how I do my stitching. it’s really simple really. Here’s an image of my low polygon stitch I use as an insert brush.
I got to mention that this method was handed down to me from the Josep Drust’s class at http://www.gameartsinstitute.com, the new Ryan Kingslien school.
It’s so easy to create. It’s just basic box modelling inside ZBrush with the basic shape of a single stitch.
Think of it as a box - you pull the ends out and then you just lower the height of those ends. So now you have two triangles at on the side of a box. Just your basic modelling - but you need to be at the lowest subdivision level to keep the Points low.


