ZBrushCentral

ProjectionMaster deformations getting blurred when picked up

Hi all.

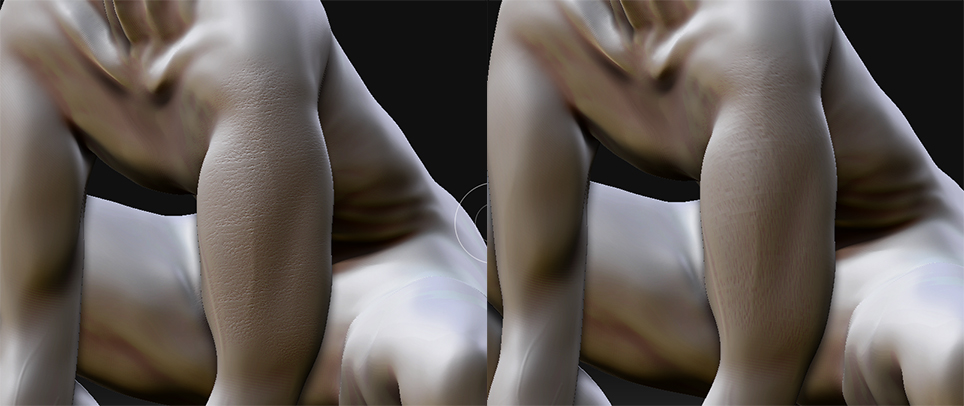
I’m currently trying to add some finer details for the skin using the ProjectionMmaster, however once the model is picked up again after adding some details they all get blurry and doesn’t keep the quality they had in ProjectionMaster.

I attached a quick example of what I mean. To the left is in the ProjectionMaster and to the right is when picked up.

Is there a way to make this stay crisp like in PM? I tried changing between the different UV map methods but that didn’t help.

My model is currently 2.3 Mil polygons, I’m not sure if that’s the problem, but I can’t really divide it one more time, it will end up at 9 mil polygons and Zbrush only keeps crashing at that ammount.

Thanks in advance for any help regarding this!

Best regards,

Robin

Attachments

blurryDeformation.jpg

When you ‘drop’ the model with Projection Master you are adding details by drawing with pixols, which are pixels with depth information. When you ‘pick up’ the model Projection Master projects the pixols onto your model. In other words you are still limited by the polygon count of your model, or rather the polygon count of the area you are projecting onto.

Your UVs have no effect on the modeled detail, but they do have an effect when painting onto an applied texture with projection master. PolyPainting detail level is affected by polygon count, not UVs (although transferring the PolyPainting to a texture is affected by your UV layout).

There are a couple of solutions to achieving the desired detail level but depending on what you are going to use the model for (still image, game model, etc) they may not suit you.

  1. Retopologize your model. Using Zspheres you can create a new base mesh (subdivision level 1) which has more polygons in the areas requiring a certain detail level. You could use your existing base mesh as a template and increase the polygon density where you need detail. After creating the new base mesh you project the modeling from the old model onto the new and now you can hopefully achieve finer details.

  2. Selective subdivision. Masking an area, inverting the mask and subdividing will increase the polygon count of the unmasked area. This wil create triangles in your base mesh.

  3. Using a Bump Map. Painting a Bump Map with Projection Master is many times sufficient for small details. The quality of the Bump Map will be affected by the size of applied texture and you UV layout. You will most likely need a ‘huge’ texture size, at least 4096x4096 but larger will be preferable.

  4. Selective subdivision for projection. Creating a new tool from the top subdivision level of your model will result in a 2.3 million polygon tool with 1 subdivision level. You can selectively subdivide areas of the model requiring detail, model the detail and when done project the detail onto a Normal Map. This is done by using ZMapper to compare your original model (with subdivision levels) with the selectively subdivided model.

  5. Using HD Geometry. I cannot remember if HD Geometry is transferable in any way.

Hope that helps.

Thanks alot for the answers.

A few follow up questions to you answers,

  1. Can you retopologize certain parts of the model only or do you have to retopologize the whole model? I looked a little bit into the whole retopo thing but it seems very complicated.

  2. How do you make a bump map with the ProjectionMaster?

Thanks again for your tips!

  1. If you want to keep your model as 1 subtool you will have to create topology for the entire model. But as I mentioned you can use your existing topology, which is your base mesh, and add onto that.

Splitting your model into multiple subtools is another option and will dramatically increase the amount of polygons available to you. Your system should be able to handle multiple subtools at 2-4 million polygons each. But again, it depends on where your model is going to end up.

  1. Set the color to 128,128,128 RGB, create a new texture at the size you want and paint with black and whites. Painting with color values below 128,128,128 will create indentations and painting with colors above that will create protrusions. The BumpViewer material will show the effect of the bump map.

As for how to set up topology creation from existing topology it is fairly simple once you know how.

  1. Select your model and go to the lowest subdivision level. Press Tool > Make PolyMesh3d to create a new tool containing the lowest subdivision level only.

  2. Select the ZSphere tool, draw it on the canvas and enter edit mode. Press Tool > Rigging > Select Mesh and choose the tool you created in step 1.

  3. If needed, resize the Zsphere so that it sits within the model.

  4. Press Tool > Topology > Select Topo and choose the tool you created in step 1. Enable Tool > Topology > Edit Topology. The Edit Topology button description shows the controls in this mode.

Thats it. You might want to change your material so that it is easier to view the topology lines. Also turn on PolyFrame view mode (Shift + f) and preview your topology changes often (the ’ a ’ key). To create the new base mesh preview the topology changes again, press Shift + D to go to the lowest subdivision level and then press Tool > MakePolyMesh3D.

Thanks for your great advices!

I went through some tutorials on how to retopologize and managed to retopo the model. Added edge loops in places where it was a bit too wide between the edges and seem to get a little better resault now, could probably add further edge loops for even more details but it will do for now. Atleast I learned how to retopo now, wasn’t as complicated as I first thought :lol: