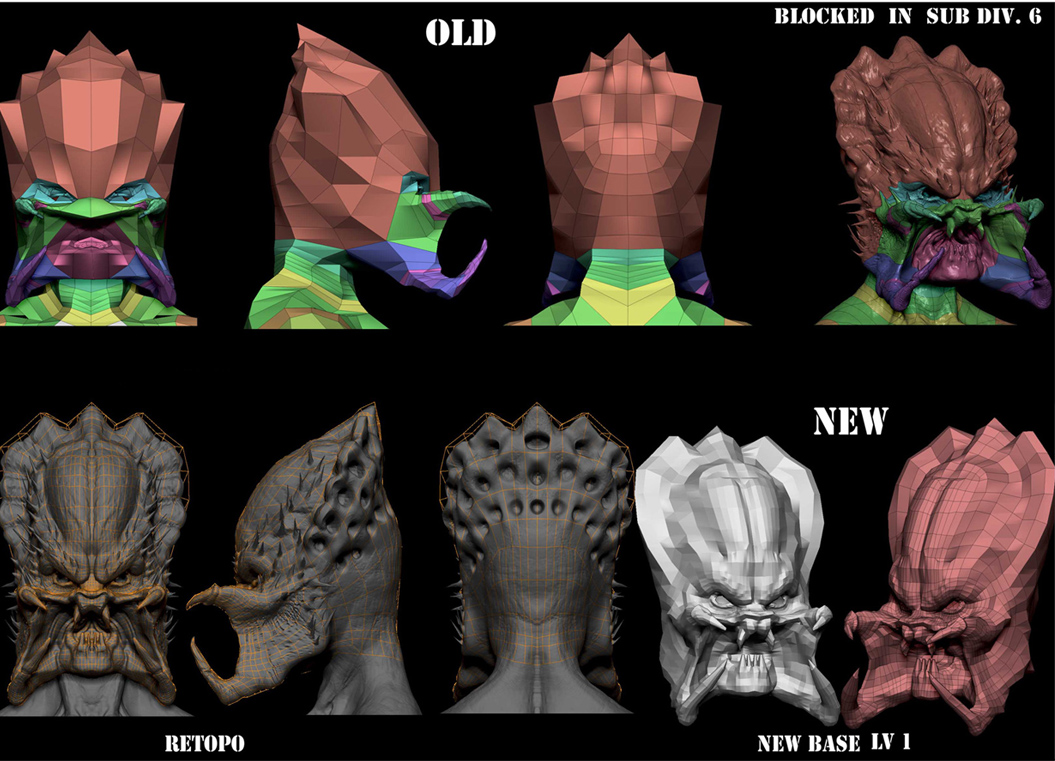
What is the best way to retopo this monster to be animation ready? He’s made up of 11 subtools so far with about 4 more on the way not even including the hair and I want to make him light as a feather. Should I retopo with subtools attached and sculpt from there or keep them seperate? 
I usually just hope that one or two people knock this down a hundred notches to help me make it better, I heard many people have done the Pred so I was hoping for more insight. Anyways I give you more to judge. Thanks for any critiques, I’m not the sensitive type.

hello. first of all I suggest you to make his head a little smaller and the hands a little bigger with claws, according to “predator” movie.
Nice! It looks like you have him blocked out, and the anatomy is looking pretty nice. I would suggest maybe reducing the head a little. You should go on-line and grab a few references of the Predators body. If I remember correctly the head was smaller, but I could be wrong.
The armor is looking pretty sweet! It looks like you have everything in place.
As far as the retopo thing goes, I would probably just use the retopo tool and retopo the armor as separate pieces. You can always delete the polys under the armor and other accessories to lighten the poly count, and you will never know the difference. It will be more realistic and it will be faster to just do them as separate pieces.
Also, the hair looks like it would be a good candidate for the Zsketch tool! That tool can do tentacles and dreads pretty well. You could also just use the retopo tool to create a bunch of splines and convert those into Zsphere chains, or just use a series of Zspheres for the hair. Another idea is to sculpt a rough tentacle/ dread out of a sphere or cylinder (no need to do anything fancy) and then retopo that for better sculpting then clone it, adjust it, and move it into place on the Predators head.
I can’t wait to see it finished!
Is it just me or do others like the retopo tools in Zbrush? Thanks for the tips guys. [attach=199910]111.jpg[/attach] More to come.
Attachments
yes liking what I see here thanks for the work flow !!!
ah the retopo tools! I think an easier way to do retopology is to create a very basic topology. If you draw too many polygons it will take forever. I am no expert on the tool but I have observed some people do minimal retopo work, using projection and higher subdivision levels to conform the retopoed mesh to the original model. but then when it comes to fingers or horns or anything protruding out the retop mesh density has to be increased 
dude looking sick, i saw you retopoing it today in class im jake from term 4. sick stuff man. if i were you i would do a rough dread lock for the print then wait till rigging to do the dreads because you can use mayas hair system and make some nice dynamic dreads that will have movement and stuff in it. as for the retopo and hollowing out, id do each armor peace separate and then the whole body as one peace so you can keep it light and simple for rigging. good stuff though man.
Thanks for the help Jake I really appreciate it!
Attachments
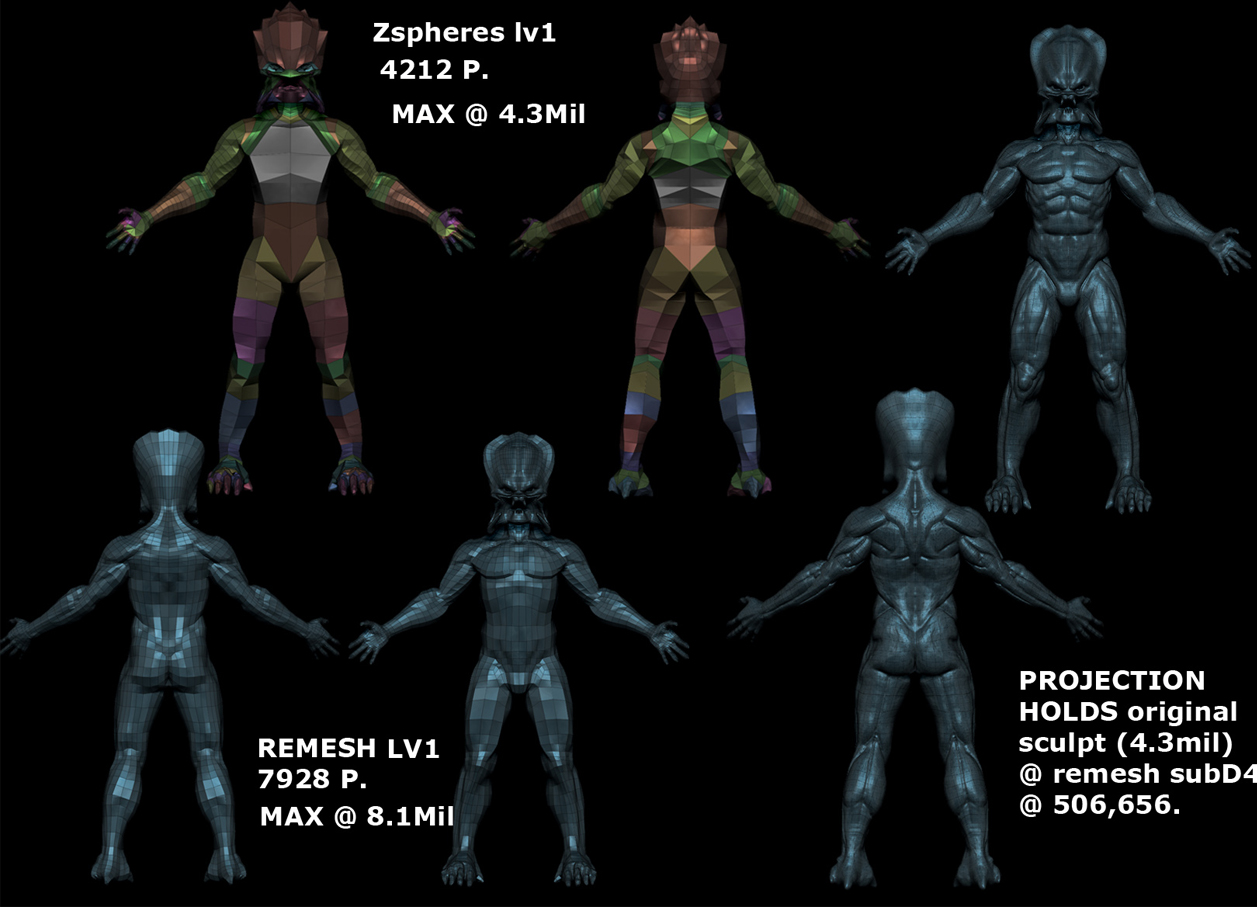
So wait… question! You can create a new low poly mesh for your sculpt that will still have the high poly sculpt with all the nice little details in it once you sub divide it again? How do you get the high poly to recognize the new low poly as its own? Tutorial link? lol
P.S. Good work!
…
“All of a sudden there was a light and then I was falling”. I can’t wait for the new movie this friday! Here’s an update on my predator. 
Cordeycep,
your Predator is coming along Nicely! Looks like your getting a better proportion with the head. Very cool.
Wow that has really come along well, get topology and detail !!!
Totally kick ass sculpt man…This really turned out stellar. Great work!!  small_orange_diamond
This is for a class? Do you go to gnomon? It’s turning out nicely.
Thanks Nubus! Will do on the crits, I’m closing in on it.
KillahPriest- I go to the Los Angeles Film School Comp. Animation program. I’m glad you like it. I’m also working on a few friends for him so he has something to kill, catch my drift?
I loved the new movie and I really like the new Predator designs. I would love to sculpt this new Predator but I have way too many things to do right now so I sketched him out instead. Just thought I’d share it with you guys since drawing is just as fun as sculpting in zbrush, imo at least. Can’t wait for Z4!

I ran into a snag with the normal maps and displacements too. I hate to update with this since it’s not so much zbrush. Click the link to see the rig and a quick breakdown of the rough animation and playblast.
 http://www.youtube.com/watch?v=7L8NpKUW2iw
the animation looks like its off to a good start! what problems were you running into with the displacements and normals? I know that they need quite a bit of tuning in pshop when you are pulling them straight out of zb depending on your sculpt. You can also try using maya’s transfer maps. Then blend the maya generated maps with your zb maps.