ZBrushCentral

Please Help! Close holes issue.

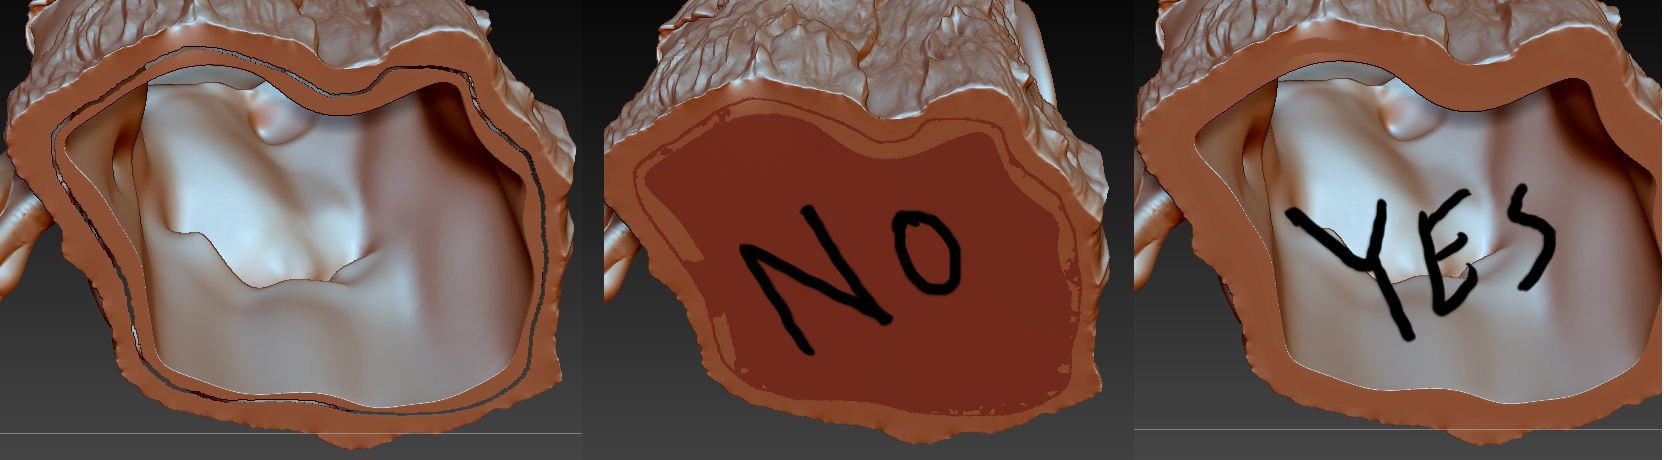
I love Zbrush, I really do but sometimes it makes me want to beat my face into my desk. Today I am having an issue closing holes. (See image.) I must have accidentally deleted a group along the bottom of the base. I do not want to retopo or dynamess at this juncture. SO I hit close holes. It keeps wanting to fill the whole bottom instead of the OBVIOUS ring of deleted faces around the base. Is there anything I can do to bridge the edges instead of filling in the whole bottom?

EDIT: And apparently Dynamessing isn’t an option either because it does the same thing. It wants to fill in the base. This is rather vexing.

Attachments

closeholeshelp.jpg

Use the ‘CurveBridge’ brush. You can read about it starting on page 45 of the ZBrush4_R6_whats_new.pdf in your Documetation folder. If you have multiple subdivisions, you will probably have to ‘Freeze SubDivision Levels’ first.

I feel your frustration and pain. Saving often helps. Undo, if you can keep tabs on your actions and keep checking. Have you tried to Extract from the Subtool pallette?

I’ve tried the curve bridge tool. That creates a separate piece of geometry. I need this to be one single shell. It’s going to be 3D printed. And anyway, when I tried the curve bridge brush then tried fill holes, I hoped Zbrush would go “oh, ok, so that’s what you want us to do” but nope! Did the same thing. Same thing with Dynamesh as well. I’ll read the documentation in “what’s new”… maybe that’ll say something else that wasn’t on the site I looked at.

Edit: Is there some way to ensure that it melds with the geometry? I need this to be one closed, watertight shell.

I have a previous version saved though I will have lost some work. I’d rather see if there is some way to rectify this before going back to a previous version. And unfortunately, I hadn’t noticed the rip until I had already saved and closed the file. XC

Did you try masking the entire outside and using Extract with a small thickness value? Not sure if you need single or double sided. You should have been able to merge your subtools into one object.?

I could try that but I already set up the inside geometry to be exactly how I want it (pain in the !@#$%^&*, let me tell you! :P). However, that is one possibility. I didn’t even realize I could do that. I just wish there was some way for me to tell Zbrush to fill only that sliver, not the whole @#$%^& base. >8{

I think I’ll try your suggestion anyway just to see what happens but I still would like to know if there is some way I can fill that hole as is for future reference and because I really want to keep that internal geometry if I can.

The CurveBridge brush does not create a seperate piece of geometry. You are obviously not using it correctly. The CurveBridge brush will fill in the gap at the bottom of your mesh and there is no need to fill any holes in after that.

Well then tell me, oh wise master, how should I be using it? I drew a curve around one edge and a curve around the other edge just like it says in the documentation. It creates this nasty, jaggy bridge that does not merge with the shell.

Well, I would, but not after a smart-a$$ comment like that. Maybe you should read steps 9-14 again.

You’re the one who came on here acting like a jerk right off the bat and now you’re being even more of a jerk. “You’re oooooobiously not using it right.” Sneering at people who ask for help makes you look bad. Go twirl your handlebar mustache at someone else.

As it is, I was able to get it to work eventually but the tude is totally unnecessary.

Curve bridge brush worked after some finagling. I believe. Thanks for the help, guys. :slight_smile:

Maybe playing with the constraints would help. Towards the bottom of this page> http://docs.pixologic.com/user-guide/3d-modeling/sculpting/sculpting-brushes/curve-bridge/

Aye. It required some finagling but I did get curve bridge to work. :slight_smile: Thanks.

I gave you the correct solution. You said it wasn’t, at which point I told you you were doing it incorrectly which turned out to be true. If somewhere along the line, I hurt your feelings, I appologize. That was not my intention. Rest assured, you won’t see me posting in anymore of your threads.

Sorry but you’re reading Zber2’s post wrong. He posted the solution (which in the end is what worked for you). You didn’t get the result the tool is supposed to get. He said you’re not doing it right, which again given that it is the solution you ended up using proves that you didn’t do it right. However you took his post as being a jerk, "You’re oooooobiously" is not how he said it, but you took it that way. Instead of realizing that he was right you go around making this personal and attacking the person that gave you the best solution. Sorry you took his post the wrong way but he’s not a jerk. I think you owe Zber2 an apology, he’s a great active member on these forums and is quick to help others with problems.

I had already tried the curve bridge tool and assumed when it created separate pieces of geometry, that was how it was supposed to work. It had not even occurred to me that it wasn’t working correctly and the documentation is very sparse with its description so how could I know something I didn’t know I didn’t know? It turns out that I had been screwing up the part where you’re supposed to hold down shift. I realized this upon following your direction to pay closer attention to steps 9 - 14. So yes, you saved the day, though I suspect that comment was meant sarcastically. :wink:

In any case, I’m happy because I can now send this !@#$%^&*ing thing off to the printer. My urge to light myself on fire with rage has abated. Neverminding your tudeaceous tudery, I must still thank you. :slight_smile: