A Brief Explanation of Adaptive Skin and Unified Skin Previews
You are in ZSketch mode (Fig. 1) which shows both ZSphere armature (Fig. 2) and ZSketched spheres (Fig. 3). While in ZSketch mode, if you press the A key on your keyboard, it will Preview the ZSketched spheres which is the Unified Skin (Fig. 3 and Fig. 5). Pressing the A key again will take you out of the Preview and back into ZSketch mode. At this point, if you press the Shift + A keys, it will take you out of ZSketch mode and show only the underlying armature. With only the underlying armature showing (Fig. 2), pressing the A key now will Preview the Adaptive Skin (Fig. 6 and Fig. 4-1). Pressing the A key again will take you out of the Preview. At this point, you can press Shift + A keys to go back into ZSketch mode if you want to do more ZSKetching.
The Tutorial
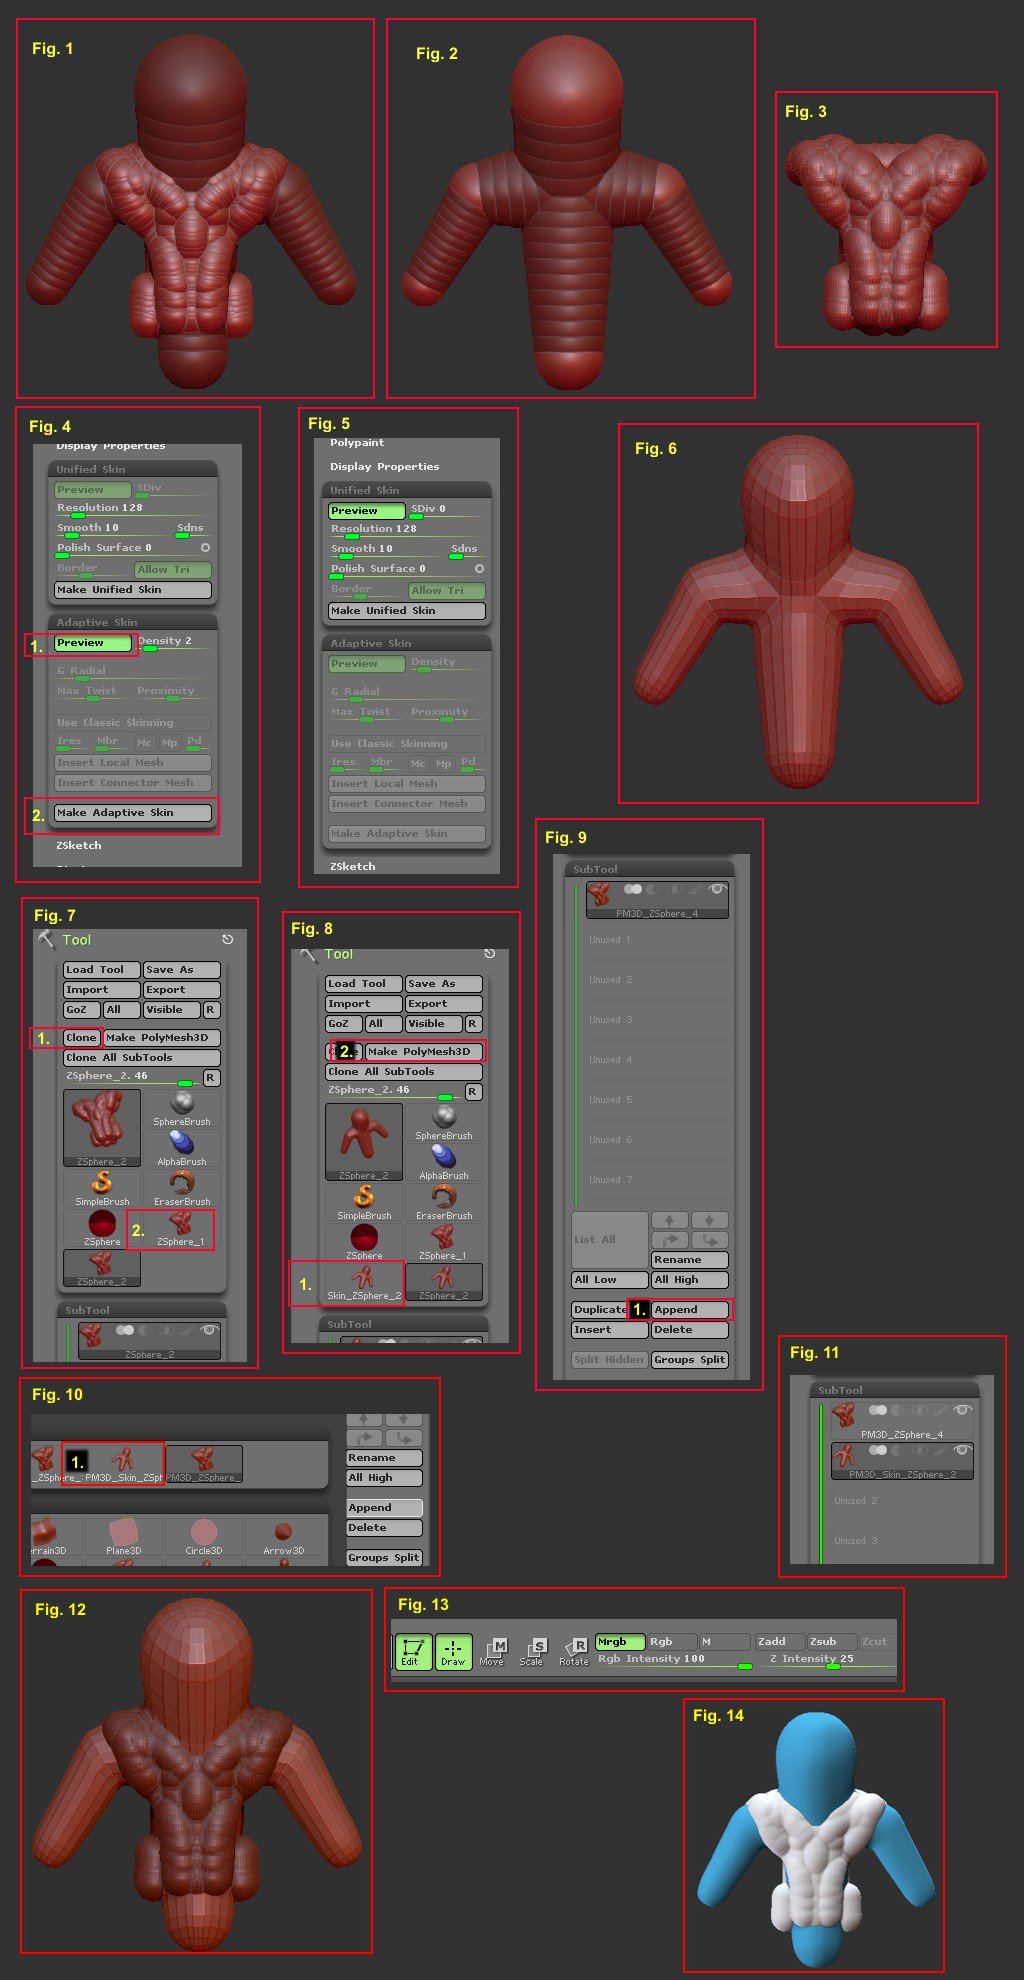
1. While you are in ZSketch mode (Fig. 1), press the A key to preview your Unified Skin (Fig. 3 and Fig. 5).
2. Go to the top of the Tool palette and click on the Clone button (Fig. 7-1). This will place a clone of the Unified Skin in with your tools (Fig. 7-2).
3. Press the A key to get out of the Unified Skin Preview then press Shift + A to get out of ZSketch mode. This will leave you with the underlying aramature (Fig. 2).
4. Press the A key to get a Preview of the Adaptive Skin (Fig. 4-1 and Fig. 6). Click the Make Adaptive Skin button in the Adaptive Skin subpalette. (Fig. 4-2). This will place the skinned object in your tool palette (Fig. 8-1). Click on the skinned object (Fig. 8-1) to place it on the canvas. Now click the Make Polymesh3D button (Fig. 8-2) to make it a Polymesh.
5. Now, in your tool palette, click on the Unified Skin that you cloned earlier (Fig. 7-2) to place it on your canvas (Don’t worry about your Adaptive Skinned mesh disappearing. It’s still in your tool palette) and click the Make Polymesh3D button (Fig. 8-2) to make it a Polymesh. This can now be subdivided more, sculpted on and polypainted, but wait, there’s more.
6. Click the Append button (Fig. 9-1) then, from the flyout, click on the Polymesh that you made in step 4 (Fig. 10). This is now added as a subtool to your mesh (Fig. 11) and can be subdivided, sculpted and polypainted.
7. You now have your complete mesh ready for polypainting (Fig. 12).
Filling a Tool with Color, Material or Both.
1. Select the tool that you want to affect. If you are going to be polypainting then it’s a good idea to select a material like MatCap White01 so click on the Material icon and select MatCap White01 from the flyout… Click on the MRGB button (Fig. 13) then click on the Color menu at the top and click the FillObject button. This assures that when you select a different color for painting, it won’t fill the whole tool again.
2. You can repeat the process for any other tools you might have and you can end up with something like Fig. 14.
Regarding Polypainting
As ZBrush paints polygons, you will have to subdivide your mesh if you want any detail in your painting. As far as polypainting goes, ZBrush sees 1 polygon as another 2D app like Photoshop would see 1 pixel. So the finer the mesh, the better the resolution on your polypaint.
That’s it! Happy ZBrushing!