excellent…i’ll pre order the book from amazon.com
also looking forward to some videos from you for modeling with z brush too over on gnomology.com

steve g
excellent…i’ll pre order the book from amazon.com
also looking forward to some videos from you for modeling with z brush too over on gnomology.com
steve g
Hi spencer…
first of all i wanna thank u for ur effort and dedication on helping others…
second… i was trying to watch the video tutorial u upload but there seems to be a problem with colombia (the country i live in). For some reason Colombia is blocked and i cant get the page open… is there any other way to watch the tutorial?? i dont know, another web page or something?
Im pretty sure its hosted at a couple places earlier in the thread for download. If you can’t find it private mesage me and I will upload it to my FTP again for download.
Also, there is another version of the video that is over an hour long and fully narrated. It comes as a freebie on the DVD with my book so if you got that check the DVD an you wont have to download anything  .
.
Cheers,
Scott
Book? What book? Please supply a link to this ‘book’.
Thanks!
~S.~
it’s really gr8…thanx to pixiologic for making such type of help . I learn lot’s from zbrushcentral and i learn lot’s frm video tutorials through veoh tv and you tube…thanx for make a gr8 world
Thanks a lot for posting that download.
Great vid scott…it’s interesting using yellows for the thinner skin aswell as red and blue for the base colours…genius!
Keep’em coming!
Sonder!
Hello Scott. Do you happen to have any full body models that are colored with this technique? I’m not sure how this works for the entire body. Also would the underpainting work well as a subdermal layer?
Hello Scott, just a word to say “thank you” for your book, from France.
Regards,
In the video, the cursor is different from me, instead of red it is a white circle with no focus setting. Does it affect the stroke??
What is a “dot alpha set”? Does it mean 1-dot Alpha 01 or many-dots Alpha 07 ?
I decide to use Alpha 07 and set RGB to 25, but there’s no way I can spray as "wet/blur’ as you - it just sprays obvious dots like yours on the back. Reducing stroke size helps but it still has MANY dots on my model.
When using the same brush and set RGB to <9 in order to cover the base color on them. It takes forever to fill even a 1cm square ! I have to spend like 2~3 mins to see little changes on the surface - but only 1cm square. I don’t even know should I increase RGB intensity.
I NEVER Texturing anything before, so obviously I am doing wrong somewhere…
Outcast0822
The white cursor sounds like your model isnt in edit more but rather it has been dropped to the canvas. The cursor is red when you are in edit mode on a ZTool and white when you are in canvas painting mode.
The dot alphas are alpha 07 - the cluster of little dots.
Make sure you adjust your RGB intensity settings and select the spray stroke. Turn color to 0 in the stroke menu
I hope that helps. My book has a chapter on this technique with more step by step instructions which may be helpful. Let me know if you have any other questions.
Cheers!
Scott
My attempt to polypainting(youtube):
http://www.youtube.com/watch?v=jfzFWfc_lg8
After a few tries, I figure that reducing Placement Variation of the spray can dense the spray a little bit.
Is the mottling pass a must for blending color ?
What color should I use when I using mottling pass brush?
I haven’t tried airbrush before(In fact I just know this technique after seeing your video).
When using base color on those colored area, I have to spray many times on a tiny spot for the obvious “blending” effect. Is that normal?
And those big dots on the top blend hardly…
Hi Outcast,
You really want to get the spray as spread out and random as possile in the early passes. You dont want to have the dots too clustered so try enlarging your draw size and reducing your RGB Intensity.
You definitely want to use the mottling pass. The best way to describe it is that the areas between the little white squiggles will retain more saturated color while the ones under the white lines will become less saturated. When you start painting on top of that it gives the skin a translucent quality. The mottling pass is a must to tie it all together (in my opinion at least).
Looking at your video it looks like you need to mix up your passes of color more. You have a lot of red and a few passes of blue and yellow isolated apart. The red is also quite patchy. Experiment with being more bold and filling out areas with large swatches of spattered color. Remember the mottling pass in conjunction with the light coat of the base color will help push everything back into the realm of believability.
Also when I watch your video it looks like you skip the mottlign pass. You really need to do this step for it to work. Think about it this way you are painting the skin from the inside out and those white squiggles represent the fibers and depth of the skin.
I hope that helps some. I hate to plug my book here but if you check out the chapter on skin painting I have this video as well as a step by step explanation of the process which may come in handy. I also reccomend looking up Jordu Schell’s airbrush painting tutorial from movie FX magazine and any articles from makeup artist magazine on painting prosthetics.
Cheers!
Scott
PS if you still have problems dont hesitate to post again or email me at [email protected].
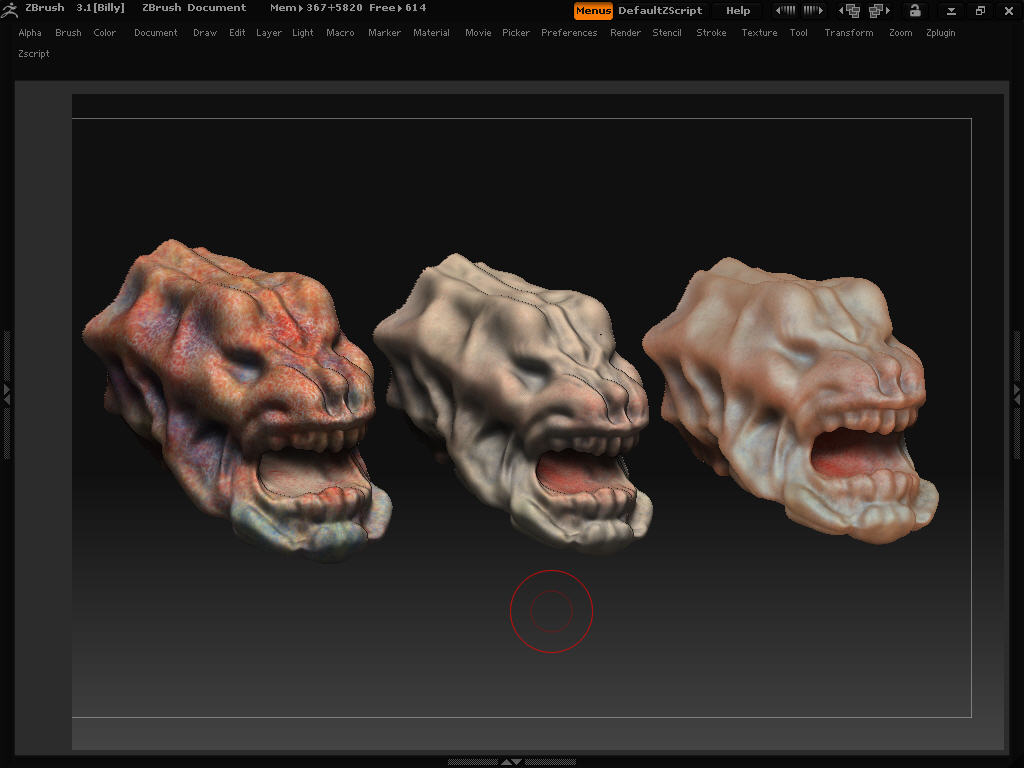
The Mottling pass is GREAT. I attached a screen capture for the result.
After washing the surface,I find the spray on it is too transparent.
I tried several “Red Spray–>Wash” on the cheek area, it stills look too transparent. Maybe I just wash it too much?? I use RGB ~8 for wash and ~25 for spray. How can I spray more red on the cheek area?
You can always spray more of any color on the head… remember this technique can be repeated multiple times on the same character to build up the paint job.
If you neeed more red on the chin just spray more red in and then mottle again or you can even try mottling the chin with red lines. I often find I need to do the color spray / mottle pass a couple times in come areas depending on how intense the colors were at the outset. If some areas look too washed out use the spatter brush on those areas again
Scott
Hi, thanks for the tutorial!
I don’t understand one thing… mmm probably two.
I’m seeing that at minute 6 the colors on the model seem to be merged togheter… so what’s happen? just changed the material?
is there a method where i can blur togheter all my color on a model?
THANKS A LOT!
If the character is green, would the mottling pass be green veins?
Do you have any examples of a full body colored this way? I’m curious also on how you near surface veins.
Hi Womball,
Unfortunately I don’t have any full body images I can show due to NDAs and such but the process is the same. When I work a full body I try and consider where and how the temperature will modulate on the body. I have seen painting manuals from the classical period that recommend a ruddy skin tone on caucasian characters around the torso that get lighter in the limbs. I have seen this rule reversed as well so work with what you like best. Personally I make hands warmer as well as the torso. This is all for a light skinned human of course the colors are the same for all skin tones just the balances between them are different. Painting skin is as vast a subject as sculpting and there are many approaches and techniques to explore. Be sure to look in places other than 3D instruction and you will come across several centuries of good information you can apply. Look at information on painting prosthetic makeups as well and airbrush magazines. I also highly recommend subscribing to amazing Figure Modeler magazine for the painting tutorials. Those apply directly to painting in ZBrush!
For an alien character with green skin I tend to use red and purple in the veins. This may not make physiological sense but I like the look. I also use a lot of yellow in a character with green skin often making my base color pass yellow and painting in blues over that with reds in teh vein area, when this mixes you get a purple cast for the veins.
For subsurface veins if I am painting them directly into the color I just use a low opacity on the brush and vary the intensity of the stroke That way stronger areas of the vein look closer to the surface of the skin than weaker ones giving it the impression of traveling shallower and deeper into the skin.
Look at the painting techniques of the artist Ron Muek he is a great example of painting hyperrealistic sillicone skins. He will paint from the back of the skin to give it translucency but by looking at the technique I believe you can take lessons to apply to CG painting.
In my new book guest artist Eric Keller writes a chapter on painting a body in a manner based on my methods here. He combines photo ref and mottling passes to great success. You may consider checking it out.
in the mean time I have a tutorial/personal project in progress that shows a full body character with paint I hope may be helpful when its done.
Cheers!
Scott
Whoa your book is out already! I need to save some money for it. I used your first one a ton.
I will have to test this out. See what works.