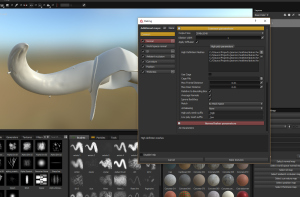
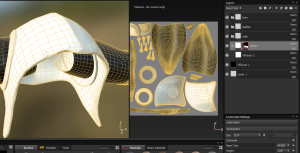
Now open Substance Painter – File and create a new Project. Select your mesh (helmet.obj) and load it. Now click on Bake Textures and let`s import our *_high.objs.
[FONT=arial]
Notice that I changed the Output size of the texture baking (usually I bake at 2k or 4k) and under *Match – I changed to By Mesh Name – This option will allow Painter to track the names and match it to bake all the maps.
I keep all the default parameters usually. I only tweak it if I have issues after baking.
[FONT=arial]Now it`s time to texture and have some fun.
I highly recommend my friends Christophe Desse Youtube channel -https://www.youtube.com/user/xtrm3d He has some great stuff. Just go there and watch it! Im sure you`ll learn a ton!
Allegorithmic guys has some great stuff as well! Highly recommended- https://www.youtube.com/channel/UC-toy9WMImypmLAiU9h_SzQ
I wanna also say thanks to my friends Corey Johnson and Adam Scott for the tips as well 
[FONT=arial]
I usually start from scratch all my materials. I like the idea of build them up but you can grab one of the presets (called materials/simple or Smart materials/complex layers) and start from that. What I usually do is to create my own Smart materials once I establish a proper look/material and use as a starting point across the other materials to keep it consistency.
If you wanna load into the same scene different objects you can. You just need to assign different materials in Maya and Substance Painter will recognize each material and assign a “Texture set” to each of them. So you can have the helmet, face, accessories, and different bakes and maps for each uv set. But I tend to find it too heavy for my machine so I like to keep things separated and simple.
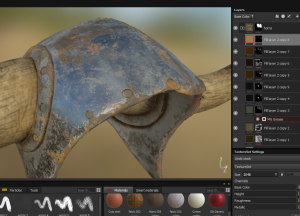
This is a simple demonstration of a quick material creation.
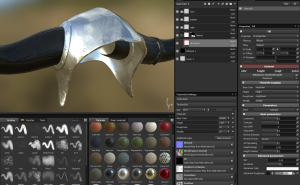
[FONT=arial]Im gonna start creating a group to separate my materials/objects. [FONT=arial] I like to create black masks for each group and then using the Geometry Decal (selecting by UV Shells) I create my white part of the mask, revealing only what I selected. You can manually paint if you want to, or if your highpoly has vertex color into it, itll automatically bake an ID map which you can use to select colors to generate masks.
To make it easier to follow, I`m gonna add a material called Aluminium. I create a fill layer and then just double click on the material I want. This material has a proper metallic value, roughness and color added to his properties. It has also some bump information, which automatically adds to the normal map. So everything you see in the viewport will be exported to its own maps.
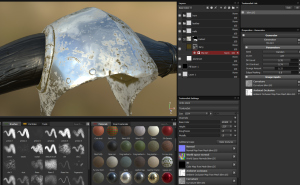
[FONT=arial]Now I wanna create some dirt on top. Add a fill layer, change color to something like dark brown. This dirt I want to be with no metallic, high roughness. And to generate this dirt, Im gonna add a black mask, and a generator. The generator will create a mask using all the maps previously baked to design and “generate” it. You can add a Paint modifier on top and tweak it as well. [FONT=arial]The great part of this process is that is super versatile because were painting masks. So we can change colors and material properties at anytime.
 !
!