ZBrushCentral

One more first WIP to clutter up the board!

Hi All,

I have a strong background in art but almost no experience in CG work. I bought ZBrush a couple of months ago and I thought it was time for me to do something with it. I started by playing around with the zspheres and got frustrated with unexpected results. Don’t laugh, someday you’ll be old and some youngster will say “You actually used a keyboard and a mouse!” I had a rare extra hour so I loaded a simple head that “nickz” has on the “Demon Head (get’em while their hot!)” thread. So far I’ve only used the “inflate tool” and nothing else. It’s just like using a paint brush only better!!! If your thinking of buying this don’t hesitate!!! I’ve never modeled and was able to do this in one hour!!! In fact I just bought LightWave to learn how. Anyway, here is the result of my first attempt. I have not added any detail yet and please ignore the ears as they are definitely a WIP. (I love all these new terms I’m learning) My only goal here was to learn to use ZBrush and I wanted to come up with a head with character and expression.
zzz head.jpg

hi Blaine,

welcome to the addiction!

If I remember correctly there should be a few zsphere head base models posted up here and there as well as a bunch of scripts to watch that show how to set them up for a head.
It takes some getting used to if you have never really done 3d before. You might find that trolling around the web for some box modelling head tutorials will help you understand zsphere setting up of a head a bit better. You will begin to “see” things in that light and then be able to apply your art background to the rest…eg…detailing etc etc.

with all things…practice practice practice

and don’t forget to have fun with it…and sleep once in a while!:smiley:

Excellent start, yeap welcome to the addiction:+1:
:slight_smile:

Welcome aboard, Blaine. A damn fine start. Don’t be afraid to try all the various tools out. Can’t wait to see more.

Dickie

Thanks for the kind remarks. I’ll post updates as I can. I plan on seeing this head through to the end as a learning experience.

Finaly had some time. Finished the ears thanks to a friend letting me photograph his. After looking at many ears I’ve discovered there is incredible diversity. I plan on tackling the eyelids and detail around the eyes next. I’ve made many mistakes along the way and learned a great deal.
eary situation.jpg

Nice definition of shape.

Thanks Zeros

looks good blaine! keep posting, and zbrushing of course :slight_smile:

Slow process as I’ve only had one day off in the last month.:frowning: 
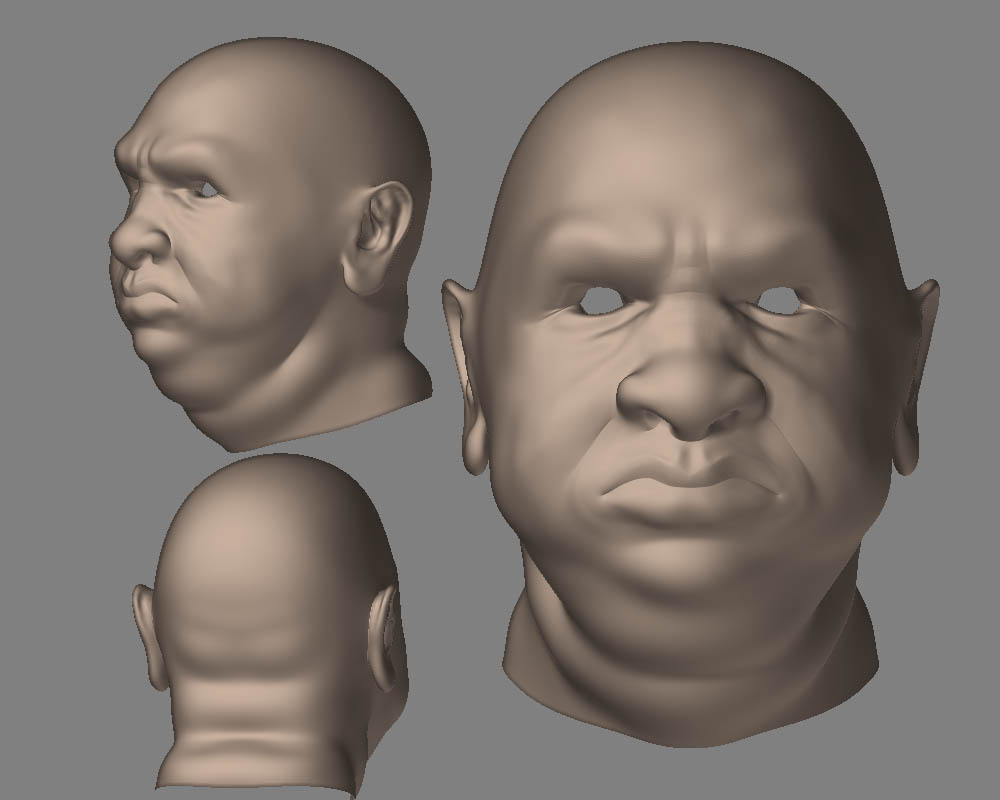
More work on the ears plus starting on detail around the eyes and started work on the expression. Still making mistakes but learning. Shown at level 6 but all detail added at level 4 or below. Needs some tweaking between the brow and the bridge of the nose. Still having lots of fun with ZBrush.:slight_smile:
headexpress1.jpg

I’m getting the hang of painting details. Easier than I expected. One problem though - when I use Projection Master to paint in fine details everything looks perfect until I pick it up - then I loose to much detail and all the work I’ve done is for nothing. I had the lips perfect in Projection Master but now I’ve lost all the detail? Is there a way that I’m missing to preserve the detail I see while in Projection Master???
lip problem.jpg

Nice job my friend! keep going with it, before long you’ll be making some crazy art!

About projection master. Make suer your model is subdivided enough times to hold all of the detail you are looking for. If you want to make a crazy amount of small details I would suggest doing it with a texture map, the bumpMaterial viewer shader and Projection master.

The head that I gave out to everyone already has UV’s that work fairly well so you don’t have to worry about that. Go into the Color chooser and pick a 50% grey color, now go into the Texture pallet and set the resolution of your map to 4096 X 2048.

Now you should see your model as a flat 50% grey color. Go to the Materials tab and load the bumpViewer material. (I always set the color bump value in the shader to around negative 5) Now go into Projection master and choose the color only option. Now when you paint with your brushes only use the colors white (for a raised surface) or black. (for a recessed surface) You can use shades of black to white as well but I usually only change the opacity or strength/intensity of my brush . Make sure you turn off the Z Intensity on your brushes. Now just about anything you paint in projection master will pick up an get baked into your texture map. (What you paint is what you get…)

Some more little ti bits of advise. Turn off the quick draw options [ hot key F] Go into your Tool pallet and go to the Display Properties. Turn up the Dsmooth to 1 turn up the Dres to something like 4 - 6 and put your ES to 0. This will make your model look like it is drawing with smooth edges without losing too much of it’s volume. (I would only suggest doing thins at the detailing stage because performance will slow down.)

Happy sculptin’

Peace,

NickZ. :stuck_out_tongue:

Thanks for the kind remarks nickz.

I could not sleep, so I decided it was time to learn to create materials. Once I figured out that I could copy and paste shaders I started having some luck. I’m getting close I think. I wanted to see how well I could do on the skin pores. I’m not sure how to accomplish translucense so I gave the shaders that allowed it around 12% transparency. What I need to figure out now is how to apply the material to the lips without the color bump??? The lips have just a touch of color added in projection master.
fat test render1.jpg

Beautiful sculpting, and the skin shader is looking very nice too. Love those expressive lips. The ear lobe looks huge, but I agree with you about the range of ear shapes out there in the real world. :+1:

Thanks Moochie,

I think your right about the lobes. I plan on reducing them a bit.

I decided to call this done so I can move on with other things. There is still plenty wrong but I need to learn more before I can deal with them.
render1.jpg

nice blaine! hey i seen dem eyes before! what did you wind up doing on the lips? texture?

That really is very good! Great progress! There ain’t much wrong with this guy, that’s for sure. Nice work, citizen.

It’s a wip so you surely already thought to it but I tell you:

Try to chose a bit more specular material for the limbs and give it a little more red color.:+1:

WANNA LOOK?

ALIEN FACE HUGGER

MattHHH:sunglasses: