ZBrushCentral

Oh NO, another head!

You too Hi Buddy! :smiley:

tried the reconstruct button, but didn’t help, it says my model contains triangles… don’t think I can do anything about it. :frowning: No, it’s the big disadvantage of the Exploring-effect; pressing buttons and seeing what they do sometimes makes things go boom. :wink:
All in all, if I had known the image would look (in my eyes) that much like a good human head I would have planned better and made more carefull saves. Then again, I would never have known I could make such a good (considering my earlier attempts) image without plunging myself in the thick of it.

I tried painting different materials on the head to give some parts more shine than others; learned that from Antropus, thanks so very very much, and maybe you can tell me if that reduces the Plakkie’s Playdoh Effect a little. :wink:
The top of the head still needed work, and when I looked at is and the total head I thought: “Maybe I should just do a hat… he looks kind of an army type… white navy hat…”
And that’s another drawback of the unplanned Exploring-mode, because OMG!!! Now I have to make a hat as well!! :ex: I don’t know if I can pull it of, but here goes, made the first attempt and we’ll see what happens…

[Hoofdmetepet4.jpg](javascript:zb_insimg(‘34069’,‘Hoofdmetepet4.jpg’,1,0))

ha I like the hat, I really like how its coming along. The skin now on the forehead, eyebrows, nose and cheeks looks really good. Very realistic looking skin, im impressed. May pester you when I finally get around to texturing skin and what not on some of what you did =P. For me if i focus only on the forehead, ears, down to the end of the cheeks it looks great. Not that the mouth looks bad or anything, but something down there still looks off to me. At first my thought process was that the distance between the mouth, chin, and nose were off. Then looking at it more it kind of feels like the spot left of the chin, where you have the darker spot that juts out more, should be pushed in and up more. Hope thats helpfull, just my thoughts when i look at it =P.

You’re making progress. I still think you might want to try drawing some guidelines over the face and see how things are looking though.

Keep at it.

It’s easy to get carried away with the details in Zbrush, and I would like to make as good an image as I can, so Bill, I’ll gladly follow your healthy advice:

[Hoofdproportion.jpg
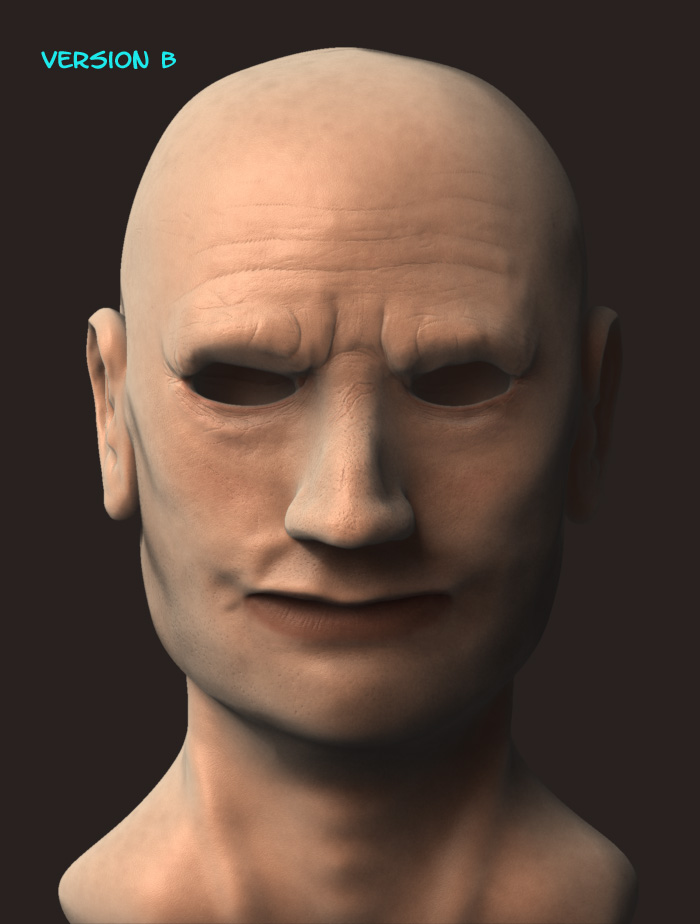
](javascript:zb_insimg(‘34081’,‘Hoofdproportion.jpg’,1,0))

Can you help me what to look for in this image? I guess you don’t use a ruler to measure out the proportions, but I’m very new to this proportion thing and I see it’s quite essential. I do see now that the eyes are not on the same place (right eye positioned more to the middle than the left). On the vertical line, I don’t know what to look for… Thanks for the help and advice so far!

Cspalak: thanks mate, glad you like those things. You are welcome to pester me when the time comes! :smiley:
You’re right about the chin… there does seem to be a lump there, I’ll look into it. I think the chin could be more pronounced and I’m not very happy about the lower borderline of the buttom lip, though I have a hard time figuring out what’s wrong with it…

Theres so much mistakes taht i dont know with to point out :stuck_out_tongue: But i think you schouldnt worry about that. Theres no way you can make a realistic head at second try without studing the anatomy of head a litlle :] I think You schould gather face references and look and the works in top row, and getas near them as you can :smiley: Your head looks better than my when i was starting :stuck_out_tongue:

Try this. Use your fingers and measure the distance of the eyes from the chin. Now move your hand up, and compare that to the distance from that center line to the top of the head, and you’ll see that the eyes are sitting quite a bit higher than they ought to be.

Another rule of thumb is that the distance between the eyes should be about the same as the width of the eye.

Man, is it that far off? I’d never have known it! I measure five of my fingers from the eyes to the chin, and four from the top of the head to the eyes. You are saying that those distances should be equal? Say… 4.5 fingers each way?
Is “eyes in the middle of the face length” a rule of thumb? According to the eyes placement on the horizontal line it seems I should place them further apart and make them just a bit smaller maybe.

Is there some place where I can find more of those thumb-rules? I know I have’nt studied facial anatomy before I started this rapidly expanding project, but I would like to learn a few guidelines to make this head the best I can make at this moment.

The tips from you more wise people (at least in facial anatomy ;)) are great, and thanks again for the time you invest to let me improve this ‘way-off-model’. :slight_smile:

Hey Buddy!

The hat! I have to admit it Plakkie, it’s pretty cool :+1: I’d like to have one :wink:
Regarding the thumb method… well, it’s just a unit of measurement, some people use eyes has a basic unit.

here’s a pretty cool link I found and it might help you :wink:

See… theory and practice or practice and theory… either way it’s fun :+1:

I prefer to think of it as just the way things are. :slight_smile: Take a look at that photo I posted earlier. Note the location of the eyes. Get photos of yourself and draw the guidelines and see. It’s especially illustrating to find frontal photos of bald guys (w/o too much perspective distort) and draw the guidelines.

Anyway, there’s lots of good stuff on drawing faces and heads. I suggest starting with here. :wink:

Keep at it man. It’s encouraging to see that you’re interested in learning, and a bit inspiring too.

Elarcano: Thanks mate! That link is just what I need! Very complete. I’ll start reading and adapt my headmodel to fit what I learn (don’t know if he will like that, 100k of poly’s moving all over his face :evil:).
It looks like I use practice to find out what theory I need. I think at this stage I’m going to reverse the process a bit.
About the hat: they are not easy to buy… if I ever find one, I’ll let you know; you know what they say about guys in uniform… :smiley:

Bill: thanks for the encouragement, and: great link, didn’t know it was out there! :lol: I’ll start drawing on my pictures and on other peoples faces. If I’m lucky I should be able to do four of them before getting arrested. :cool:

Staying at it and thanks for the kind replies!

Well, I spent some time drawing lines on faces I found in newspapers and magazines, and I must say: it’s a revelation to see that most people’s eyes are in the MIDDLE of their face, allways thought the eyes were in the upper part of a face. Just shows that you need to know what to look for and how to watch something. I guess those smileys set a bad example :).

I red the very helpfull link Elarcano send me, and applied the proportions described there to my existing model, and here is the result:

[Hoofdproportion3.jpg](javascript:zb_insimg(‘34224’,‘Hoofdproportion2b.jpg’,1,0))

It’s really fun to learn a little about this whole proportion thing, but I’m a bit confused why I like version A better than the more ‘correct’ version B. :confused:

Attachments

Hoofdproportion2b.jpg

I’m a bit confused why I like version A better than the more ‘correct’ version B

It might be because that you like that proportion more than the other one. You have to remember buddy, those are general lines, just so you don’t put the eyes where the nostril should be ;). We all have little differences that makes us look the way we do.

Remember that the proportion part comes first -before any detailing- or what I refer as “From General to particular” Proportions first, giving him your personal look, basic corrections, wrinkles, pores, etc…
But I not gonna say that everythings lost or that you should start from scratch -hell no!- Just give your B vesion some chance, play with it, move things a bit and try to achieve the look you want for the character… I’m sure you can come up with some improvements :+1:

Just one last advice… save the model with another name… if you don’t like what you’ve done to the model you can always go back to an earlier version :wink:

Lets get those ztools moving :sunglasses:

I’d say you’re making progress. The position of the ears looks like it could use work though?

It’s strange, but over the last days I’ve come to accept that humans wear their eyes in the middle of their face… :slight_smile: 
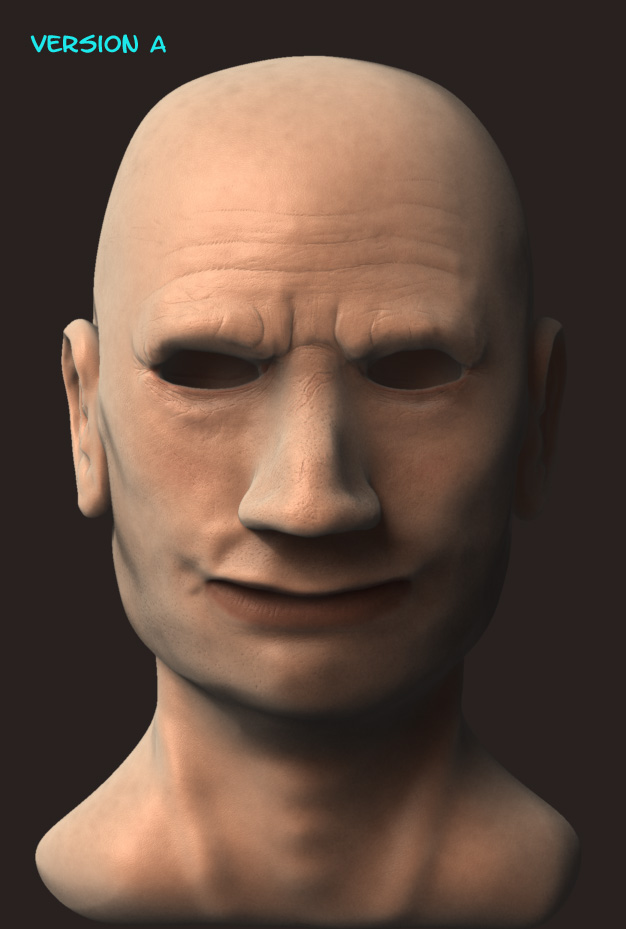
I’m now glad that I made those proportion changes. I’m contend to finish this ‘project’ in a day or so, but I would like to make that hat I started. Part of a Navy uniform. I worked on the shape a bit, and here’s how it looks now. Couple more hours work to go…

Bill: thanks for the tip, I will pull the ears out a little.
Elarcano: you’re totally right; I know that now. My next Zbrushproject will be “From General to Particular” and then we will see what happens! :smiley:

[petpoging1.jpg](javascript:zb_insimg(‘34537’,‘petpoging1.jpg’,1,0))

Work on the hat…

[petje.jpg](javascript:zb_insimg(‘34638’,‘petje.jpg’,1,0))

I decided today to be content with what I got out of this first serious head-project. This is how it finally turned out:

[FirstHead_forum.jpg](javascript:zb_insimg(‘34640’,‘FirstHead_forum.jpg’,1,0))

Over the course of this ‘project’ I learned a lot of things. The importance of planning (which I didn’t :lol:), of good polyflow (absent on this head ;)), and of the right facial anatomy and proportions (which it now has a bit… I think… if I close one eye…). Most important of all I learned that with Zbrush you can visualyze anything you want, and with relative ease. Before I bought Zbrush I’d never have thought I would one day make a visual representation of something as difficult as a face! But it wasn’t hard or impossible; it was big fun! I know the result isn’t perfect, but I also know I can improve with more practice and studying the great works of art seen so often on this forum. Nearly can’t wait to start another project!
I couldn’t have come to this result without the help of some generous souls:
Elarcano, for making me think about my present workflow.
Bill Robertson, for making me look into facial anatomy.
cspalak & psyonic, for pointing out the more ugly bits of my model to me.
Dreamreef, for supporting a fellow Newbie and laughing at his wrinkles :smiley:
Steve Warner, for learning me what polyflow is, and many other things.
Krishnamurti “Antropus” Costa, for sharing his skin detailing technique with the whole community.

Thanks a lot you guys, and thanks for Zbrush and the ZCentral community!

Hey, and you deserve a lot of credit too, because you have been very receptive to people’s comments, and that can be difficult.

It’s kind of weird. After awhile you start looking at people in entirely different ways.

Yes, I noticed that too… I looked at one of my friends the other day and thought: “Did his face allways look like that??” Same with music: know more about it end you will hear more in it.

hi, watching the images from the beginning of the thread and from the end there’s a lot of improvement. You modeled the ear very well, and I like the skin detail a lot. Pores and wrinkles look very realistic. However I think you should observe proportions and forms more carefully. I’ve made my first head a few days ago http://www.zbrushcentral.com/zbc/showthread.php?t=73997 . I’m not saying it’s better than yours:) I just want say that at this stage, you should try to model some parts of the head separately, I mean - focus on them and on them only. While doing it try to maintain similiar polycount. Maybe some will say that this is bad what I’m saying but I found it helpful. I’ve modeled lips and nose separately and after connecting them to the rest of the head I changed the topology a little bit so that the mesh looked better. But after all your head looks quite good. Keep working on it! And don’t look for any tutorials, observation and a mirror is the best tutorial.