ZBrushCentral

Obachan

obatcha3.JPG

Hi, this is the old lady I’ve been working on for the past hours…My first serious attempt at Zbrush 3d modeling/sculpting…I got to say that I really love this prog, anyhow this is far from done, thougt…It will never be done…cus as I was saving the file…Zbrush died…and I lost it…Eventhought I had just played forth this model I was kinda fond of how it was turning out. and well I just wanned to show it to some one so…here it is…To me it’s kinda worth griving a bit for probably cus it’s mine, but with this post Im looking for critik and stuff, tips (not the one about how you should be saving every 10 minute; I know that one >.>) stuff that can help me evolve, and make better charakers…this is the only pic I’ve got…so I guess It’ll be kinda hard to judge from only a side view…But I’ll be glad if you gave it a try and left a coment on what you thought.

Thx ^^

  • Obachan- means Granny or old lady in japanese I think.*

Well done m8, keep it up, zbrush only gets better and more fun.

Dont be discouraged of lack of replys. I think the ZB community has be so desensitized to such astounding works for such a long time that our eyes are spoiled by the masters.

Always get a front screen shot as well as the side and work on the form way before thinking of any detail.

Use the Optimize slider In tools/Geomatry /optimize to make the base mesh with lower sub devisions this wil make things far easyer.

After getting your basic form, better take a look at the wire frame and see where you can improove it. If your building the head from a spheare3d then make sure you create a edge loop for the areas that require it, Eyes, Ears, Mouth and nose. Get plently of pictures or take some pictures of your self and family to use as a reference.

To others that have not got a replys at all and are reading this, keep making art and posting it, spend some time to study what your about to make and have loads of fun doing it. :smiley:

Yeah I agree, it does only get better thought right now I’m having problems with multimesh or what its called, trying to do some eye’s on a new project character of mine. Hopefully I’ll get the hang of it, there are a lot of tutorials for it out there, I think.

I haven’t been here long but, maybe it’s true, I don’t know, thought I have indeed seen a lot of splendid work on display here.

Humm anyhow, do you know how you use the Optimize slider on meshes that aren’t base? Cus it does not show up on some tools. I’m trying to diminish my poly-count on a mesh/tool and I can’t figure out how. Maybe I should post a thread on that…umm.

Thanks for your reply and the tips, I truly appreciate it! :smiley:

I should have mentioned that the optimize only shows when using the primitives.

First Draw your sphear3d onto the canvas and press the T key directly after.

Go to the tools menu and expand the geomatry menu by clicking on it once and move the optimize slider up. Each time you move it it brings down the sub division levels. Move the slider up 3 times then press, make poly mesh 3d button also located in the tools menu. This will put you base sphear in the tools.

When you open the tools your see your new sphear in the bottom tray. This looks like the first one but its not. This version when sellected and drawed onto the canvas will alow you to move up and down sub division leves using the ctrl +D to devide and shift + D to move back down the levels that you had just devided. When you draw a new tool into the canvas is will ask to switch, select yes, your also want to clear the canvas at this point by prssing ctrl + n or go into the layers menu and sellect clear.

Does that work in reverse to?
Can you make a polymesh3d in to a sphere3d an then lessen the polygon count with the optimize slide?

Once you make a primitive sphear3d into a polymesh and use that sphear, you can devide using ctrl + D and go back down your devision levels using the shift + D key. Your best to set it to a lower sub devision with the optimize before creating a polymesh out of it but somtimes the reconstruct button in Tools/geomatry will give you a lower level when your working with a polymesh.

If you find that you made a primitive with sub D level too low and already had made it into a polymesh just devide it once and go to that level and press (delete Lower) button, this will then alow you to make edge loops in the level that your require as edge loops only work at the lowest level.

Im afriaid I’ve done the opposite, I made it to high…my lowest sub d lvl level are at 1278 poly, I don’t know if thats low or high I know it’s not that high but I would still want it to be less. But so There is no way I could lessen the poly count on the lowest sub d lvl?

oh and I could not find the reconstruct button. :S

Go into the zscript menu and load this file up.

Heres a very quick head usng the method I has mentioned. Set the replay delay high enougth so you can see what im doing.

PS: Your have to click your mouse to move on to each section.

Other than the method on that zscript I wouldnt have the end points of that sphear showing at the ear ends.

I personaly would prefer to make a head with zsphears if I had to use zbrush.

The followng script is a quick demo of making a head with zsphears. Note your see me taking more time moving vercities than sculpturing, this is the way I recomend you do it. I didnt have alot of time to do it so please forgive the look and quality of him lol.

Whoo! Zscripts! you are really devoted, those a always a great help, Thx. thought was the second one suppose to be a zscript as well? cus I could only find a .txt file when downloading it.

quick (maybe stupid) question; edge loops? what are those good for? What do they do?

Anyway Thx a lot m8 you are really helpfull :smiley:

Never mind my earlier question, I pressed ctrl while hovering over the edge loop button and found out…err…I just found out you could do that…^^* that was niffy.

Anyhow this is what Im working on now, (points to pic) I wanted a really low base, and all the detail to become maps that I could apply later, I heard it would work. anyway as you can see it’s on its lowest sub d lvl, and to me it’s still to many polys, you mentioned a reconstruct button in Tools/geomatry I found it, thouhgt it was Unable to reconstruct a lower sub dvision lvl, I was hoping it might help me diminish the polys, thouhgt I guess I was out of luck. Oh well, we live and learn, thx for the help, I just have to think about making it lower from the start next time, with the method you showed, :slight_smile: though then I would have to get a hang on those edge loops. Anyway thx a again :smiley:

[attach=51381]err.JPG[/attach]

Attachments

err.JPG

The text files and .zsc are zscripts. Just load the text file into the via the zscript menu.

At the bottom of the screen your see a play button press it and away your mouse will go making a head. It will stop while showing you about the tools im using so you can read it, you can skip these pauses by pressing any key other than esc.

The second script is using the Zsphear method which is more comonly used.

As far as edge loops go they give you extra edges in a loop. Typical, around the eyes, mouth, ears nose. These edge loops give you extra detail in these areas without having to devide your whole head too many times. Not only does the edge loops give you more polygons in these araes but they greatly help you form the shape.

In the picture below you see that the marked areas are edge looped. your see that because I moved points into place at a very low polygone level that just deviding the mesh gives you some great results before you even start sculpturing.

edge copy.jpg

Yay finely got the second one to work, the .zsc file didn’t want to appear before. anyway jikes that was long :stuck_out_tongue: 
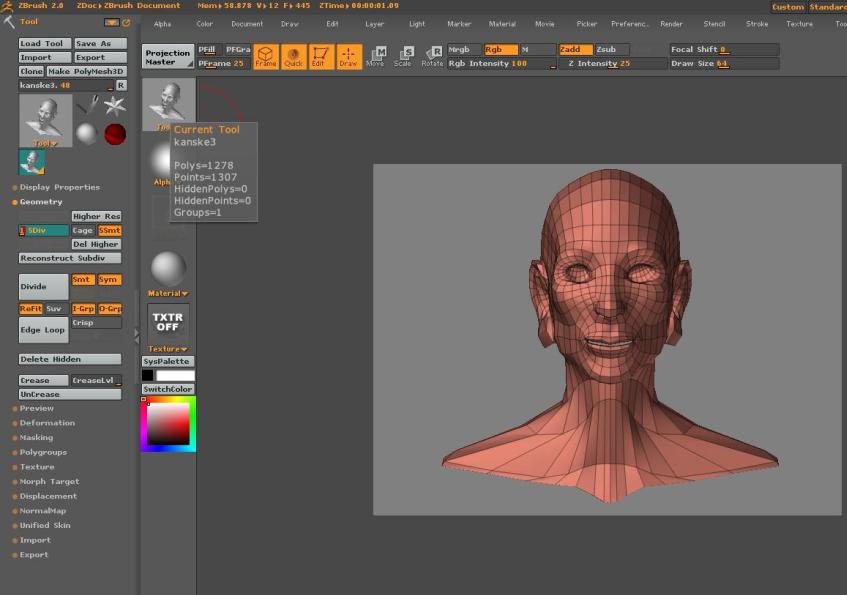
and good, I think I start to get how the edge loops are working which is fun…thought I think making stuff with zsphears are a bit to complicated for me at the moment, I’ll keep to doing the base in blender for a while ^^

There is nothing wrong with the quality of the guy, m8 ^^ and he looks happy which nice :slight_smile: just one thing that bothered me, the ears are to high up; they usually align with the highest point of the eyes and the lowest point of the nose. but you probably knew that.

Cheers! :smiley:

:smiley: Yea, I have writen a small post a while back in the forums on placment and alignment for anatomy. I did carry on playing with that base mesh and make it into somthink and bit better than it started as. Your second one looks much better.

:smiley: