ZBrushCentral

Now What?

Hey guys. This is my first post and i’m not sure if this is the right section to post in, but…I am very new to ZBrush, but not new to 3D/Graphic Design/Motion Design…
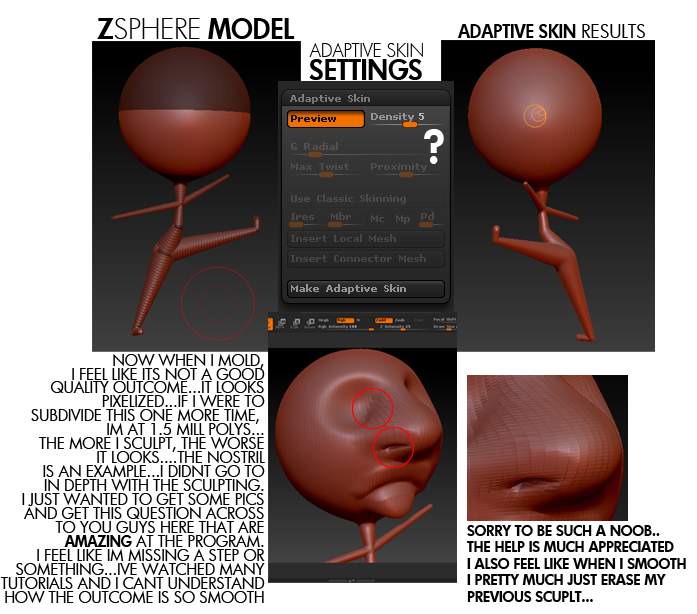
Ive watched the ZClassroom videos and they have helped ALOT!! My brain is hurting I learned so much lol…Ive stumbled across a problem…this picture should get my question across…
[attach=201787]zphere.jpg[/attach]

the first model i made in ZBrush was a similar start to this, but i went more in depth in my sculpting (learning the brushes n tools)…i turned it into a cartoonish grandmother type figure (long chin/ponytail and even some alright looking hair)…and thats when i first encountered the problem that my model wasnt looking as smooth as i wanted…even after subdividing it wasnt looking like your models i see around here (very very very impressive)…

i hope i can get some help and get this figured out soon. i cant wait to add some work to the boards!! i know once i get it down my creative mind and sufficiency in other programs will create some AMAZING work!! Thanks guys!!

Attachments

zphere.jpg

I would suggest you leave your adaptive skin density @ 1 when you generate it. The you would subdivide it up to 1.5 mil poly count, or whatever you like. You’ll get distortion because of bad edgeflow, which you can retopologize later in zbrush. You should work from the lowest sub level to the highest, this allows you to keep it gesturalin the early stages. Also, if you have detail that you like at a higher level, but want to smooth the nostrils for example, step down a division level or two and smooth it then move up to see your results. Also, hold shift, you’ll notice your brush palette shows the smooth brush is now active. While holding shift change your zintensity and it will only effect the smooth brush, this should help the smooth brushing be less destructive.

JWilliams, first of all, i love that simple posed figure.complete it.also welcome to zcentral.
only solution to your unsmooth model is to subdivide it further.:wink:
mainly its because if you start from zsphere, start from low density,also sculpt from low subdivision level and increase on its way to higher subdivision.this will help you to get more edges on nose.since nose is extended out from sphere.
Other solution is to retopologies model after getting basic shape,but i think its not necessary since this is a single small model.
all you see clean model here is all having high subdivision model,also some are retopologized.usually i go upto 6 or 7 subdivision level since my system is old.Great works here are result of hard work.may this helps you.and learn well.best of luck.thanks

thanks so much! i will try the advice you’ve given…
i can not wait to get this program down!!
thanks again!

Since this isnt clay, but polygons, good topology is the essence. There is no reason to bump the subdivitions higher than necessary. With good topology you need less subdivitions, and makes it easier for your system to handle.

I usually like to sculpt as far as I can without retopologize, and when I cant do further, I retopologize before I finish the final details. Some make their mesh in another program with good topology from the start and imports it. There are also those who dont care about the topology, but since the topology tools inside of ZBrush are so easy to use, I dont see why not to.

As phakscion mentioned, start on subd 1, and when you cant sqeeze more detail out, jump to subd 2. Jumping to subd 5-6 before you’ve made the big shapes is like working with wet clay, and that doesnt help much.

i just watched a youtube video ( http://www.youtube.com/watch?v=gUXFfDyR8Vw )

and i saw he was sculpting on a pretty high poly model…
after watching this video, i played around with sculpting and got this…

scientist.jpg

however, this is already 2.3 MILLION polys and i feel like that is waaaaay too many and i only sculpted on the head…
im not really familiar with topology so i am going to do some research on that now…(im guessing its just making sure all the faces are normal)

i did seem to like smoothing in a lower subdivision but i feel as if you get better outcomes sculpting in a higher poly model…(i did most of my sculpting in around 135,000 poly subdivision)

if i drop down subdivisions after i finish you can barely tell the facial details or what the face even would look like so i dont see how i could sculpt in that mode (unless i am misunderstanding, which im sure i am lol)

THANKYOU SO MUCH FOR THE HELP THO! I really appreciate taking the time to reply to help a noob such as myself!

ps…before i made that image i found the RENDER BEST option in zbrush…cool feature

JWilliams,may be you can use the higher subdiv as a starting level.but i highly recommend that you should start from low.for example:for sculpting the human body,i think you cannot do the muscle form in higher subdivision with ease.lool at that model you shown,it only pushing and pulling and looks almost like a soft material.I am sure after you start some sculpting you will then start from low subd

NOTE:the hard surface modelling brushes are something differenr which use the higher subd level to get finished stuff
NOTE 2:i think there is now need of such higher polygon number for that head if you start sculpting from low subd
you can see my works,i have no model that exceeds 4 million i think,since my PC cant wittstand.
thanks

yes i looked at your portfolio when you first replied…VERY impressed…
very realistic…exactly the look im going for…

i played around with another model and understood more of the sculpting at a lower model…im thinking i should learn more about this topology stuff after doing some research…
scientist.jpg

i stumbled across another problem of when i saved my zbrush file…i reloaded it but it only opened as a document and i couldnt sculpt on it any longer…(super noob)

i know my models are terrible and take hardly any talent or planning lol…im mainly getting used to the interface, this is only my second day on ZBrush…im stuck between learning to model on this and 3dsmax…i love them both…

i also thankyou again for your replies and help!

if you ever need any Photoshop or After Effects help let me know! :lol: im pretty darn good with those two…3d is my new thing…

  1. In order to save your model you’ll want to save Tool from the tool menu. If you save the document it stores a flattened image of you model, as you found this is unsculptable. You greatest asset with zbrush or any other program if you’re pursuing character modeling will be knowledge of anatomy. There are some greath resources here on zbc as well as topology reference. You CAN start a model out at a high poly level, but as you’re new to this it will be easy for you to lose sight of the general forms and shapes of your model. Sculpting low poly allows to see the rough outline of your character, beware of jumping into the details, its tempting but should be resisted. A full character model is usually around 1-3 million polys, most artists will the generate a displacement and normal map and slap it on a much lower poly model to increase render times and system performance. The aliasing in zbrush can be overcome easily. Create a new document, under the document tab click double near the document resolution. Select your model and drag it in the viewport, on the right there is a verticle toolbar. Click AA-Half. We doubled the doc size then we shrank it back to normal, but its now anti-aliased. Notice your drop in system performance, use only for renders.

Also, topology is important not only for undistorted details, but also for proper deformation during animation when/if you rig your character. Bad topology is useless to a rigger and animator, its just a pretty statue.

thanks guys…great community