this is about 3 weeks that i’m experimenting “3.5”, and so far, I feel grate about it…
However, I’m getting a problem that I never met with “3.1”! My “normal map uv seames” are no more smothed… and I tryed every possible parameters or mapping uvs “modes”, sizes…
I’m asking myself if this is related to the HD subdivision use, or if this is a commun for many 3.5 users (?).
So here I’m asking you to help me see more clear, as i didn’t found any thread covering this case on this forum.
I’m going to hazard a guess that this is a tangent map rather than an object space map. The math behind tangent maps (which is not unique to ZBrush) is that the normals get flipped whenever you cross a UV seam. This means that if you’re going to be using such maps, you need do your best to hide the seams.
Thanks aurick… but how come that I never faced this case with dozens of models made before, using 3.1(?)… and fiew others, donne with 3.5(?).
In Z mapper,we can face the same situation if we choose, not to smooth uv seames, so I don’t beleive that this could be a flipping matter…
aurick,
I checke the the model, after having deconstucted a hi res one, inside 3.1.
so in z mapper, it seams that actaly this is flipping problem and you are write.
I’m also having very obvious and dramatic seems with Normal Maps created in Zbrush v3.5r2. I have been searching the forums to see if there is a resolution to the problem… But haven’t found a thread that offers a solution (or workaround). Perhaps I haven’t entered the right combination of keywords in the search criteria. I apologize in advanced if there is a thread that already addresses this issue. If someone would be kind enough to post a link that would be greatly appreciated
I have seen some members advise that one’s UV seams should be hidden. I have done my best to hide the UV seams, but it’s not possible to hide all of your seams unless you are only rendering a still image from one angle. Realistically, the UV seams will be visible in models that are animated or brought into a real-time engine. Therefore, I’d like to ensure that the seams are as inconspicuous as possible. Currently the seams have a high amount of contract. Any help is greatly appreciated.
Thanks for the quick reply goast! I do have some experience and understanding of how normal maps are rendered in an engine. I actually wrote some basic HLSL directX shaders for rendering normal maps in my engine.
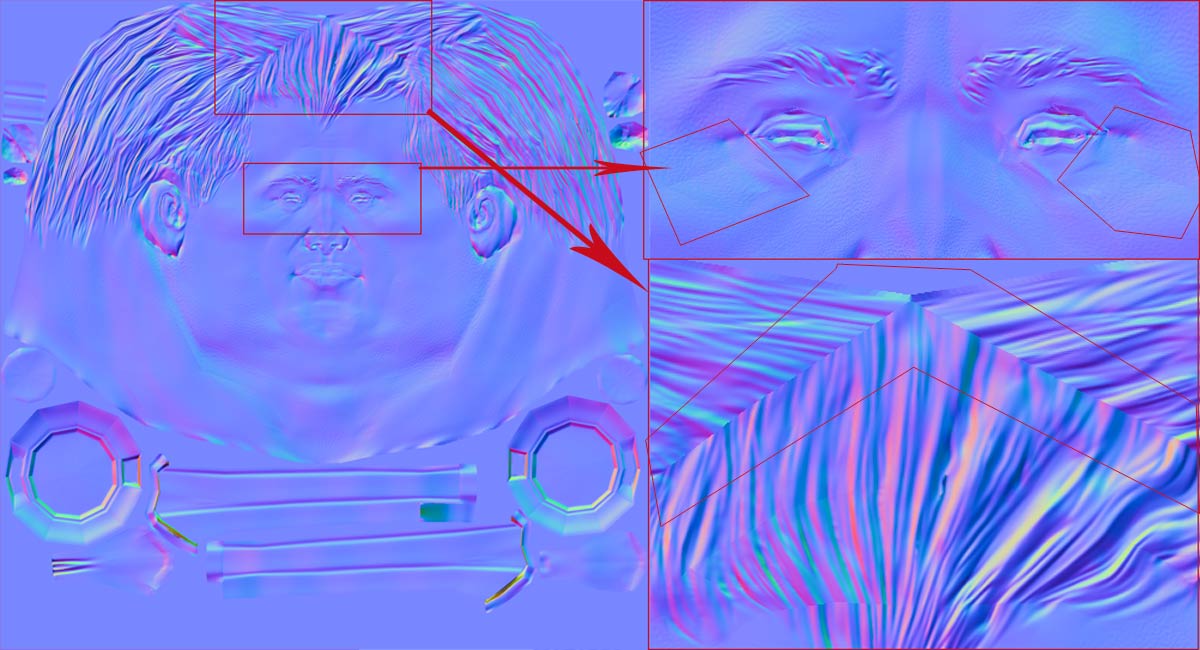
I have attached a couple of images of the seam. The first image is from ZBrush, the second is from a normal generated from 3ds Max using projection mapping.
…
I seem to have resolved my own issue. I will post it here for posterity’s sake. The green channel needs to be flipped in order to render the normal maps correctly in 3ds Max.
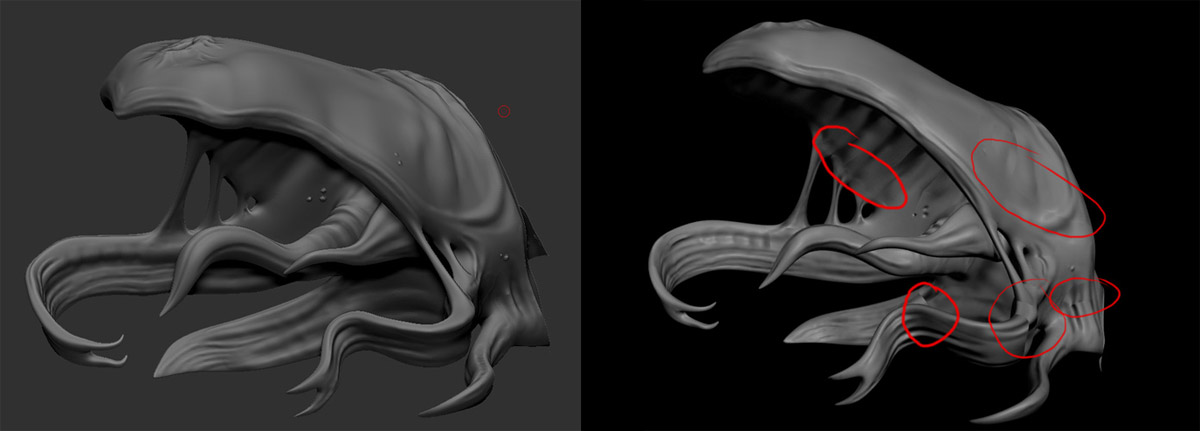
Ok guys , it’s understood to have seams like you had when your uv’s shelves are flipped (inverted normals) but what’ s going on if you have seams like I do inside your mesh ,where you have no seams at all.See here what i mean: http://www.zbrushcentral.com/showthread.php?t=77095
And again , i never had this problem with Zmapper but i have it now with Zb 3.5 native tangent normal map generation.
For God sake, is impossible to generate Normal map with a high mesh over 2-3 million poly in Maya, so we need a far more capable Normal map generator with options and stuff like Zmapper was inside Zbrush ( by the way , what if i want to project the normal map from a subtool to another, but i want Zbrush to keep my chosen form not to project volume on it and automatically deform it ?Ex: to project a sphere on a cube as Normal map but without Zbrush to actually affect my cube’s real form , but if you project the subdivisions , you automatically end up with a sferelike deformed cube …this actually was possible in ZMapper) .
Hello TigerTiger, Do you have any kind of smoothing applied to your model (i.e. Smoothing Groups or a smoothing modifier)? From the images in your other post, it looks somewhat similar to some of my models when I don’t apply any smoothing to my models prior to rendering.
As for rendering your Normal Maps in Maya, I don’t know much about Maya but there might be something similar to ProOptimizer in 3ds Max which will reduce the polycount of your high-res mesh into something more manageable (very similar to the Decimation Master plug-in for ZBrush).
Hello Emat3d, the images you've seen are from 3dsmax...How you gonna use ProOptimizer with a mesh let's say like 4 million poly in max when max crashes with only 1 million ?If you need to project some pores,wrinkles,etc you won't be able to.
About the smoothing groups...there are no multiple smoothing groups ...the polygons are assigned to smoothing group 1..that means the mesh is smooth. on the other hand, you can see the problem inside the Normal map ,those edges are there, in the map.Something tells me that Zbrush manage to split my uv's after i imported the mesh inside the program...or I don't no what else can be.
I have been able to import models that were just over 2 million polys. And you are probably right, Max won’t be able to import a model with 4 million polys without running out of memory (at least for 32 bit systems).
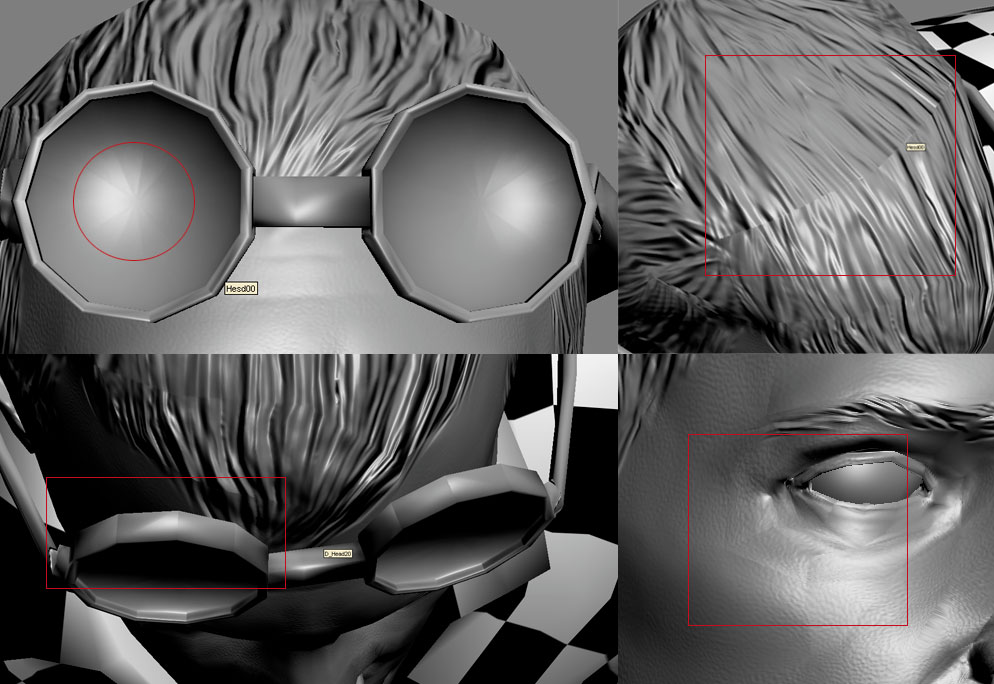
Is your base mesh very low-poly? And are the seams appearing where the base mesh has edges?
Well man,this is how my normal map looks,I assure you everything is ok with the UVs. The so called seams appear absolutely random ,I can’t make a connection with anything at all…looks like the uvs are split in that area , but it’s not the case, I verified and everything is just fine.When I import the obj in Zbrush on top of the first subdivision ,just for getting the uv’s i want , probably Zbrush splits for i don’'t know what reason , the UV’s in that area…just probably.If anybody has the same problem just tell me, I want to figure out what’s really happening.
[]
Do you mind posting up your ztl and obj file? I have some time today to fiddle with your model to see if I can get a better result. I will most likely run into the same problem your experiencing at some point, so I don’t mind going thru this exercise now.
The only thing I see that may be the problem is if you guys didn’t select Smooth UV in the Normal Map window. I always have Tangent, Adaptive, and SmoothUV selected and it works fine for me. Without the SmoothUV selected I get those harsh sharp breaks in my normal maps.
Thanks man ,I tried Adaptive and Smooth UV on ,but the same result… And is not the only head i get this with, maybe it has something to do with the fact i am using 3.1 old tools and working or starting over them.I also have a strange bug with the perspective field of view , and is more obvious when I turn on Draw>Align to Object( the head is really distorted and deformed).This is not happening with new from scratch 3.5 tools.
Hey Emat,I can’t share the model because is company stuff…thank you anyway.
Hi Redonix, The SmoothUV option is on by default. The issue I was having was the Green channel needed to be flipped to properly render in 3ds Max so my problem is resolved. It seams (pun intended) that TigerTiger has a different problem.
Hi TigerTiger, no worries if you can’t post your model. If you run into this problem with any of your personal models, I’ll still be happy to take a crack at it.
This issue happens quite a lot.Normally if your making concept sketches or sculpts smoothing UV’s or using Auvtiles is not a big issue.You can always finish a sculpture and then transfer its contents to another file or re paste uv’s.
The tigertiger 's problem is however is related to game models (low poly).
On these types of models you cant and should not smooth uvs, because smoothing uvs shrinks the uvs and its texture space cover and there for will reduce the texture quality, besides you spend time to work the uvs and organiz it so they are neat and tidy and conserve space (you might be using mirroring or overlapping) .
So whats the solution ?
actually theres 2 but transfering an already finished model so those seams disappear is another process ill try to cover that too.So these solutions are for when you start from a clean project.Lets say a Basic mesh from max/maya/xsi with uv’s ready and cleaned. (*overlapping uvs should me moved in U or V space 1 unit from the original position.)
*(use search button if you dont know this.)
The Smoother way
1a)You import your model and start editing.Now before you start to subdivide it deselect “Smooth” and “SUV” in the geometry tab. (Smooth Uv/it should be deselected from default i think)"
Now subdivide it as you wish until you re satisfied or until you reach around 1m polys.This should get you around 7-9 subdivision levels (depending on the the base mesh).As you can see not like it normally happens your subdivided mesh is not smooth or polished but faceted smoothly.If you check your uv map now you will see they will protect their exact shape and borders.
But you have another problem now. because we subdivided the mesh so much the edges on the original mesh have become very strong and are actually sculpt information.This is not a problem if your making a hard edge model but what if your making a smooth organic one ?
Now we need to clean these lines or if not done properly they will leave marks in the normal map or displacement map which will be hard to clean on simple sculpts or impossible to clean on HD sculpts . go to the half sub division level of your highest level (for example you have 8 levels goto the 4 th subdivision level) .
1b) From the materials choose “Bump Shader Material”.We choose this because it shows sculpt details very nice.Some fancy materials are good to look at but they can hide small surface information which is crucial for cleaning edge lines.This is important.
1c) This following step can be ignored if you think your base mesh is complicated and needs special attention; its optional.
Goto “Deformation” Tab and on it find polish (leave the small circular button open you can press ctrl and learn what it does and pull polish to right of the slider to 100.Now Zbrush will automatically smoothen out your mesh a little bit.
1d) Now on the draw mode press shift and enter smooth mode press “b” or goto brushes and while still holding shift press “Smooth Subdivide” brush (you will get a warning brush message ignore it) now when you press shift again you can see on the brush thumbnail that your brush is now not “Smooth” but “Smooth Subdivide” it will stay that way until you change it or close zbrush.
1e) Now with “Smooth Subdivide” selected and on your 4th subdivison level start smoothing the sculpture slowly you can use polyframe to see those edges and pay close attention if you like.
optionally if you re in a hurry you can zoom out a little and increase your brush size and cover a huge area.
1f ) Now after you cleaned your mesh move to the next level and etc etc.
after cleaning your initial subdivison level (4th level) you can sculpt and clean as you move along or you can clean it throughly and and when reached to the last level you can then start you sculpting process i.
1g ) I presume you did what i recommended so heres another recommendation before you start indulging you self in the time consuming process of sculpting, polypainting etc.Export a normal map or displacement map on 2048x2048 texture size wih NO “SMOOTH UV”.Export those maps and open them on photoshop or what ever program you use. And look at the surface of the maps and see if you see any edge lines or something similar.Alternately you can transfer the map to you 3d program and use it with realtime shaders or take couple of qucik renders, with no sculpting details there you can spot those lines fairly quickly. and smooth them out in Zbrush if necessary.
1h ) Take a break. Ok, we are almost there.The last part is easy.
1i ) These last steps are for when after you have given your sculpture some shape and details.The HD (High Definition) sculpture is a must for successful
normalmaps and displacement maps exported from Zbrush. Ofcourse you can always use decimation master and use xnormal or projection mapping.But why bother when you can do much better with 1 click of a button.Here is the thing
if your not short on time use HD sculpting.It will improve your maps greatly.
if your short on time or your machine is having a hard time in HD sculpting move to the last step.
1j) Set your texture size to at least 4096x4096 I have tested this myself a lot
and can say with confidence that Zbrush works better with high resoultions.if you can export big maps use 8192x8192.The idea is to give Zbrush enough texture space to work with then reduce the texture space to your liking.Scaling a high resolution map to a smaller one in photoshop will protect so much details then exporting a native resolution map.Warning: Working with HD sculpted models with super high resoultions can cause stress on the machine save your sculpt before you attempt HD sculpting and and before you attempt high resolution mapping.4096 is an enough resolution for almost anything so on most machines there shouldnt be any problems.
OK finally WHEN YOU EXPORT DESELECT “SMOOTH UV”.
OK thats it , now you should have a clean normal map with uber details and no smooth uv borders.In my oppinion this is the best and clean way to go.yes it might take a little longer but after you have done this a couple of times trust me it will take no extra time.Now lets come to the second way.
Smooth me a little Baby ! Way
2a) You import your low poly model and enter edit mode.On geometry tab deselect Smooth and SUV. subdivide it until you reach 8000-10000 polys.
Now here is the trick, goto geometry tab and TURN ON SMOOTH and SUV
and work your way up to your highest subdivison.
2b) Continue the steps mentioned above and When you export your maps you can select Smooth UV. Your uv maps will get smoothened out but not so crudely, I still recommend the first way but if you dont mind smoothed uvs you can use this too.Of course since you UVs are smoothened you might want to export subdivison level 1 and use that as your base mesh.
Q: What if I spent a day making a polypainted Sculpt and want to get good normal maps ?
A: Re import your original base mesh choose the 1 st way or the 2nd(smoothuv), then subdivide your mesh until it has the same number of subdivisons and polygons.Now Save this as “Mysculpt_clean_uv.ztl”. Open your old finished sculpt.Switch back to “Mysculpt_clean_uv.ztl” and goto subtool pallete.Click on append and choose your old finished sculpt from the list.Make sure your on the highest sub divison on both sculpts and both of them are visible.then choose “Project all” and your old high poly mesh sculpt details will be transfered to your new mesh with no smooth uvs.When you export maps make sure you use NO “SMOOTHUV” for the 1st way and smoothuvs for the 2nd way.
About the polypaint I never tryed to transfer polypaint , And dont know Zbrush can do this ? However you can import you polypaint as a diffuse map in zbrush and use that as a texture for you new clean uv model and the goto polypaint and choose “polypaint from texture”. You can repaint the part with seam artifacts or gaps.This is the easiest way i know.
Ps:I use Zbrsh at work and I was at home while writing this , so dont have a zbrush to check things.I might have misspelled the button names , if thats the case sorry.Feel free to make corrections


 ]
]