ZBrushCentral

Normal map problems

Hi all,

First post to this forum, great to be here. First a big thumbs up :+1: to all the good stuff I have seen here and to ZBrush which I think is a pretty amazing app. I’ll not waste too much of your time as this post will be lengthy enough so I’ll save the rest of the praise for upcoming posts :).

On to my problem and the reason I am writing. Quick rundown: I am making characters for a game engine. Model and UVs in Maya, pop it into ZBrush, sculpt, generate normal maps. Easy as pie. But I have some problems with the results of the normal map.

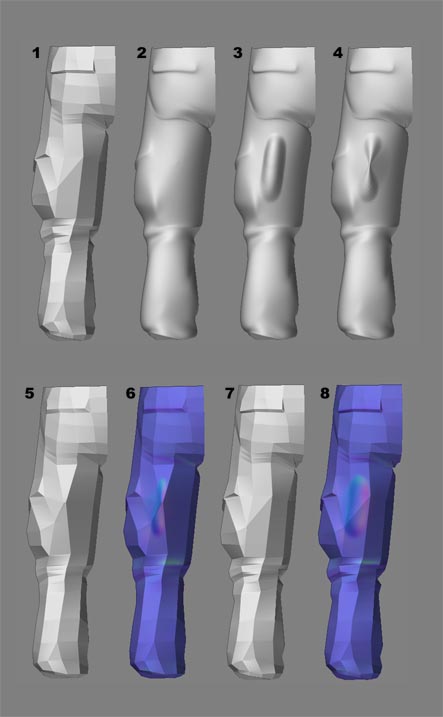
The way sculpting changes the underlying lowpoly mesh is a bit of a problem for me. I have modelled the body carefully in Maya and would rather keep the same mesh if I can. But my from-out-of-ZBrush normal map fits the edited mesh in ZBrush, not my original mesh. When I did the head for the character I re-exported the deformed mesh from ZBrush again and that was fine because the deformation was smaller and the denser topology of the head could handle the way it had been pushed around. In sculpting the body the deformation is too great on the lower res object. Ideally I want to keep the same original mesh or with very small changes.

One way to counter this is to re-import the original mesh after sculpting, but because this affects the overlaying levels, it alters the high-res into something I dont want.

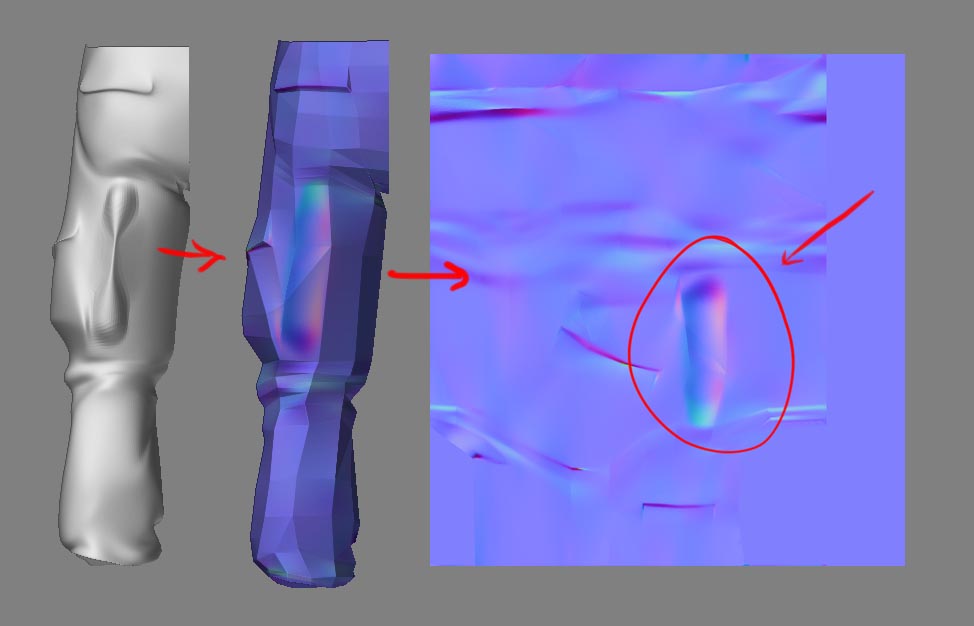
The other way is to avoid sculpting techniques that cause too much deformation at lo res. Pinching and nudging shifts the surface “sideways” (as opposed to “outwards” or in the direction of the normal or whatever you want to call it). This leaves the low poly mesh in a bit of a mess. But excluding those tricks leaves the sculpting bit quite crippled.

I hope I managed to explain the problem. Any help on this would be greatly appreciated. By now I have tried so much sculpting gymnastics and map generation settings I am about to go bonkers on this one.

Actually, the way that multi-resolution subdivision editing works is that changes made to a given subdivision level do not affect the other levels until you change levels. This means that after you have sculpted your high resolution mesh, you can go to Level 1, save your ZTL or store a morph target, and then import your original model to use for calculating the normal map. The high resolution details will remain EXACTLY what you sculpted, and will only change if you then change levels again.

You save the ZTL or store the morph target before importing your original mesh again so that you can return to the higher levels later if you need to continue sculpting them. If you saved the model, you would just load it again (effectively undoing the fact that you imported your original mesh). If you stored a morph target, life is even easier because you just switch to the target before returning to your higher levels. Later, you can return to level 1 and switch morph targets again to return back to the original unsmoothed mesh.

If you continue to have trouble with your normal maps, be sure to watch for the release of ZMapper. This plugin is going to make normal map generation a dream, and even give you OpenGL renders of your normal-mapped model directly within ZBrush.

I made a test on this workflow but I’m not making much progress. I wonder if I did it right. I took some snapshots.

  1. This is my original mesh (it’s the rear view of a leg).
  2. Subdivided
  3. Adding a brush stroke.
  4. Pinching.
  5. Switching to level 1, this has been pinched too.
  6. Generating the normal map now looks OK, the pinched stroke seems to match the high res version. But I don’t want this change at level 1. I store this in a MT just to preserve the high level sculpting.
  7. Time to fix the lo-res leg. I re-import my .obj leg to generate the normal map again.
  8. … but alas, I don’t get the pinching this time.

How do I keep the original topology (1) and get a normal map for it that looks like the wrinkle in leg No. 4?

On a side note: I tried switching the Tool->NormalMap->SmoothUV because I thought it might be the cause of the problem but it looks basically the same. In this example I had it switched on.

Attachments

normalmap_distortion.JPG

Using Maya, render the the model in step 6 using the normal map made in step 7. Then render the model in step 7 using the normal map made in step 8. In Theory, when you render them in Maya they should bould look exactly the same with the wrinkle showing. But based on the image you sent, its hard to tell what the different normal maps are doing unless you render it.

Long

Long Phan: Thanks for replying. Well first of all I’m not using Maya for rendering but a realtime game engine but actually that’s not the issue. Regardless of the renderer I need the proper mesh and normal map to render and that would (hopefully) yield the same result at render time. :smiley:

And then I think I lost you there… did you really mean model+map of step 6+7 and 7+8? I think you mean 5+6 and 7+8 because that makes sense when you refer to what model to use and in which step the map for it is made.

Well in that case yes, they are the models and maps that fit with each other. Actually the maps are the same or become nearly identical upon generating. It is the topology at lo res that controls if the stroke becomes pinched or not. It is the pinched stroke I want because that’s what I sculpted in hi res. But the lo res mesh that gives the pinched stroke is the wrong one (5,6). I want to use the 7,8 mesh… and still get the appearance of what the hi res step 4 looks like.

If you want to use the 7,8 mesh and get the appearance of the hi Rez pinched 4 mesh, you should open up the 4 ZTL file, go down to the lowest level,import in the 7 mesh, and generate the normal map imediately. the key is to not change subdivision levels after you import in the 7 mesh because this will mess up the higher subdivision levels. People always change levels after they import in the proper mesh to check what is happening in the higher levels, but this actullly messes up everything. I’ve done this process a million times and always got the proper results.

Long

Hey Long Phan, thanks for sticking with me. But aye caramba… still no luck on this one. I can see what you’re getting at but oddly enough I can’t make it work! Seems easy enough: sculpt, re-import good mesh, DO NOT change res, generate map. Well that’s what I do and there is not much pinching coming through in that map anyway. See for yourself below, I attached the texture. Just a big bloated brush stroke with none of my hi res sculpt with the pinch in it.

Am I seriously missing something? What should the settings be under Tool->NormalMap? I’ve tried all combos of Adaptive and SmoothUV. Are there any other settings elsewhere that matter?

thanks

… and here’s the snapshot :slight_smile:

Attachments

normalmap_distortion2.JPG

I’m trying to use my created-in-zbrush high resolution model to generate normal maps on my “imported from Maya Low rez” mesh within Zbrush.

The problem is that my low-resolution mesh has a differing surface topology than my high rez mesh, so z-brush gives me a warning when I try to import it at the lowest sub-d level that says “THe imported mesh must have an identical number of points or faces when imported into an active sub-d surface…”. This doesn’t surprise me, but I was hoping that there was a way to use a mesh of a differing surface topology as the TARGET of the normal mapping process.

The reason that this is happening is that I am importing a “medium” resolution model into zbrush as my starting point, I uprez the hell out of it, and sculpt in z-brush. When this is all done, I create a super lean low-resolution model that fits the proportions of the high rez and normal map it. I can’t really use those super low-rez version as my initial import into z-brush, because it has a highly optimized (non quad friendly) mesh and is not good to use in a sub-d workflow, but is ideal as my final in-game target.

What I’ve been doing is importing the high rez zbrush model into maya, and then using maya to normal map the high rez onto my optimized low rez, BUT Maya just can’t deal with a mesh with over 1.2 million polys, even with a super beefy machine with 2 gigs of RAM. So, I was wondering if Zbrush could do this, but I don’t think it can.

ANyone know of a way to use Zbrush in this way? That is, to have it generate normal maps using a source with a differing surface topolgy than the target mesh?

Thanks,

Lee Petty

ZBrush 2 requires that the two models be related by subdivision history. Creating a displacement or normal map between two unrelated meshes is not currently possible.

Thanks for the reply. I suspected as much. That’s unfortunate :slight_smile:

Lee