ZBrushCentral

Need help with Topology/Anatomy Issue!!!

I posted this in the trouble shooting forum but didn’t get a response that I need soon so I put it in here srry

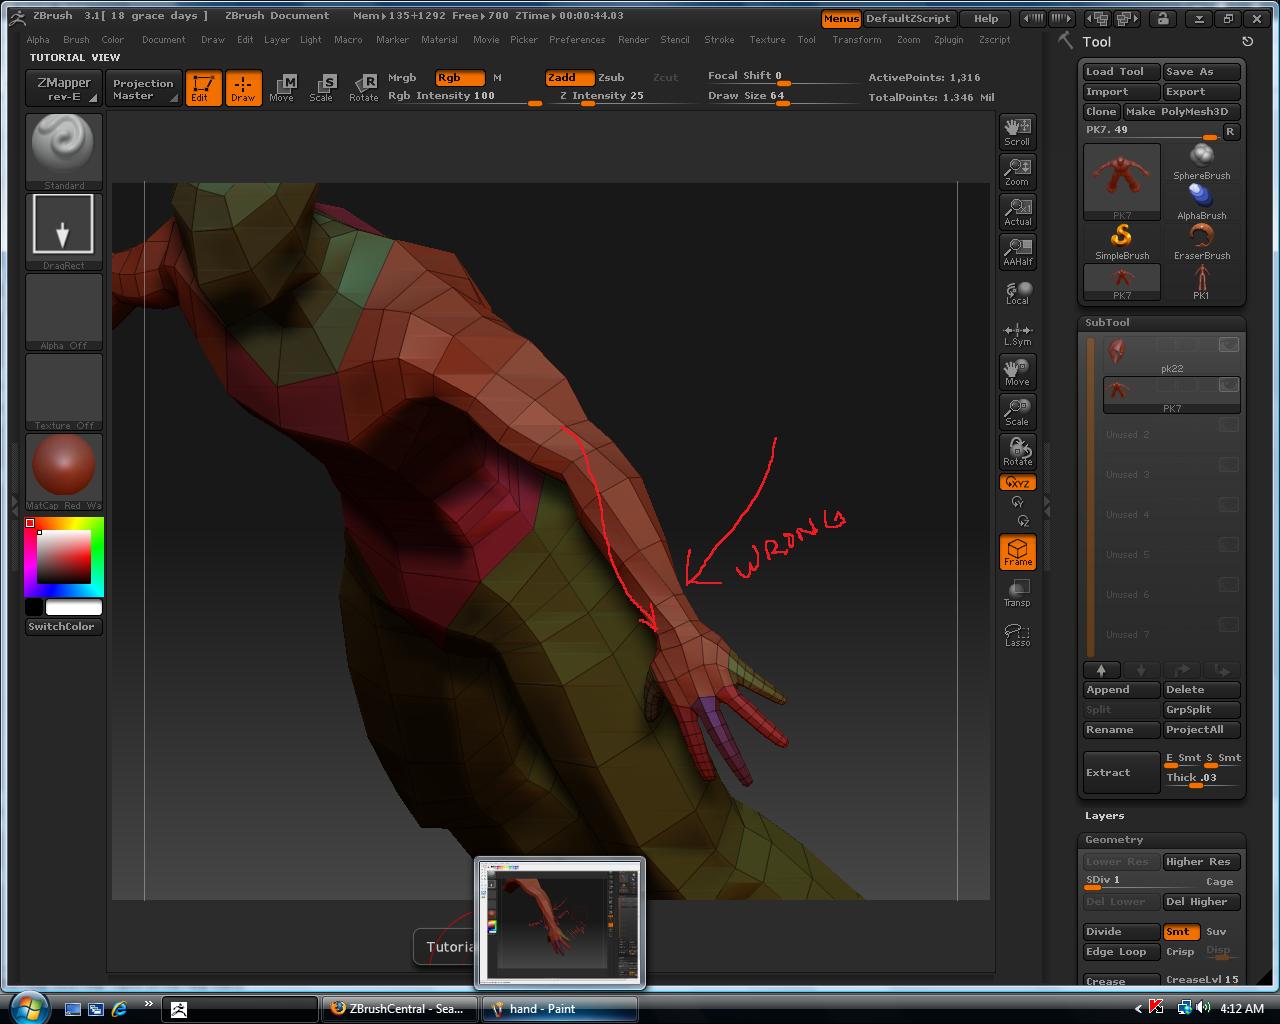
I guess when I created my Zsphere model I placed the hands wrong so now in the later stage of detailing and posing I noticed the topology is off for the flow of the muscle anatomy of the forearm to the hand at least from my point of veiw
or am I just imagining this…

so I figure what I need to do is detach the mesh at the hand and wrist somehow and reconnect the topolgy somehow and either rotate the hand to fit or move the topology of the wrist around so its not so twisted
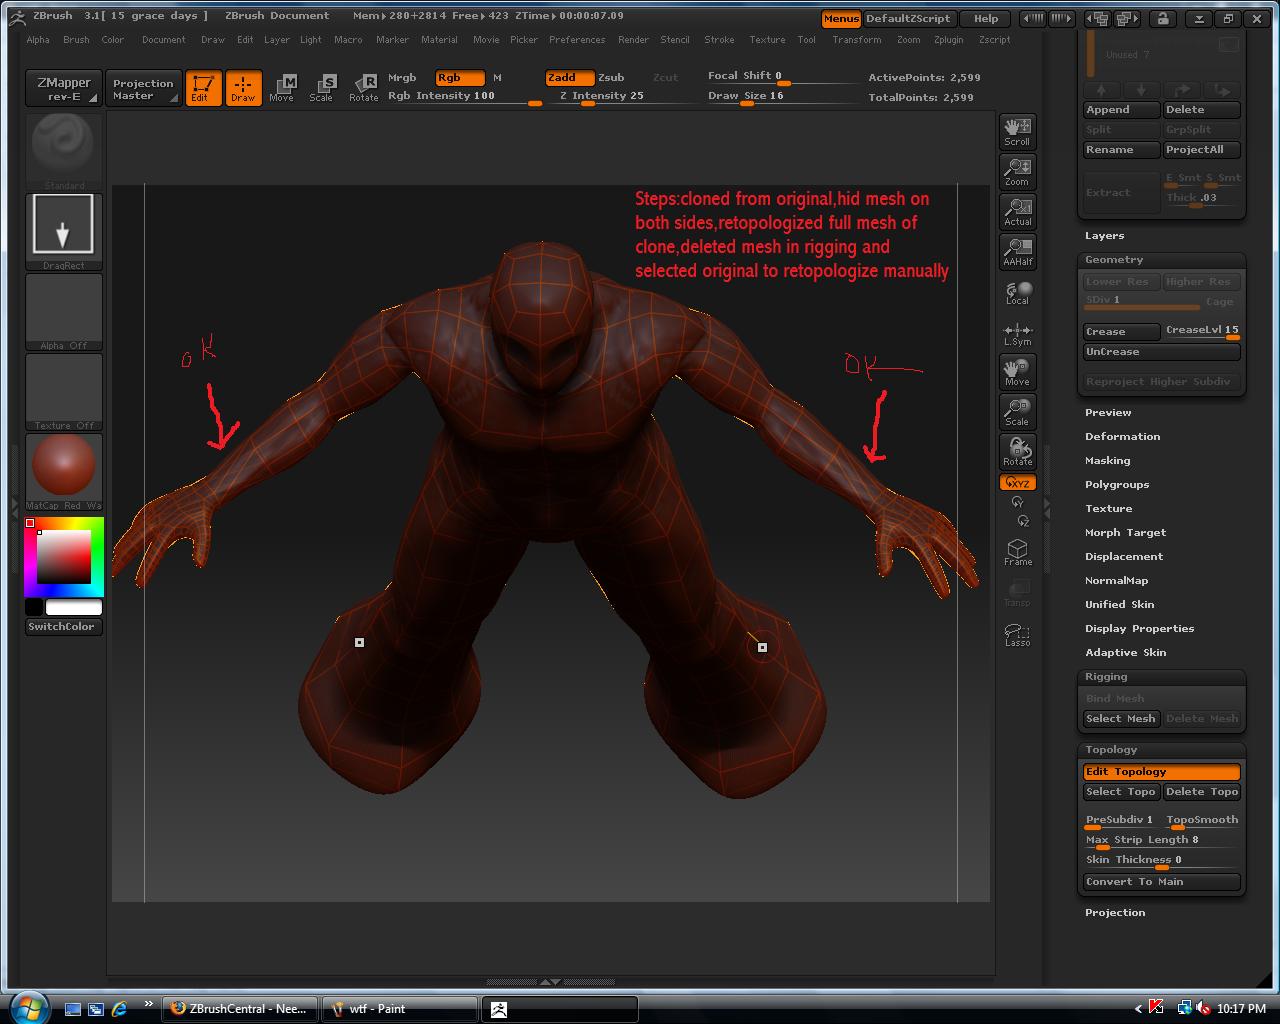
I can’t get the retopology in zbrush to work efectively and

I tried takin this into maya to retopologize and back into zbrush but can’t figure out how to apply this new topology to the old mesh without zbrush crashin on me :mad: can someone please shed some light on this so I can move on…

Thanx

Attachments

arm.jpg

hand.jpg

I imagine you want to “Project all”, takes the target (new) mesh and “wraps” it over the source (old).

If you are having issues with memory limits then hide part of your mesh and do them individually, also start at the lowest subdiv level and work your way up for both target and source.

Usually in Maya we work at 1/10 scale…zbrush doesn’t perform at its best at this scale, so up size your mesh before you go through the whole process, you can always down scale later.

Remember to increase your mem limit in zbrush under preferences.

If the problem persists see your docter. :wink:

cheers

as far as my understanding of retopology goes, it should take about 10 mins to fix this. This is how I would do it.

Clone your object. In the cloned object, bring it down to your lowest level of sub division. Then hide the polys that you don’t want to keep (the wrist/forearm bit). Then make sure in your tool palletter you have your lowres clone, and your high res original.

Then Zshpere, and in riging, select mesh, pick the lowres clone. In topology, click edit topology. Then make your brush size big, and press shift and run the brush over the whole model. You will now have all of your topology, except the wrist/forearm. Then unclick ‘edit topology’ and in rigging, ‘delete mesh’, then ‘select mesh’ and pick your highres version. Edit topology, and use the normal topolyg methods to add the polys you want to the wrist/forearm bit.

When your done, meke sure project is on, and creat addaptive skin at what ever res you need, and your done.

Hope this all makes sense.

Thats a clever technique…although I find it buggy.

First problem is the zsphere, it leaves an edit point where you don’t want it…usually at the center pivot which usually you need to delete.
Second is the “projection”.

I tried leaving it in…and taking it out but each resulted in artifacts where no edit was done.

I also tried deleting subdiv levels and hidden geo…and of course tried it with leaving all that stuff in (as per your example) and still had artifacting and loss of geo in areas with no edit.

However the area I did edit worked awesomely!

I would say that the fault is in the software and the work around is to not use the adaptive skin “projection” but rather after you have generated a new mesh (with the retypo technique, except don’t use the adaptive skin projection) append it as a subtool of your original hirez mesh and use “project all”.

Note: project all isn’t 100% perfect all the time, but it allows you to first store a morph target, add a layer, then project, then if need be create a new layer, and use a combination of the morph and project brushes to fix any areas where artifacting occured.

Gordon Robb,
Nice technique, fast (under 10mins) and didn’t need to leave zb.:+1:
Wound defiently be using this all the time if the retypo tools could handle extreme close up editing without getting confused by the surface normals.

btw the mesh i used was production ready…I know usually the problem with retypo and disp etc… comes from the geo and uvs itself.

hopefully little things like this get fixed in the update

:slight_smile:

Ok I’m just not getting this
Why is this crap so complicated even using tutorials ect.

Ofcourse this is coming from a creative thinker and not a logical, technical one so I hate this retopology crap for starters!! and wish I could just sculpt and paint cause this stuff slows my process down immensley, but unfortunately to get this to work effectively in other software there is no room for glitches

Gordon I am grateful for your advice and tried your technique and I got 1 side to retopo correctly through your steps, but the other side is screwed up as you see in the pic I followed all the steps you provided ,did I miss something? ,I believe it went wrong through the projection or adaptive skin

is there a way to mirror my good:+1: side over to the bad :-1:

Morph also very appreciated advice, but I can’t seem to get that method to work either is there a good tutorial that covers this at all or something similar cause I have reveiwed just about everything:confused:

Thanx alot:)

Attachments

Frosty: Its really simple once you get the feel for it. From what I see, the good one looks cool. All I can think is stuff like…

Did you have mirror on when you were doing it? Also, you need to make sure that you have the complete mesh selected in rigging when you create the adaptive skin. Apart from that, withought knowing the step by step, I’m not sure.

I think there are ways to mirror, but I don’t know what they are, and I think they are a bit hit and miss.

Gordon first of all do I hide both sides of what I don’t want or just one side and then will it mirror over to the other?

and second do I hide and delete the mesh before retopology or do I just hide it?
I’m trying every possible way so I’ll keep posting my questions and progress…

Thanx alot for ur help;)

Gordon These are my results after following your steps up to the final retpologizing before making adaptive skin

I made sure mirroring was on
I cloned from original highest sub lvl.and droped the clone to the lowest sub lvl. before hiding mesh & retopologizing
I hid both sides of mesh and retopologized entire mesh,then deleted mesh in riggin,selected original at highest subd lvl. and retopologized manually

I don’t get it what am I missing…and even though its good practice I do not wanna go back and rebuild another Zsphere model cause of this

Are there any really good Zsphere placement videos or tutorials

Attachments

test1.jpg

test2.jpg

Dont have a lot of time right now but…

Step one - clone object.
Step two - hide the part you don’t want to keep (wrist/forearm), on both sides
Step 3 - reduce sebd to 1
4 - zsphere
5 - rigging and select low level clone
6 - retop ‘edit topology’
7 - big brush, press shift when over a part of the mesh, and paint the whole thing. this will copy all fo the visible topology (ie, everything except the wrist/.forearms.
8 - press a, and move the object around to make sure you have it all
9 - switch off ‘edit top’
10 - in rigging ‘delete mesh’
11 - in rigging ‘select mesh’ and pick the highres version that has everythign visible
12 - ‘edit topology’ on
13 - make sure sym is on
14 - starting at an existing point by shift click, then build up the new wrist/forearem (checking it’s doing both sides)
15 - when its’ all done pres A to check it’s all there.
16 - turn on project
17 create your adaptive skin at whatever level you want it.
18 - done (or should be anyway :))