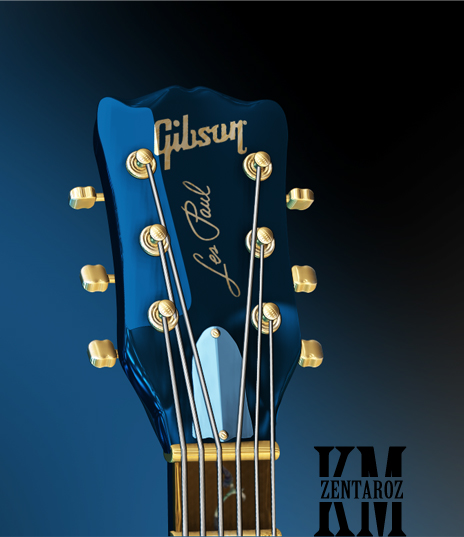
I have learnt to make 3D for 1 month.
And this is my first work.
My custom made Les Paul.
I don’t know too much about 3D. Please help me to improve skill. 
And sorry for the terrible English
Attachments
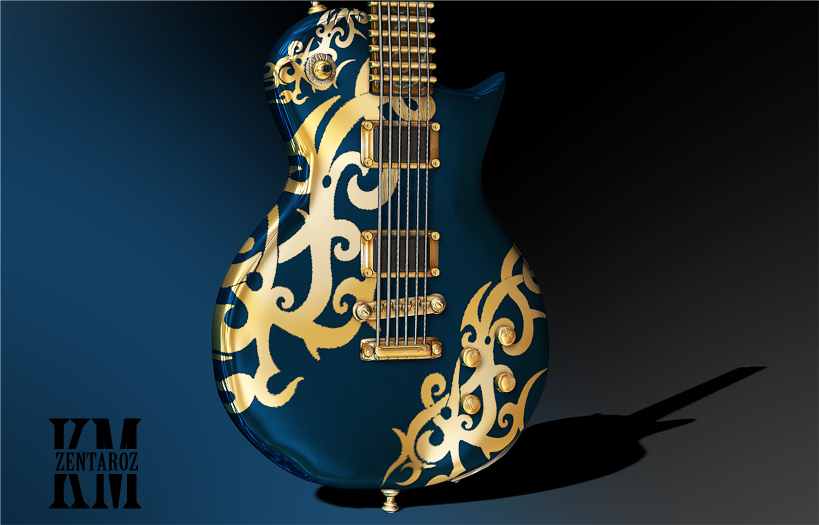
I have learnt to make 3D for 1 month.
And this is my first work.
My custom made Les Paul.
I don’t know too much about 3D. Please help me to improve skill.
And sorry for the terrible English
i month ? wow keep at it nice work ! i prefer this kind of modeling - too many monsters here  small_orange_diamond only crit is texture polypaint ? maybe higher res on tex - unwrapped in uv master - for crisper grafics on body unless that was the look your after ?
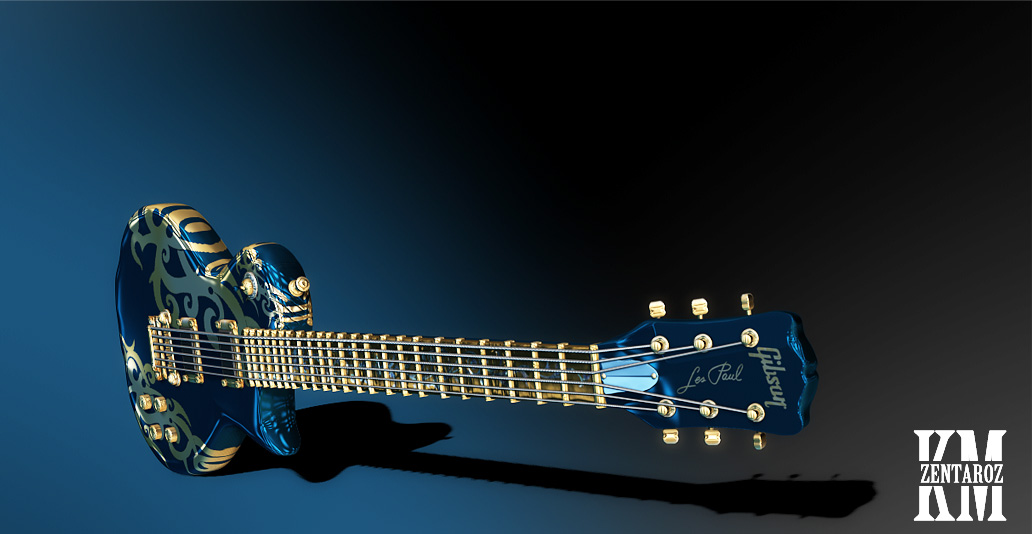
Just High-Res(20m poly / 1 knot = 1m.) polypaint and made alpha for logo and texture in the body.
My pc spec is too low I can’t take more poly.
I dont know how to unwrapped in uv master but I will learn soon.
excellent start. very impressed. Check out the Pixologic classroom for tutorials on UV master
I agree Higher res on textures otherwise very nice.
Excellent. Looking good.
And I agree, this is refreshing, WAY too many monsters.
Ezra
Welcome to ZBrushCentral
Cool work, definently keep it up and ur on the right track =) Would recommened you to study anatomy intense!!!
Will keep an eye on your future posts here and wishing you happy sculpting!
aaaand there it is … a monster ! 
no just kidding! looks nice ! Cloth looks a bit weird but still good job!
Keep it up
Cxyda
My New Work [Skull Ring]1 Hr.Base : MayaTexture : ZbrushRender : Zbrush & PhotoshopHigh-Res : 1.3M PolyLow-Res : 80 Poly ^^
it’s so good for fist work~~~
@SYRZ Thank you guy
You got some nice stuff there man! Really awesome legs/pants for the undead guy! Kepp it up! I am a noobie as well… Soon I’ll start posting some of my stuff and see what ppl say… The thing is I was very focused on learning how to model and I don’t really know how to render properly… All in good time I guess
GL and I will definitely drop by in the future to check your work!
My unfinished work “Tossakun” Lvl noobie
Nice work.
To answer your question, explaining the entire step by step process would take too long but I can point you in the right direction.
I’m assuming that your sculpts contain just one high poly subdivision level? Created with Dynamesh perhaps?
If so, you will need to retopologize, creating a lower poly mesh that is designed in a way that is animation ready. This step is crucial if you want to have your character move around in the game.
You will find retopo tools both in ZBrush and Maya. The process can be slow and boring but is essential…that is, until QRemesher for ZBrush is released (google it).
I can’t tell you everything you need to know about retopology because I usually start with an animation ready base mesh and don’t use Maya but just search here at ZBC or on YouTube for the answers.
Assuming that you now have an understanding of the above you must create UV’s. These are co-ordinates that basically tell your maps how they should fit around your character or mesh.
That brings us to the next step. Because of the limitations of most game engines and current hardware you must use maps known as “normal” or “bump” maps to fake the detail of the originally sculpted mesh.
Basically you generate these maps using an application such as xNormal (you can use ZBrush for this also) that calculates the difference between your high-poly sculpt and the retopologized mesh (mentioned above) and the result is a normal or bump map. You then apply the new map to your low-poly mesh to get the detail of the original sculpt and import this information into the game engine in a form that it can (hopefully) handle.
Using xNormal is pretty straight forward, you import both the low and high-poly meshes, adjust the settings to your preference and “bake” out the maps you need. Once again, look around on the net for a more detailed explanation of how this all works.
This is just about as far as my knowledge goes regarding getting your character into a game using ZBrush, Maya and xNormal. If you do a bit more research into each step you will come to a full understanding of what you need to do. Also remember that the process will vary so just read between the lines (I am being very general in this guide) and you will get there eventually!
Hope this all makes sense - by no means am I the most experienced person round here when it comes to this particular process.
I am happy to give you any tips regarding the use of xNormal if you are having trouble.
Good luck!
I also second Trist. I think the concept of creating this model’s quite big. You might want to get the overall form set prior to putting the details …especially the usage of alpha. At the moment the model looks like too dense for what it should be.
Beautiful guit. I wish I own it.
Bravo!
@Trist Wowww Thank you for the guide. Now I can make Normal map from Xnormal. XD
I’ve tried to learn how to do this step[create model for game] for a month. Google Youtube and everything I can learn from. But I’m not good in English.
This time I understand how to retopologize [in Zbrush and 3D coat] and create UV with UV master in Zbrush. Next step I’ll learn how to render Low-Poly with Normal map in Maya.
Thank you again Trist. Can I save your reply? This 's my lesson for me. I didn’t know too much about 3D. Because I 've learnt by myself and google for 4 months.
@SolidSnakexxx Thank you for your advice. I will fix it.
@ricor It’s not finish


