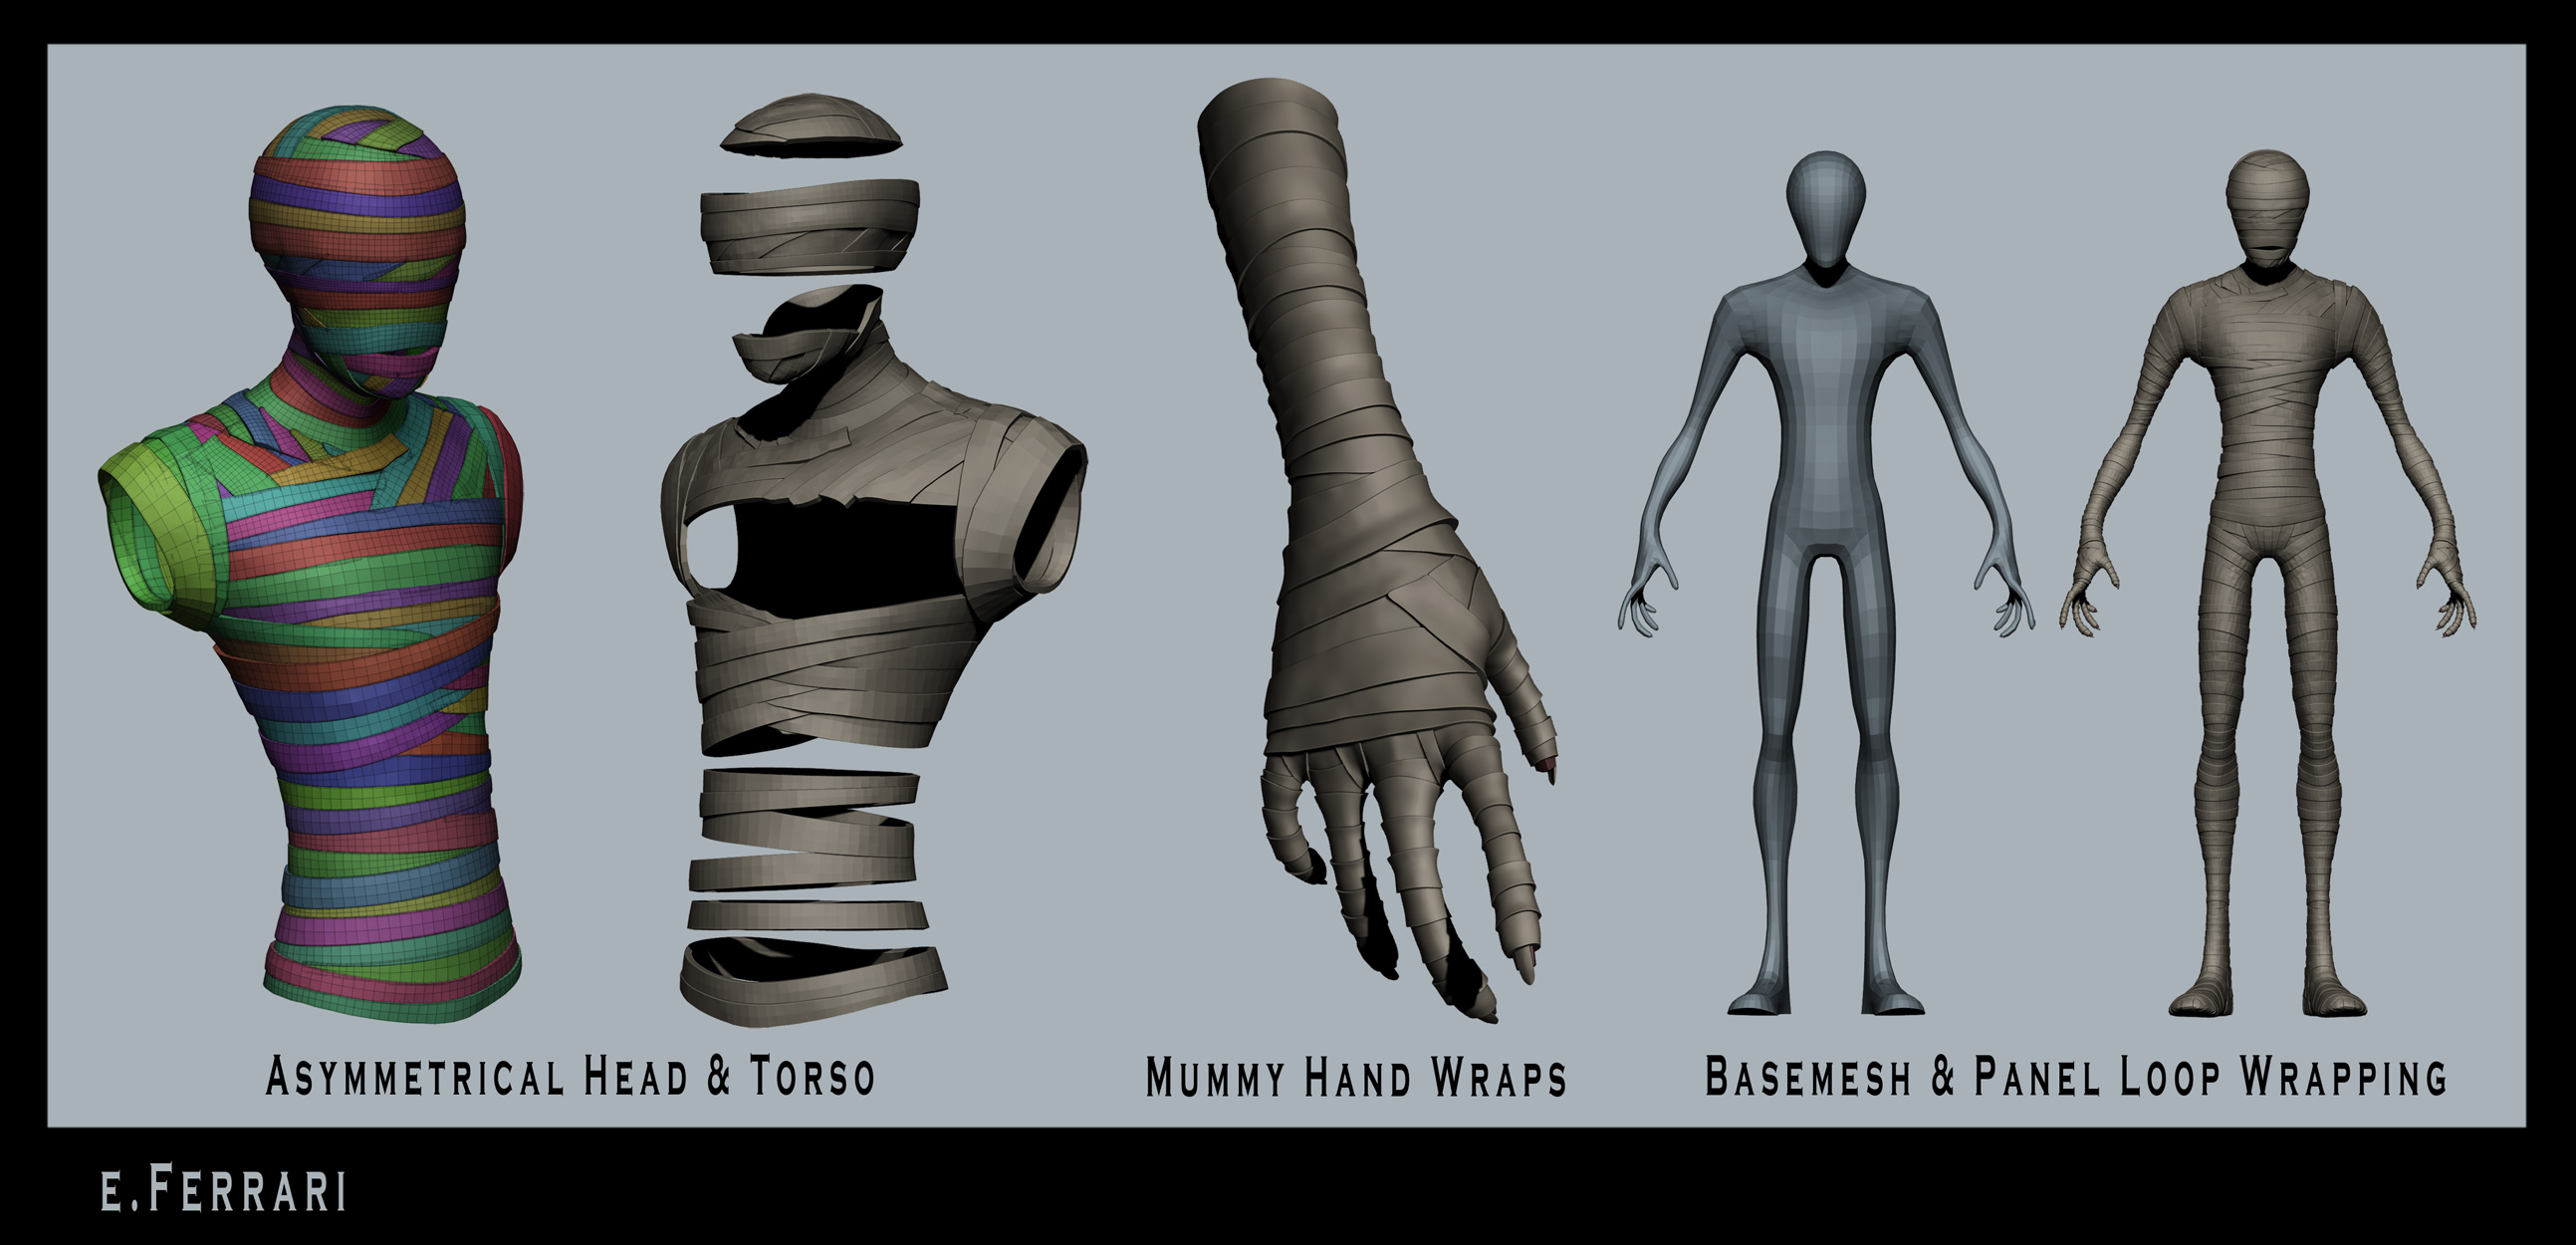
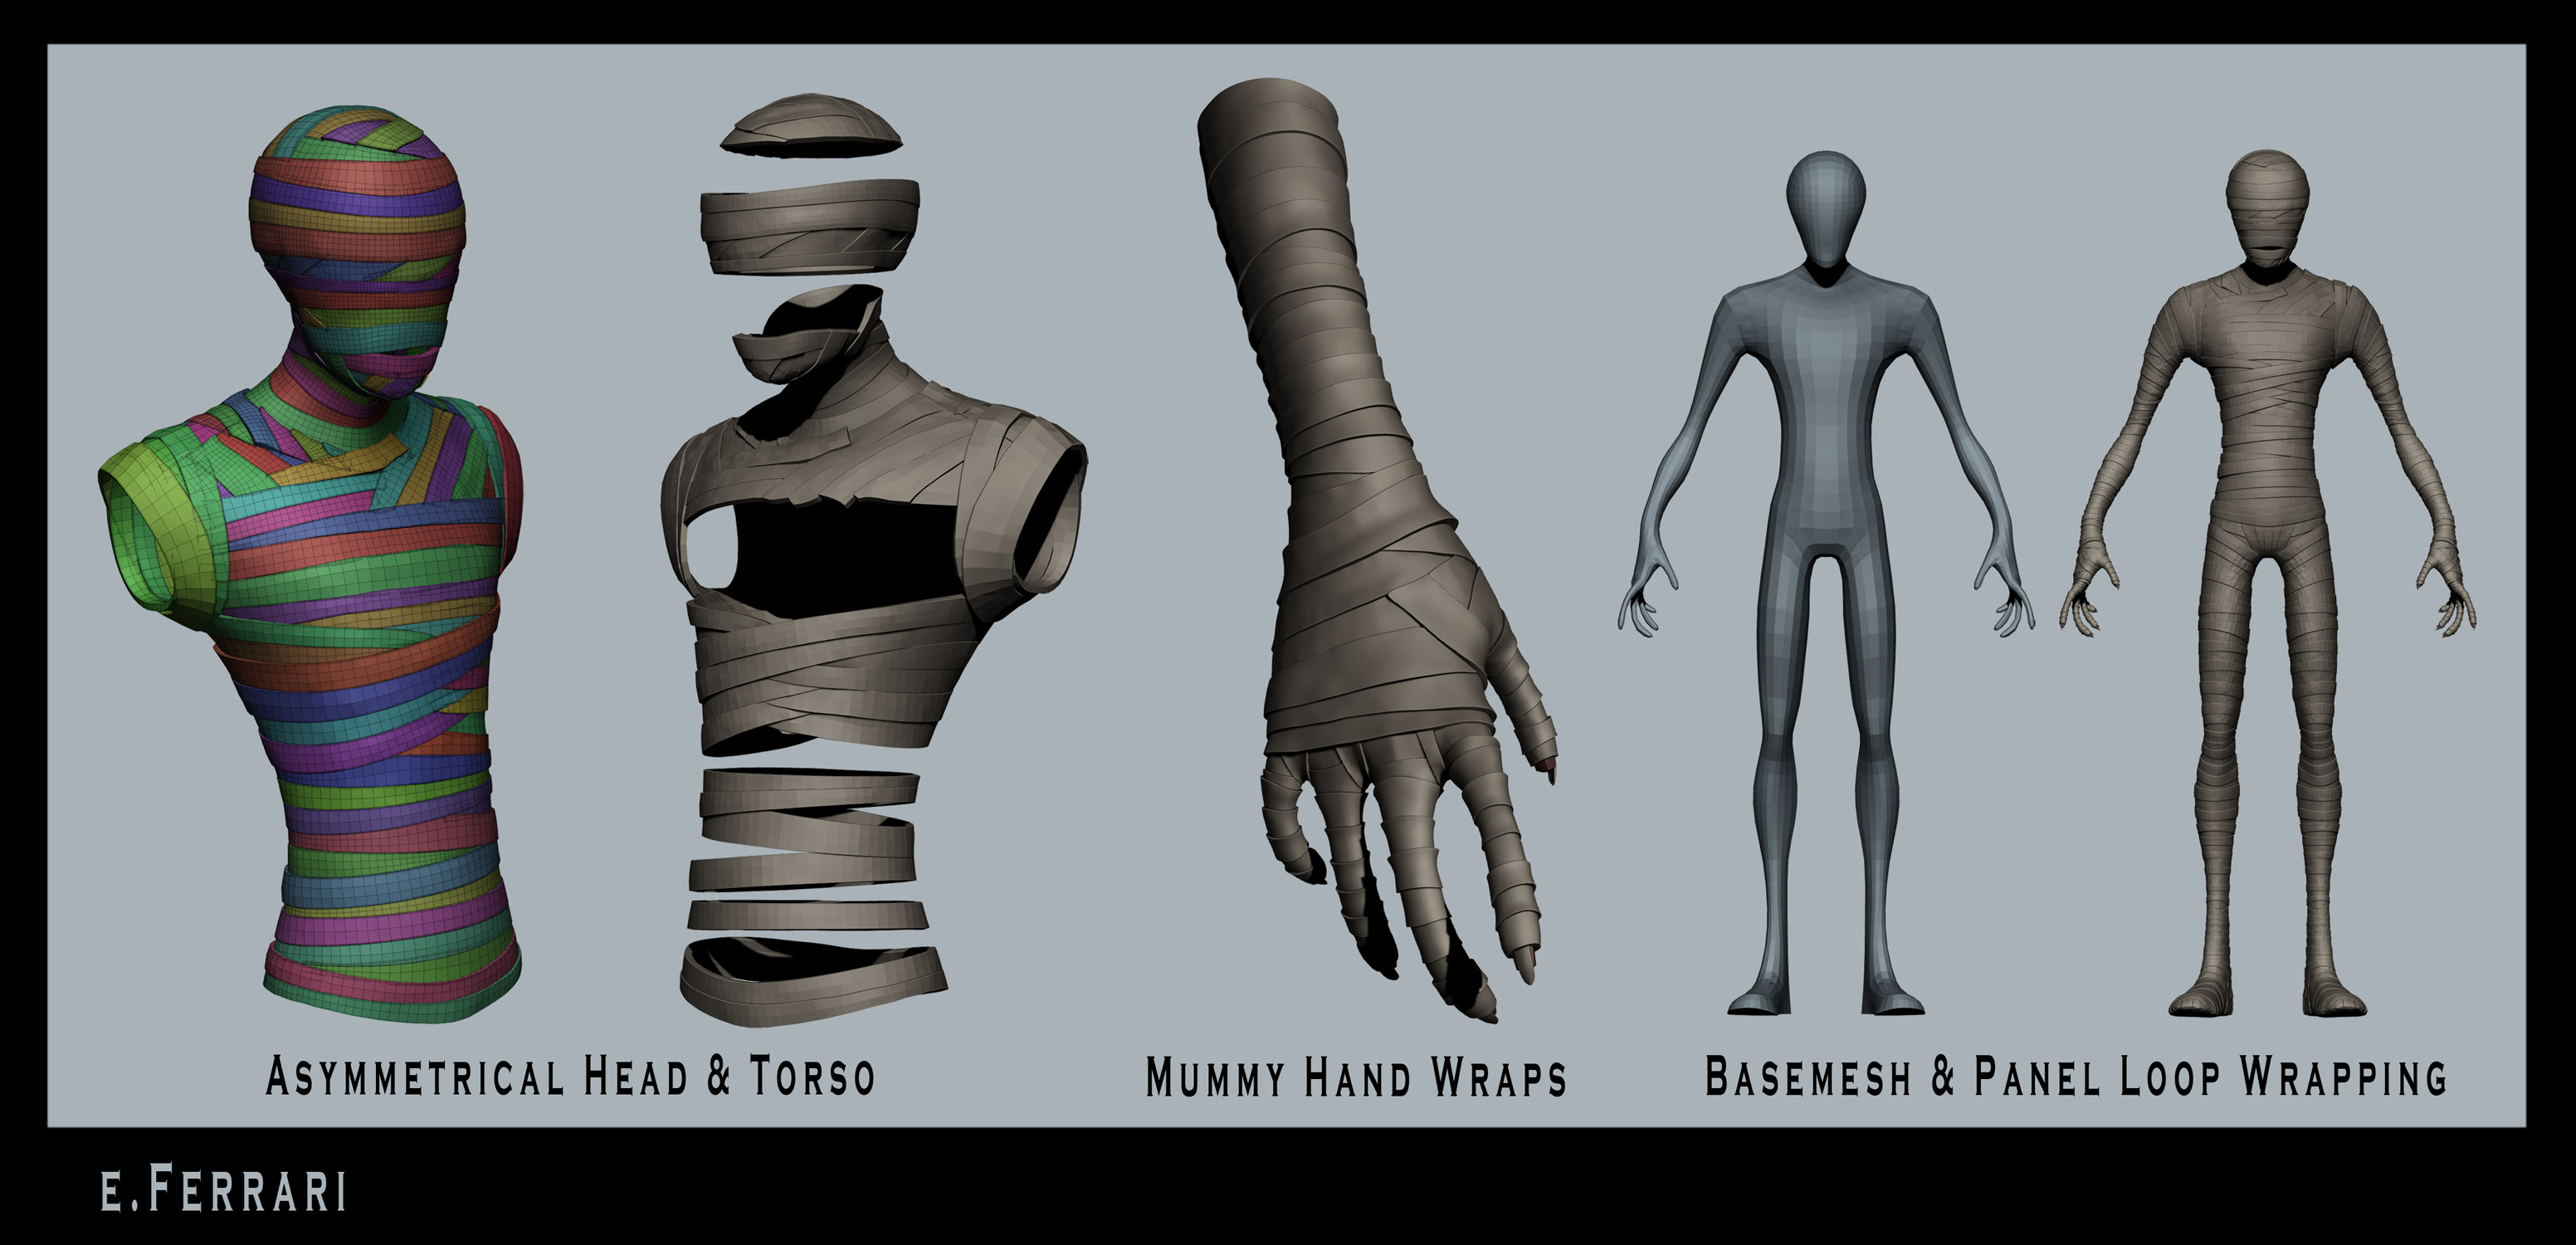
I thought, I’d share a character/workflow that I’m developing for a class over at ZBrush Workshops. The class is called “Advanced Character Creation for Games” and is taught by Joseph Drust. The class is excellent! Anyone interested in creating characters for games should go to http://www.zbrushworkshops.com and check it out.
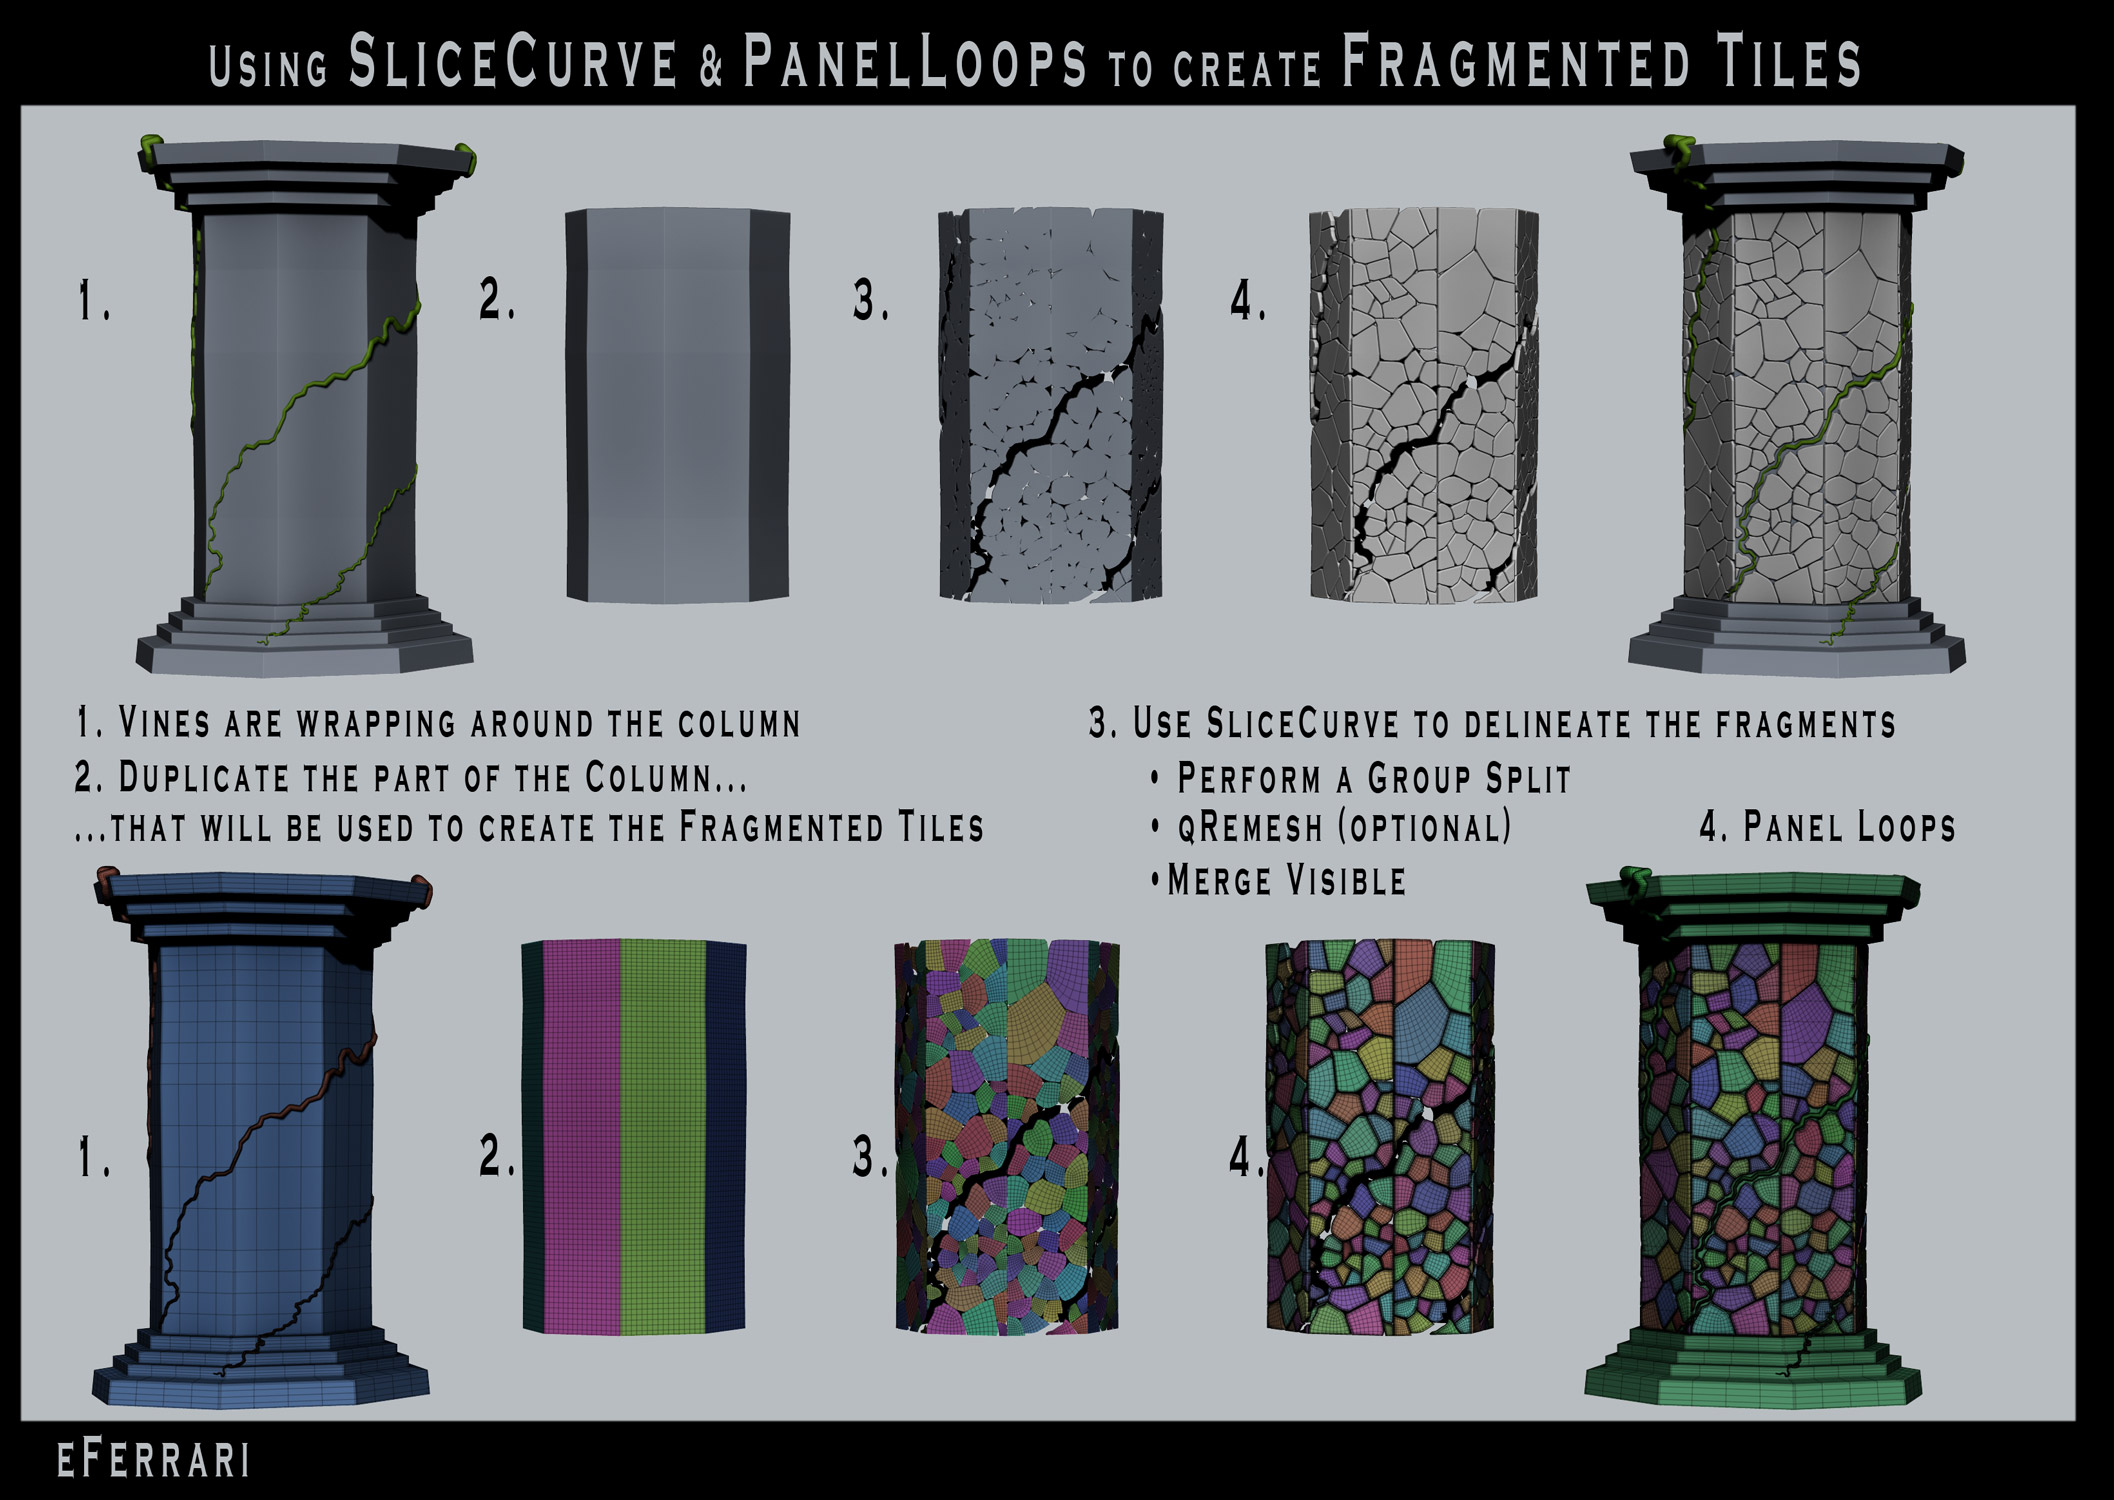
In order to create the wraps/bandages on the mummy, I used the SliceCurve brush, the qRemesher, and the Panel Loops feature.
I will post a full breakdown of the process for creating the wraps soon; but in the meantime, I hope these images will help illustrate my technique.
Feedback and Crits are more than welcome, and I hope to see the work of others using these methods.
Joseph’s class is incredible! I really like your mummy sculpt and clever use of slice with panel loops. so many powerful tools inside zbrush with ridiculous variations for using them!
Thanks for the valuable insight. one thing I’m having trouble wrapping my head around is how you managed to get all those individual polygroups with such a natural fragmented look on step 3 of the column. Could you describe your slicing methodology here in a little more detail?
Hey Skittixch, thanks for the question. I’ve been a little busy lately, but I do plan on going more in depth on this process soon; and I’m going to include more images. But for now, I’ll try to explain the best I can.
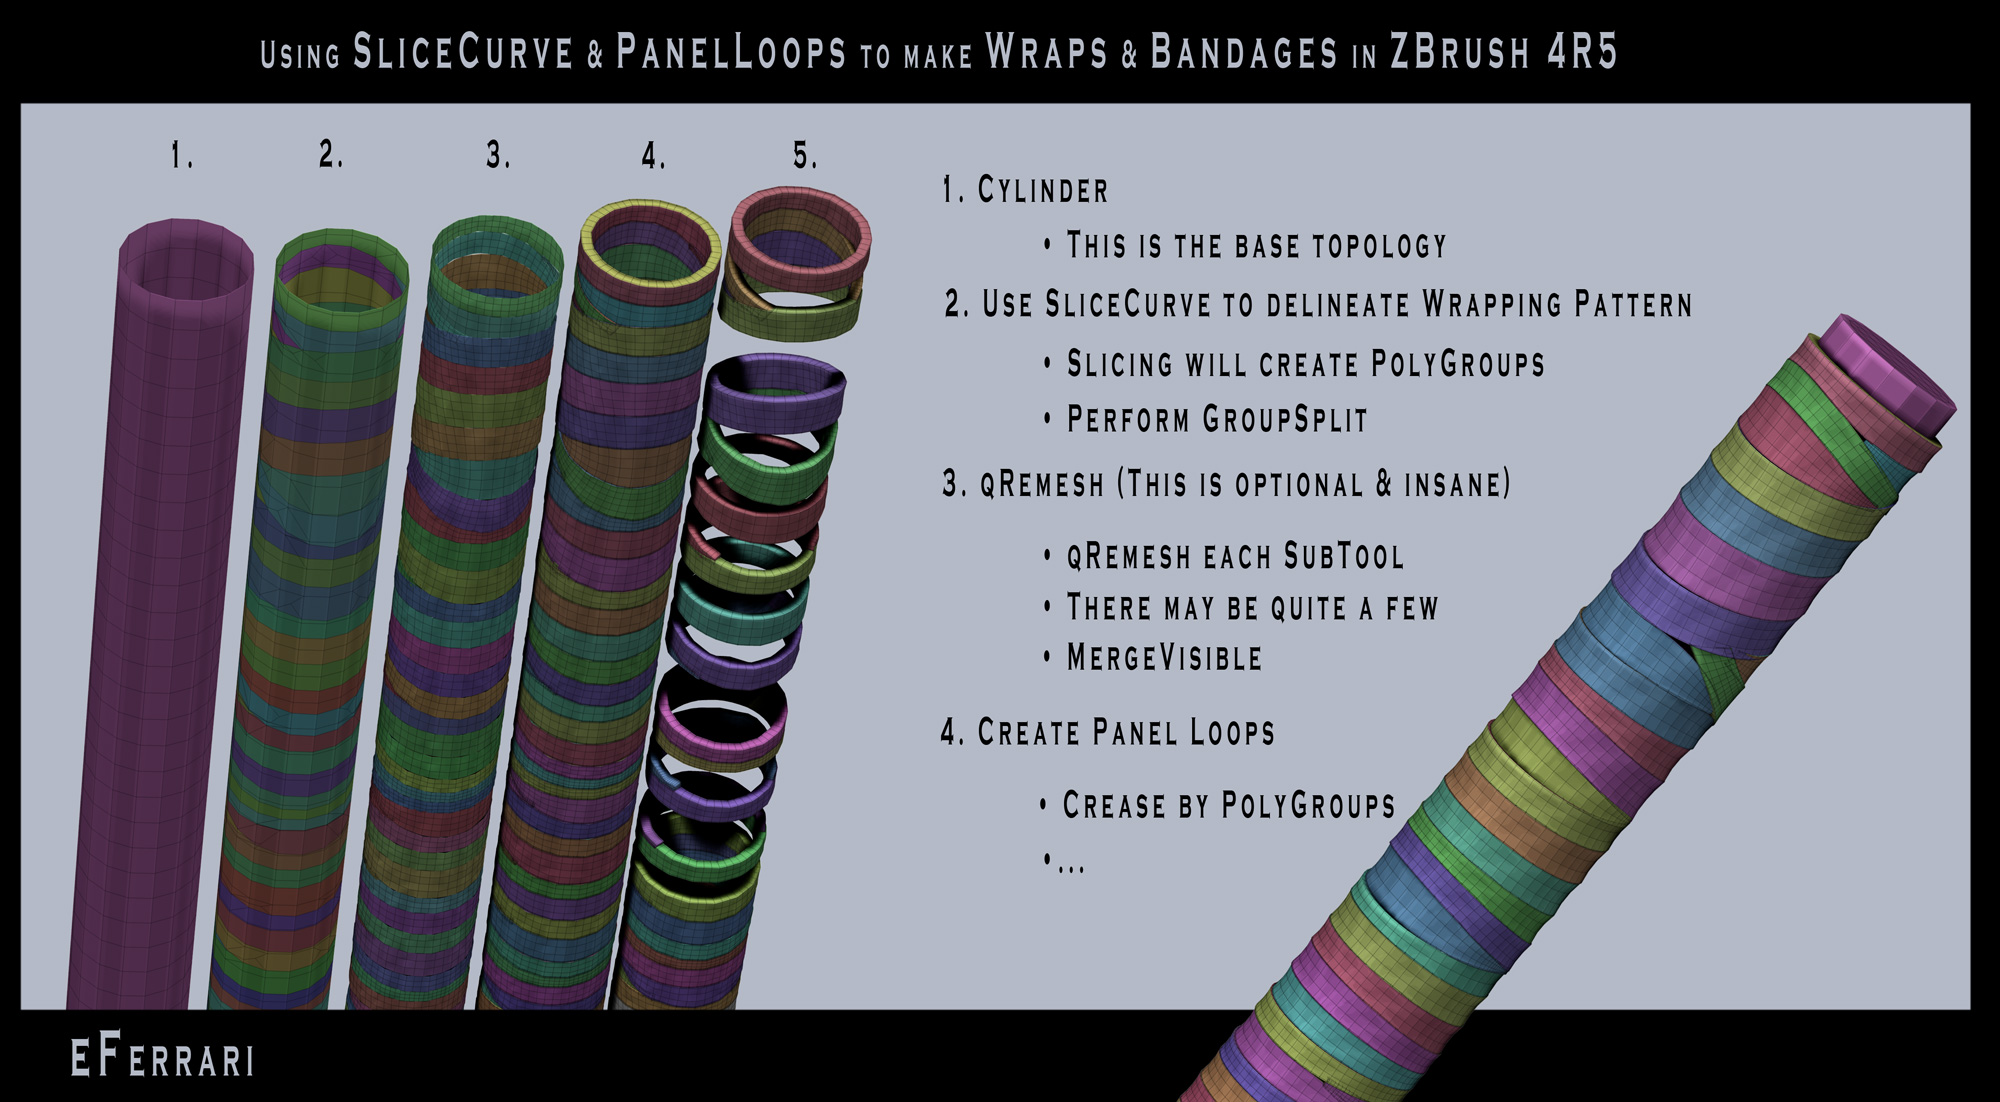
Before I get into the meat and potatoes of my response, one simple thing to note is that I used the SliceCurve Brush with a Lasso Stroke instead of the default Curve Stroke; this allows for some serious freedom when slicing.
Now onto the details:
So if you use SliceCurve to delineate the fragmented pieces in Step 2, you’ll be left with some ugly topology. Now you could just perform the Panel Loops function on the bad topology and sometimes it will give you okay results.
But if you want the fragmented tiles that result from the Panel Loops to be perfect and clean, then you’ll need to use the qRemesher on any and possibly all of the PolyGrouped fragments.
In order to use the qRemesher on the PolyGroups, each PolyGroup has to be its own SubTool; that is why we perform a GroupSplit after slicing.
Here is a quick Tip: prior to performing a GroupSplit, adjust your qRemesher settings. By adjusting the qRemesher settings before GroupSplitting, the multiple SubTools that result from the GroupSplit will all share the same qRemesher settings, which saves you the time of having to reset the qRemesher settings for each and every SubTool.
The qRemesher settings that I prefer for this technique vary depending on the density of the original topology. I usually try to sculpt/model as low res as possible for as long as possible. But my settings are usually: Half or the Same with AutoMask enabled and the MDensity slider set to around 2.5. But these settings are not set in stone.
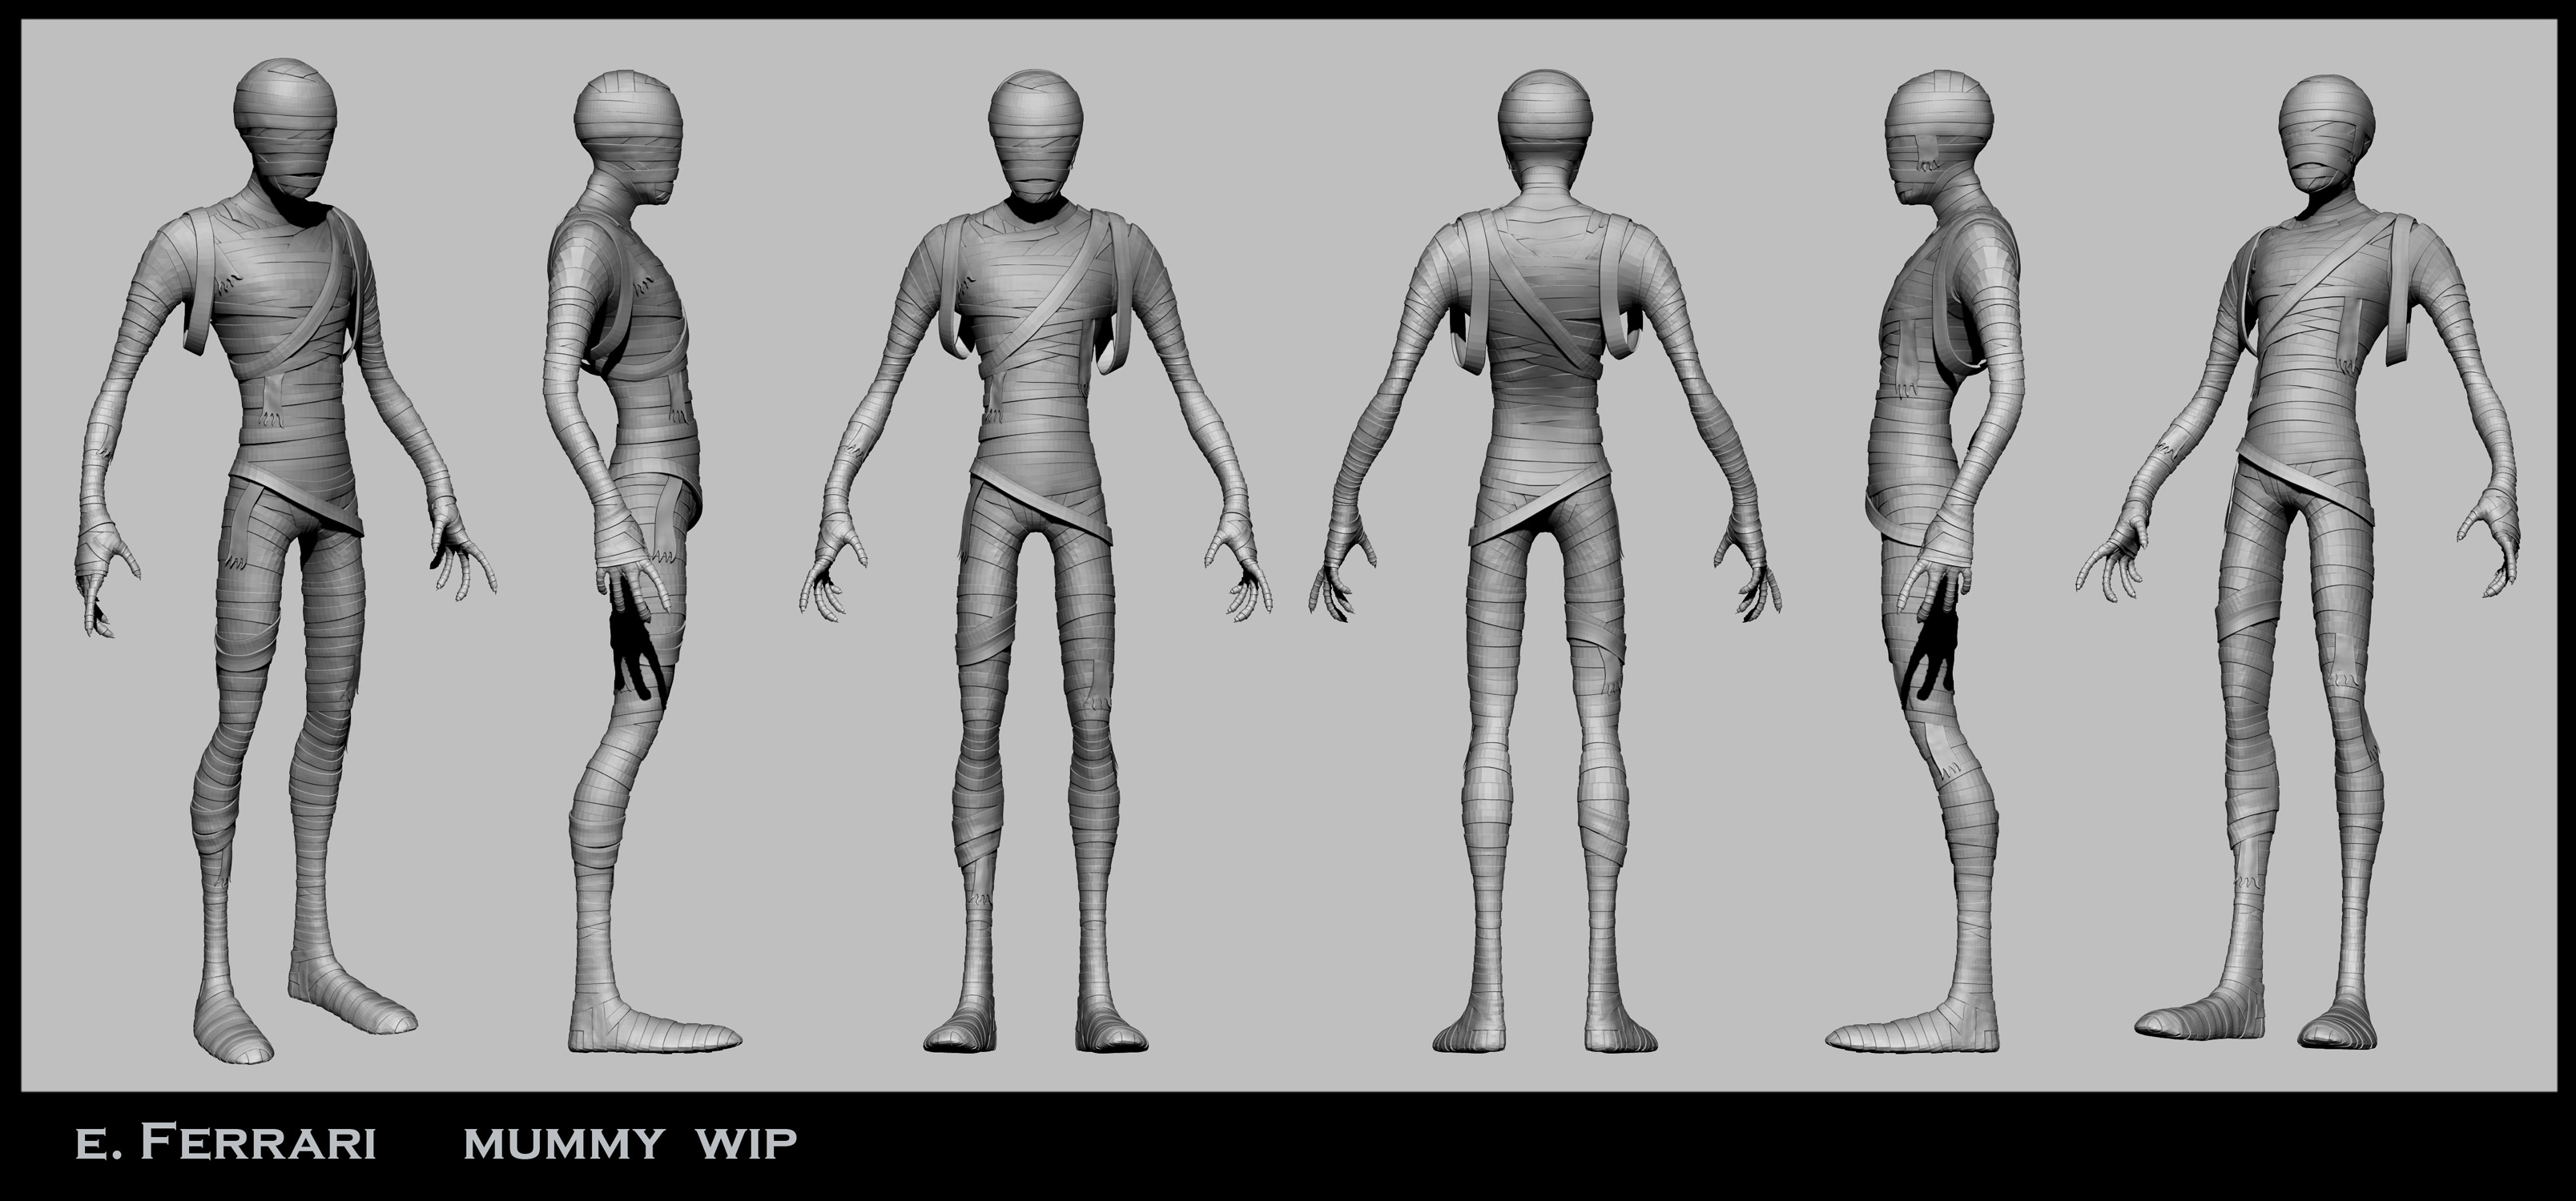
So at this stage you will have quite a few SubTools. I have had anywhere from 50 SubTools to 500. I try to keep my SubTools on the lower side, so for instance, My Column has eight sides, I sliced each side separately rather than doing the whole column at once; and with My Mummy, I sliced the different body parts separately. The Head, Torso, Limbs, and Fingers were all sliced separately so that I didn’t wind up with a thousand PolyGroups all at once, which would have resulted in a thousand SubTools after the GroupSplit.
So now that the fragments (PolyGroups) with all the bad/messy topology are all separated into their own SubTools, it’s just a matter of starting at the top of the SubTool list and pressing the qRemesher button in the Geometry palette. Once the first SubTool has been qRemeshed, move down the SubTool list and qRemesh the next SubTool; and then it is just a case of Rinse, Wash, Repeat.
Occasionally, the qRemesher will give you a triangle at one of the corners of the fragments. When this happens, I just qRemesh again and it usually solves the triangle problem.
If the qRemesher messes up the mesh too much, you can always use the Move Brush to massage the topology into the desirable shape; and you could even qRemesh once again after that.
I alway turn off symmetry while qRemeshing these fragments, because while qRemeshing with symmetry works for characters and symmetrical models, it has actually caused ZBrush to crash while doing this fragment technique, and I don’t know why.
Once all of the SubTools are qRemeshed, you can perform a MergeVisible to get them into their own SubTool; and then you could perform an AutoGroups from the PolyGroups subPalette. Now you should get excellent results when you apply a Panel Loops.
Additionally, prior to the Panel Loops, you could go to the Deformation subPalette and mess with the Polish by Groups or the Polish by Features sliders; however, this is totally optional, and I think the results are a little too heavy handed.
The Panel Loops features in ZBrush are incredible, but for this sort of thing I turn the Number of Loops to the lowest setting with Zero Polish, Zero Bevel, and Zero Elevation because I want the fragments to look like they were cut by a skilled stonemason.
I am looking into writing a script to automate the tedious qRemesher process, but it may be a bit out of my scope so we’ll see…
Skittixch, if there’s anything else that I can clarify for ya, please let me know and I’ll do so.
Also, thanks so much to everybody who commented on this post, I’m really glad that you like it; and I’m sure that you’re all talented enough to improve upon and streamline this little technique.
Thank you for providing that info. I even printed out the text. The thing is, when I try to qRemesh, even at same or double -- my mesh sort of crumbles to shambles. I can’t see what I’m doing wrong as my mesh is very low rez and there doesn’t appear to be anything I’m not following (starting with a simple cylinder). I wonder do you change the curve stiffness also? I even tried to mask the top and the bottom a bit so that automask would hold with what I thought would be more polys to protect the shape. For now, I guess I’ll just skip that step, but it does make sense to do it. I am not happy…but love your results. Any thoughts?
Thats a rad workflow I love how in ZBrush there are so many ways to get to your final result. And thanks for sharing such a detailed description to your methods. I really appreciate it as it helps eliminate user error, but maybe that’s just me when I try new tricks!
Hey ArtBot, thanks for the question. I’m sorry that you’re unable to achieve the same results; it’s frustrating and I would also be unhappy. Let’s try and figure this out.
I don’t mess with the curve stiffness because I don’t use the qRemesher brush to draw out qRemesher Curves; I think those two tools are bound to each other; however, I could be wrong about that. I do vary the MDensity slider a bit, but a setting of around 2.5 usually does the trick for me. And I don’t do any masking for this technique. This technique works best with cylinders, but one thing that I’ve realized is that I get horrific results (i.e. awful topology) and sometimes a crash when I have symmetry turned on. I always turn symmetry off when doing this technique.
Here’s an idea: if you have a part of a cylinder that is very low res, you may want to use the SliceCurve Brush to “slice in” some loops to give it more geo, thus making it slightly less low res. If the mesh is too low, the qRemesher may be unable to read the surface; and it may need more resolution to make the initial re-meshing. Once you get the qRemesher to work a little bit (i.e. it doesn’t turn your topology into confetti) it should be easy to qRemesh it again at “Half” to lower the resolution. Also, once the topology is all quads thanks to the qRemesher, you could use the Delete Loops and Align Loops to get it really low res. But the first thing I would do is make sure symmetry is off, because for some reason, this technique and symmetry are not made for each other.
Also, this is a long shot but maybe it has something to do with Local Symmetry being on or off? I don’t know how LSym effects/influences the qRemesher, regardless of whether symmetry is on or off. I’m sort of grasping at straws here with that last one.
Be sure to let me know if the problem persists, and I’ll try and match your results and provide an update.
I too get different results at different times using qRemesher. So I will try every variation I can think of tonight and let you know if any of my new experimentations work. Thank you for getting back to me. Your results are terrific, as I said. I appreciate your thought processes here. From what I understand the automask looks at the peaks and valleys and give more polys where there are valleys, which in this case, there wouldn’t be. Anyway I am determined to get this to work for me.


 these look great!