ZBrushCentral

Model Problems. Subdivisions gone and ugly wrinkles (answered)

Hi!

Well this is my first real project and I have a few problems now.

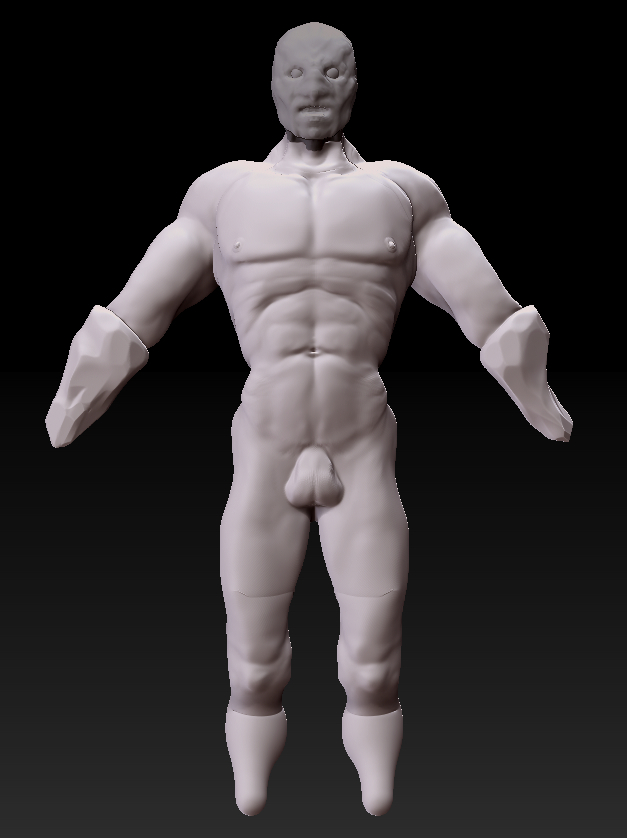
I have started making the head as a subtool and I now face a couple problems.

Before I was working using “make adaptive skin” and step by step worked with new subdivisions. But for some reason I thought (after watching a tutorial) I have to “make polymesh3d”. Now that I have done that, I believe my subdivisions are entirely lost! Is this true, or is there a way I can rebuild them from the more detailed model I am left with now?

And with the head… I am pleased with it and because I started that with “make polymesh3d” I have the subdivisions under “geometry”. So I have no problems with the head, in terms of subdivisions.

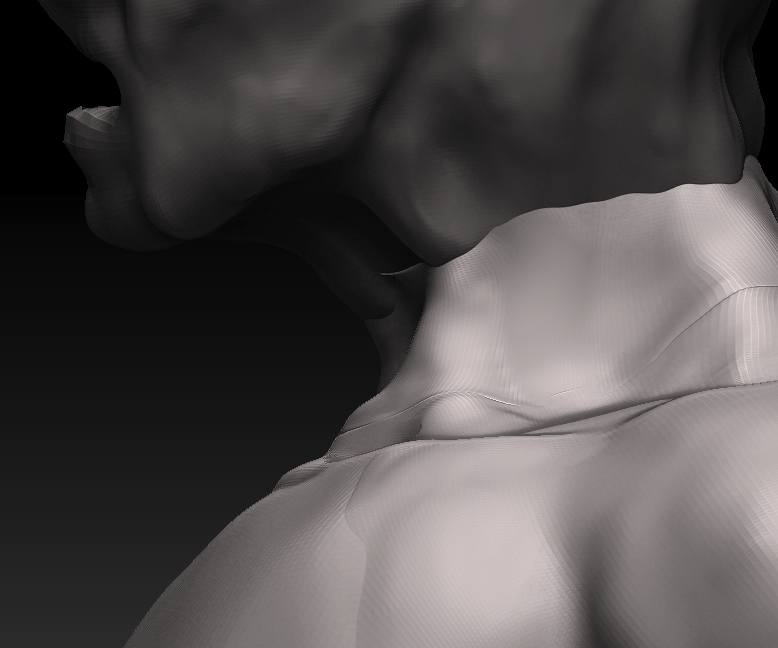
What I did encounter is these nasty wrinkles which I posted a close up of. They are very dominant at the neck but if you look closely you can see them running around the chest as well. The question here is how can I get rid of them? I found out that I can fill them up with the clay tool, but that would mean I have to add a certain amount of clay to the entire model just to smoothen out the wrinkles. OR: I end up with strange bumps on the model from when I filled them out with the clay tool.

Are there any suggestions or tutorials you can point me to, to figure this out?

And is my model lost because I have gone into the “make polymesh3d” and thus losing my subdivisions. (I am thinking about transposing the model for which I need the low subdivisions to not affect the details too drastically, as well as for making the model asymmetrically and for facial expressions etc.)

Thanks a lot guys!

forum_help1.jpg

Attachments

forum_help2.jpg

you can go to tool>geometry>reconstruct subD levels to bring back your subD levels.

to remove the “wrinkles” you’re going to have to retopo the object. What you have there is a disconnect between two meshes and that will always create that wrinkle…unless you use the clay brush to remove the wrinkle. But if you ever use smooth on that edge the wrinkle will come back.

you can also try to use a unified mesh, or remesh all function on your mesh but it will have to have a faily high resolution to work around your legs and under the arms correctly. You could repose him to help with the projection though.

I recommend a retopo personally.

hi goast666 !

Thanks for your quick reply :slight_smile: I am so so very happy you told me hwo to get the lower subdivs back! It worked just as your described :slight_smile: Thanks a million!

Is there some more info you can give me about “retopo”? I will have a look around for tutorials. Do you have a good link that might teach me?

Thanks for the help :slight_smile: already much more of a happy camper here!

Originally posted by MMOELLE

Is there some more info you can give me about “retopo”?
0502 Zbrush4 DVD (Topology tools)

Link to Whole Series of cannedmushrooms tutorials on ZBrush 4

thanks a bunch zber2

Sorry for the double post, but I just realized that I didn’t make something clear enough about “the wrinkle”.

If you observe the screenshot of where the head and the neck, do not connect, that was not the part I was referring to. When I meant “wrinkle” I meant those deep wrinkles along the collar bone of my character (below the neck, in the brighter white area).

Is this also a problem of topology? I think “retopo” means that I join the head and neck together and smooth out that area where it’s obvious that they do not connect. But what about those flaps or wrinkles on his collar bone. How can I get rid of those? I have a lot on the legs and under the arms as well. Do I just go down the subdivides and smoothen them out? Or is there a tool that can get rid of them quickly?

Start at level 1 and smooth out, then level 2 and smooth, etc. etc. until you get to your highest subdivision level. These wrinkles can occur if you use the Move brush a lot.

thanks again zber2 :slight_smile: I didn’t know what exactly to call it, so it might have been hard to understand. I’ve got two great answers and an amazing resource! Thanks a million :slight_smile: love the forum already!

No problem MMOELLE! :slight_smile: Happy ZBrushing!

I found a tutorial by JC Capelletti who has gone through the steps of sculpting a head from a zsphere and then explains his process and tips and tricks of retopology.

http://www.jcappelletti.com/z3tut03/

It’s very usefull for beginners, and I believe it made enough sense to me to get it! I will continue to finish off the feet of my model and then start to retopo the whole thing for posing :slight_smile:

Cheers guys!