ZBrushCentral

Metal Gear Solid: Grey Fox....and beyond...

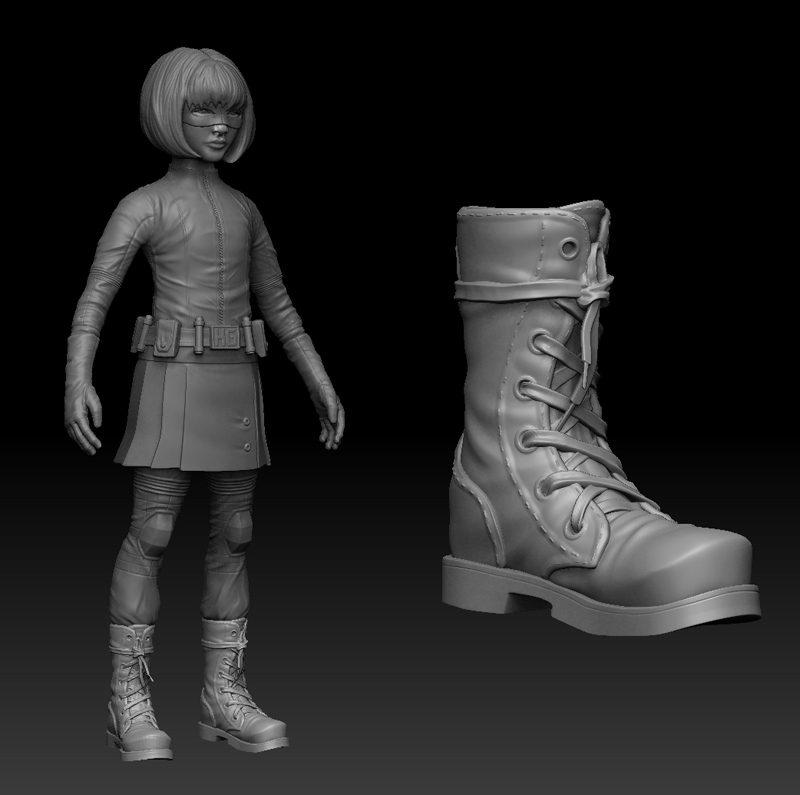
Omg I am loving the hit girl. Just seen the movie 6 days ago and loved it.

Can I ask you a few questions? Im a real noob to Zbrush and modeling in general. I am a stay-at-home dad using this program as a hobby atm and have no schooling whats so ever. Just learning this program through DvD and YouTube tutorials. How heavy are your high poly models to get that kind of detail? What is your process of making your models? Zspheres, premade base meshes from a 3D modeler, or through retopology? (besides that awesome looking alien, which you clearly showed you used Zspheres) Are you gonna make the Hit Girl into a game model as well?

Santis: Thanks man!

silkyskeeter: Thanks! Well, for something like a head, depending on how much detail I want, I usually subdivide to 1 or 2 million. Of course, this is very different depending on the artist and what your computer can handle. For the most part, I tend to use basemeshes I create in maya because I am much more comfortable with it. I will make Hitgirl a game model in the end. Once I am done with the sculpting, I will export all her pieces at a lower res and then retopo her to get my lo poly game mesh. Then I will bake out normal and AO maps before texturing her. I may polypaint her in the zbrush to get my base colors though.

Progress update: Finished the jacket for the chest portion. On to the cape or gloves next! Look Ma, no hands!

<table class=“fieldset” border=“0” cellpadding=“0” cellspacing=“1” width=“100%”><tbody><tr><td>WIP 3.jpg</td><td align=“right”>
</td></tr></tbody></table>

Alrighty! Worked on some gloves! I also went back and tweaked the chest a bit and added a few more details. I will probably do her legs next!

WIP 4.jpg

Got some time to sculpt tonight…whipped out her legs! Up next, her skirt.

ZBC1.jpg
<TABLE class=fieldset border=0 cellSpacing=1 cellPadding=0 width=“100%”><TBODY><TR><TD>[attach=194705]WIP 5.jpg[/attach]</TD><TD align=right>

</TD></TR></TBODY></TABLE>

Attachments

WIP 5.jpg

Very nice work, I too am like silkyskeeter, a hobbyist when i’m not at work. i am going to start using ZBrush more and more, i shy away from trying it because i tend to use Cinema 4d, but i would like to create characters, would you always advise retopologising the characters. Mine wont be used for games or anything just for me to show and learn.

Simon

Keep up the great work

Great sculpt of a great character - she freaking made the movie! :+1:

Knight Templar: Thanks! Well, in my experience, retopolizing is good for 2 things. One, when your mesh starts to get too high res, you can retopologize and then re bake the details on to your newly retopoed mesh. This is especially useful for faces and such to get a cleaner mesh. The second reason is for game models…retopoing your high res to get a low poly cage to bake your normal maps onto. So, in your case, it would be wise to retopologize if you want to make your sculpt mesh cleaner. This will allow you to sculpt further details much easier. Hope this helps!

Hosch: Thanks man! Yea, I loved the movie too…really motivated me to get back into sculpting!

Here is my latest update. I did the skirt but I have to admit, most of it was modeled in maya. Pretty much simple tweaks and the buttons were done in zbrush. Still, i will prob add further texture detail with a custom alpha at some point.

WIP 6.jpg

Worked on Hitgirl’s utility belt tonight! Not much but making progress slowly:D Prob will move onto her boots next…not looking forward to the laces:confused: I did them in maya using extrusion over a curve for my last character. They turned out “ok” but I think I want to do better this time. If anyone has any good suggestions?

WIP 7.jpg

For the laces,here was a method posted the other day using zsketch.
Still havent tried it yet.
http://www.zbrushcentral.com/showpost.php?p=684124&postcount=577

Really diggin this character. cant wait to see it finished. Loved the movie.
That little girl was “Kick A$$”:rolleyes:

daugaard47: Thanks man! that tutorial looks great! I have never used polish, hpolish, Zsketch, or TrimDynamic so this should be a great learning experience. My only concern is whether these exist in Zbrush 3 cuz thats all i have right now. Thanks a bunch though!

Alright, the boot took forever. Correction, the LACES took forever! Shout out to daugaard47 for linking me to a good shoe tutorial and to Callahan for writing it! Anyway, on to the cape!

ZBC1.jpg
[attach=195695]WIP 8.jpg[/attach]

Attachments

WIP 8.jpg

Well, the shoes look great - I will check out that tutorial.

Did a quick cape! Not sure if I’m gonna do more with it. Here it is for the time being.

WIP 9.jpg

Great cloth, and i like your boots ^^

Lovely work - what Game engine you planning on preping her for btw?

Oh and any Tut links u used would be much appreciated - Im currently sculpting a series of mini superheroes, so Shoes, Hair etc tuts would be great :smiley:

Keep on Zzzzing

this is looking pretty sweet already.

I am looking forward to see more updates. :+1:

renaud bellefon: thanks man! i have been painting cloth at work for years now so its fun to actually get to sculpt it out for a change :slight_smile:

Steamtrooper: i dont think i’m gonna render in a game engine this time around. though i would recommend marmoset if ur looking for one! i’m gonna try and do mental ray renders in 3dsmax. as for tutorials, here is the one i got from daugaard47 for shoes:
http://www.zbrushcentral.com/showpo…4&postcount=577

Beneto: thanks. i’m not sure if i want to model out the gun, grenade, knife straps she had on at the end of the movie. its either modeling that or moving on to polypainting :slight_smile:

nice take on hitgirl! That movie was awesome.
HEr boots kinda look too manly for her though…

HEr boots kinda look too manly for her though…
I have the “making of” book & I can vouch for sarakawa’s approach. The boots on the movie version of Hit Girl are indeed that utilitarian.