ZBrushCentral

MeshInsertDot - Possible to use one stroke, produce lots of bolts?

so i was under the impression that you could do this but maybe i was wrong,

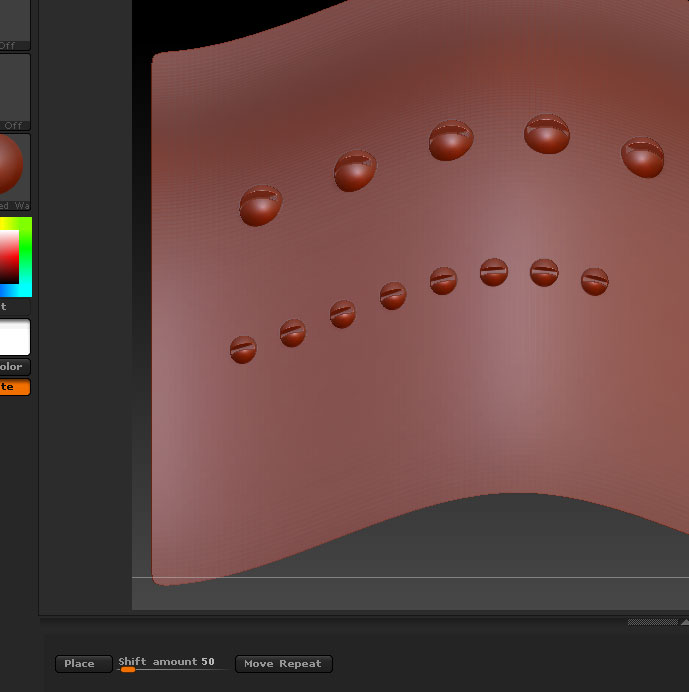
what i’d like to do is use the MeshInsertDot brush and stroke along a curved surface and have it drop a lot of instances of something (bolts, screws, etc).

currently, the only way to do this seems to be by using the radial symmetry and placing bolts around a circular feature… which is cool.

but is it possible for me to stroke along the curvy surface of a jet and just do a bunch of meshinserts along the way - of say, a bolt tool?

i’m trying to do everything i can under the stroke and brush settings using the DOTS stroke and its settings but i’m not having any luck.

any insight or a link to an existing tut or doc would be great.

thanks.

jin

ah… interesting-

so the mesh insert brushes do not respect the stroke types at all! basically, no matter what stroke type you select, everything just works like DRAG RECT.

i’ve put in a request for this to be changed so that the mesh insert brushes function just like the sculpt brushes. there’s no reason why they shouldn’t and it would go a long way toward giving us very accurate placement and alignment capabilities in zb, using zb’s philosophical approach of doing things even.

great way to draw a bunch of telephone poles along a road or when you have to place other evenly spaced details that require the detail of actual mesh as opposed to just an alpha stamp.


interestingly, i’ve also discovered that:

http://www.pixologic.com/docs/index.php/Strokes

under the section for the freehand example is currently erroneous. unintuitively, for 2d strokes, it is correct to select FREEHAND and then the SPACING option but for 3d, this function is moved over to DOTS where sample spacing is controlled by LAZY STEP. it seems it would make the most sense to simply give this kind of functionality in 2d AND 3d to DOTS and have spacing apply for both 2d and 3d as well. FREEHAND would just describe a stroke with samples so dense that it is essentially continuous.

With a script, you can do it along a straight line (conforming to the surface). I’ll try and post something later today.

Here’s a fairly basic script but it may help you. It’s a simple zscript so needs to be loaded whenever you need it. (If it’s useful I may turn it into a plugin when I have time.)

  1. Unzip the file to your ZBrush 4R3/ZScripts folder (or any other suitable location).

  2. Press the Load button in the ZScript menu and navigate to the file.

  3. Press ‘H’ on the keyboard to show the ZScript Window at the bottom of the UI, and the buttons and slider.

  4. Press the Place button to draw out the first rivet. The size is determined by the Draw Size and it will be placed in the middle of the canvas, so you’ll need to position your model appropriately. You can undo and repeat if you need to.

  5. Set the Shift amount slider to the distance (in pixels) you want between rivets.

  6. Press the Move Repeat button to shift the model to the left and place the next rivet. Repeat as necessary.

Attachments

MeshInsertRepeat.jpg

oooooh sweet… thanks marcus! currently, my tasks on set building requires placement along freeform paths but this will definitely be useful when interiors come up! thanks again.

jin