ZBrushCentral

Maya Transfer Maps Tool

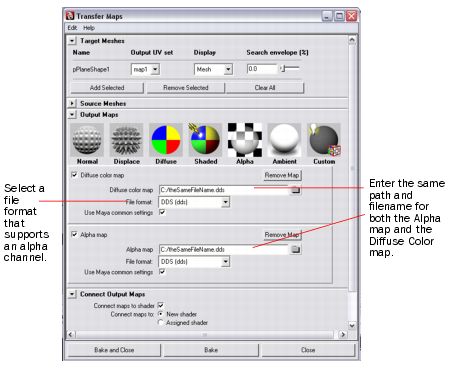
For those of you that are not familiar with the transfer maps feature in Maya and might be having issues with displacement maps, normal maps, or any other type of map in ZBrush, take a look at the “Transfer Maps” feature introduced in Maya 8.

You take your high res version (max subdiv) then your low res version (sub div 1) and import them both into Maya. Once in Maya go to Lighting/Shading>Transfer Maps.

Pretty much self explanitory from there. This might be familiar to some of you but I thought that I would share with all since it’s rather new.

Cheers,
Thomas Goddard

Attachments

bakingMapsWithAlpha.jpg

I was trying to find the difference between doing this and doing it manually by getting the map from Zbrush…
Is there a difference or is it just 2 different methods?

I was actually unable to find a tutorial on creating displacement maps in ZBrush from a tool. I just want the difference between a plane and the X,Z orthographic projection of my detailed mesh. I am not sure it’s as simple to create the many different types of maps in ZBrush that Maya’s “transfer maps” feature provides.

I’ve tried using the projection master tool but that produced some pretty wonky results.

digiegg:Yes. They use different methodology of taking the maps so you will have the almost same result but with different waiting time. And also still in Zbrush 3 the plug-ins don’t work so you have to use transfer maps in maya for workaround.
Kosher: projection master is the solution just you have to use it with high detail geometry - make a plane and devide it few times. Then use it and for a reason just try deformation turned on without color. Hope it works.
see this:
http://www.zbrush.info/wiki/index.php/Tutorial:ZProject_Bas-Relief
http://www.zbrush.info/wiki/index.php/Tutorial:_Modeling_a_Telephone
and here I have a post it is similar like tut for displacing but still under construction:
http://3d-tips.blogspot.com/
Hope you like it.

There is difference but it is technical. So after all the result is near the same. But for now you can’t use plug-ins in Zbrush 3 so Transfer maps is workaround.
Se my post here for more info:http://3d-tips.blogspot.com/
Kosher: I think you can do it with projection master with no problem just have to increase a resolution of the plane before using it. Also you can use this methods:
http://www.zbrush.info/wiki/index.php/Tutorial:ZProject_Bas-Relief
http://www.zbrush.info/wiki/index.php/Tutorial:_Modeling_a_Telephone

Thanks for the reply. Those examples are pretty good but I am more interested in the missing displacement feature. The fact that my mesh surface is not entirely planar creates some problems using projection master. The curvature of the surface causes the areas of the projected mesh to be very large.

I am basically trying to create a displacement map from a set of duplicated and scaled meshes that are in a sequence. If I can get the displacement map then I can use it as an alpha brush, which tends to look a little better than the projection master for some odd reason.

I am having some issues getting the displacement to look just right from the Maya “transfer maps” feature but I’ll keep playing with my options here and let you know what I come back with.

Thanks again for the replies.

Cheers,
Thomas

Well lets see have you tried 3d layers - new future of Zbrush 3?
You can even not duplicate but just make different deformations on your mesh in layers then use Store MorphTarget on layer from which you wish to add detail. And then just use new Morph tool to create like cloning of this displacement. Intensity of the brush show you how much of detail you can recreate. Second method is only with morphtg without 3d layers duplicate say one mesh or import 2 different doesn’t matter use one for morph and use Morph tool. Use switch comand to see your previous mesh.

Where is the “Morph Tool”? I also don’t see how to duplicate a layer and move it around on the surface, scale it, etc… Can you provide a little more detail?

Thanks!

Oh my mistake. Its morph brush it is active when you do StoreMT below Blob brush.
See here: http://www.zbrush.info/docs/index.php/3D_Layers
and here:http://www.zbrush.info/docs/index.php/3D_Layers
This is not layer that you can duplicate and scale this is just like slice of the cake (it is 3d layer under subtools ;-)). Think of it as variations to your mesh and on or of switch for detail. See this zscript below. About duplication you can’t store morph mesh with different topology, vertex. So maybe the workflow like two spheres 1st deform 2nd not 1st do storeMt then use CreateDiffMesh, then on 2nd do append in subtool. Other method is bu mapping still doesn’t work… I will see and post here if i have a solution.

Appending the two will still create two separate meshes. My whole purpose of creating the displacement map in maya or zb is to adjust the gain and use it as an alpha brush, so I can apply the brush with symmetry and create many instances. While animating my model, problems will arise with your technique.

With the single mesh it works with two or more you have to use append so it is no good for you or maybe break your model im maya and use separate pieces. Say you have a nice model of human. Break it on parts. Export the objs import lets say the head. StoreMT, Layer New, start sclupt make deformations, after done use turn of the visibility of this layer. Then you are beck in the original state again Layer New and make another one(different “blendshape”) etc… After done you can use StoreMT with different switch on layers and Morph brush to return this deformations. Then just use Visibility “Eye icon” to show different meshes you like and export it separate with displacement maps the Vertex count and the mesh stay the same only the deformations change so it will be good for animation. Then use the same method for other parts of the human. Import it all in Maya and use merge vertex. Merge your maps in Photoshop. And use your aplhas values copied from Zbrush. But I think you have to do your work again as far as modeling different diformations.
For projection master you have to (get)make your projections base on the camera so what you see is what you get. For example you have a face the projected(texture/deformation) will be nice in front on the nose area if you set it in high resolution but as soon as you go to faces that are away from camera years it will be destorted. So where it is destorted you must do another projection again. And your map can be based on the multiple projections using the master it will automaticli paint over the last and sum it.

Another method is using the import. Say you have different blendshapes in maya or two, three heads with different expressions. Import one then with it selected import other and if it has the same number of vertcies you will make the deformation on your mesh.:cool:

PS: Me still looking for nice method.

Thanks for the tips.

I ended up using Maya’s “transfer maps” feature to take my shape displacement map and apply it to many areas using the radial symmetry brush.

The initial issue was Grainy Alphas and stepping/banding.
http://zbrushcentral.com/zbc/showthread.php?t=47411

I discovered that Maya only supports 32 bit displacement maps if you use .exr. I took the .exr alpha channel and placed it into a new 16bit .psd file and inverted the image.

I still had grainy issues so rather than smoothing each instance after painting in ZB, I applied a cubic blur of about 10 to the .psd version, which got rid of the ray->tessellated poly-bounce artifacts from mental ray :wink: . I did all of these steps at a resolution of 4096^2.

The result is exactly what I was looking for. I just wish I knew the exact setting in Maya to get rid of the tessellation details in the displacement map. It’s like the normals are all facing perpendicular to the surface, causing gourad shading at the triangle detailed level.

As another side note and perhaps a feature request for ZB, it would be great to be able to take two separate meshes and generate a displacement difference from the two.

For example, in Maya, I created a poly plane and placed it below a completely separate mesh (based on totally different geometry) and generated displacement map using transfer map from my highly detailed mesh on the plane.

The only way I know of creating a displacement map in ZB is by using the same mesh with different subdiv levels. I would say that's the main difference between Maya's Transfer Maps tool and ZBs displacement maps tool.

HELP…

I’m wondering on how i can get the maya displacement transfer map tool to calculate an accurate displacement from the hires to the lowres. Often i generate a displacement(or depth/height map) in maya, i get really shallow and blurred grayscale maps that don’t represent the true depth of the object’s details. The normal transfer map works brilliantly but the displacement doesn’t make an accurate calculation. Any tips?