ZBrushCentral

maya 2009 / zbrush displacement issue - not the usual!

Hi All,

I am aware that there are plenty of threads dealing with similar issues and I have read all of them at least twice.
I will post in detail my steps to get to where I am and hope somebody can help me with the problems. There are more than just one but I thought I just start with one and see what I am left with once this one is solved.

Basically I can not get my 32bit displacement maps to render in Maya Mental Ray in any way close to what they look like in Zbrush. I am running the ccmesh script from scot spencer and I am using the correct settings as far as I can tell but am getting highly bizarre results.

Here is one example, the workflow is always the same:

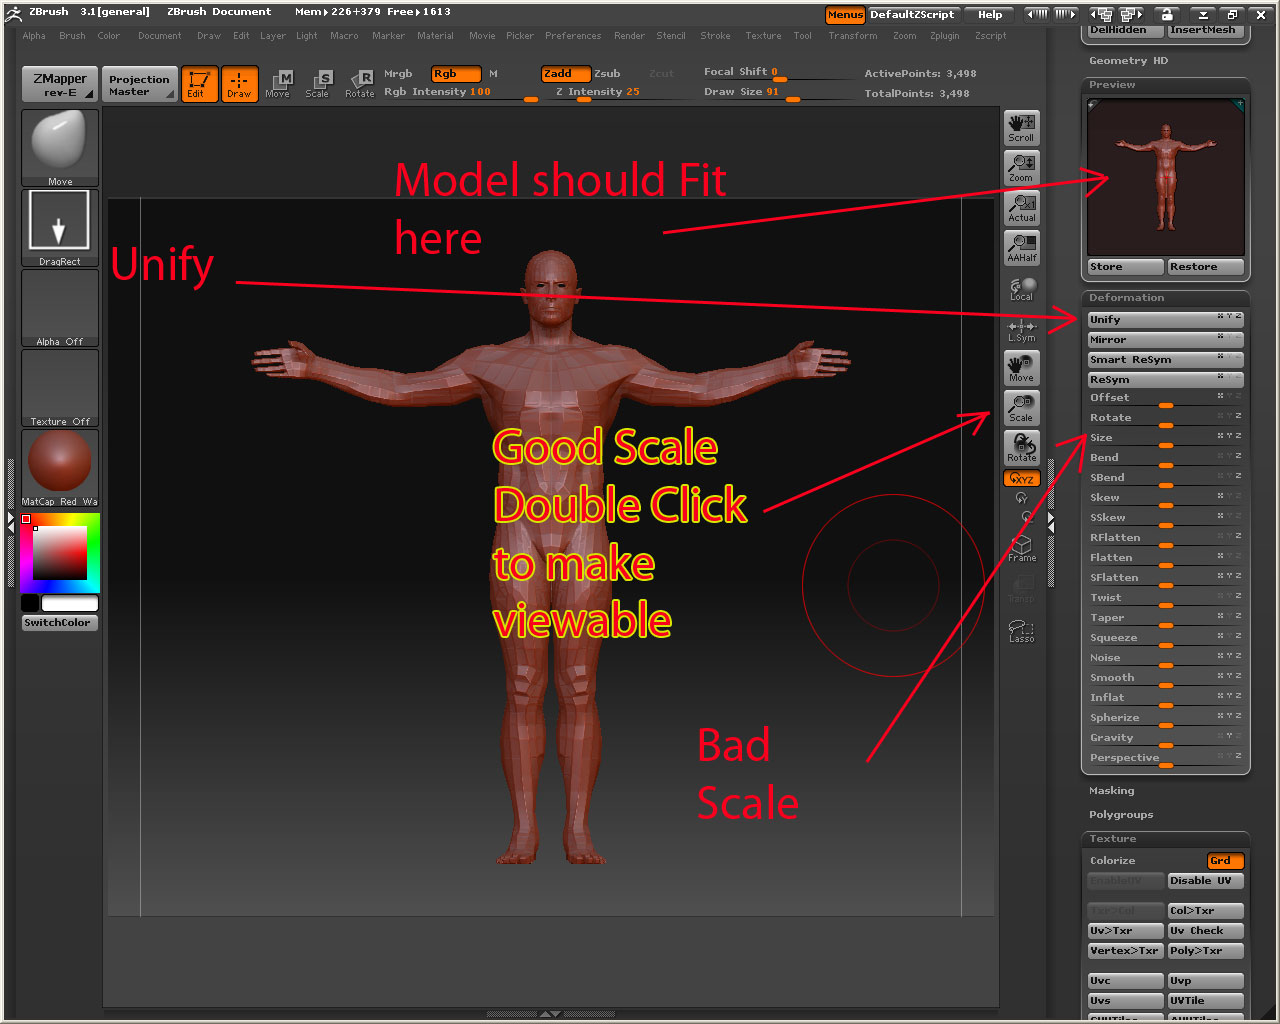
I have a model with 4 levels, lowest at 25k, highest at around 1.6million

and here at the highest level:

no to keep things simple i am using AUVtiles to automate the UV process. I do this on the lowest level via:

then as the next step I export the newly uvmapped model on the lowest level as an obj for later use in maya:

then i set up my 32 bit displacements like this:

… which creates a file in about 30 seconds, good size, it all makes sense. i then convert it via imf_copy to a .map format for maya

and import it into maya. I also check the UVs and as you can see below the automatic mapping from zbrush has worked as intended:

now i switch of feature displacement:

and set up the subdivision approximation editor to match the zbrush division settings like so:

then I run the script to setup the ccmesh:

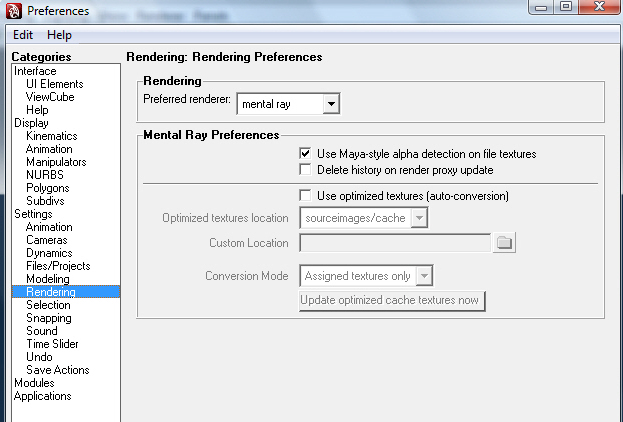
i create a shader network with a simple lambert shader and a displacement node attached to its shading group, and load the .map file into the file node and set it up with the standard 2.2/-1.1 setting

now I render with the settings above and get NOTHING, which is strange to begin with - it looks like its simply subdividing the mesh but not adding any detail - however there already is a slight problem around the toenails …

now, just to make a point, i up the settings by a factor 100 to see if there actually is any effect to the mesh and i get the strangest thing ever:

which looks like some tiling/uv border issue. I have all sorts of other issues that I dont want to let out of the bag as of yet because they might all be connected or might confuse the process of solving this issue but I am happy to post more if somebody can maybe help me with this one first?
This has literally been driving me nuts for weeks and weeks and I really dont know why this process is so complicated and hard to figure out!!
any help would be much appreciated!!

your 7th picture shows your UVs
which have small UV to poly ratios and odd spacing

can you post your displacement map / uv snapshot

side by side?

It would be easyier to figure out this way.
Ow and for entertainment sake a screen pic of your preview window inside the tool menu within zbrush.

Double post sorry.

hi - here is the link to my uv snapshot (3k):

snapshot

the disp map itself is 32 bit and looks just plain grey which is suspicious but not unusual, i cant find any detail in it even if i play with the exposure in photoshop but again thats not really unusual - i cant post the file as it is over 100mb in size and if I save it as a jpg it loses its range? Any suggestions?

Could this be some sort of scale issue? When I place my model in zbrush and press the edit button, it always appears as a tiny dot which I then have to scale up using the scale tool on the sidebar to get it to a reasonable viewable size? but even without this seems to happen the same way, without me touching the model at all, or as a third option using the UNIFY button - it still is the same problem

Ok

  1. Never take a sculpt and scale up using the deformation it will flatten the levels of displacement.

Well that was easy :wink:

  1. Try not to over do your UVS
    Example : Giant guy with armor - hemlet -sword of a 1000 truths - rocket launcher all done using AUV tiling

your UVs are so small they could not hold any detail if they tried

The fix

  1. First Unify you model
  2. Delete lower Subdivides
  3. Reconstruct subdivides back down till you get to your lowest (this will rebuild your levels of displacements that got flattened) “BTW this takes forever”
    4.Then at the lowest level redo your AUV tiles

These 4 steps I religiously do before making any displacement maps.

  1. When you do get it done and rendered in maya pat yourself on the back and start looking into UVW mapping your character. The UVW mapping holds displacements better since most of the UVS are stitched together.
    Its also more professional then AUV tiles.

wow if this works I might have to send you a christmas present or something.

as for the uvs - I am completely aware (and agree) with what you said, naturally, the reason I used AUVtiles for this instead of my original uvmap is to eradicate any possibility of error with anything I have done, i.e. reduce my involvement and concentrate on the automation.

In any case, I will do exactly what you said and let you know how it goes in a few hours (depending on how long it will take).

Also, if I had a better uvmap for the character and wanted to transfer it onto the mesh in zbrush, how would I do that?

Thanks mate!

also, just a practical question in regards to the scale:

i load my ztl tool and when i place it in the viewport it is absolutely tiny. How do i actually get it to a resonable viewable size without scaling it?

Are you using Size in the deformation pallet
or scale?

here is a picture

still repeat steps 1-4 on the above post

[model.jpg]

thanks - yes, i was doing the right thing then (unfortunately that might mean it wont solve the problem?) -

in any case, I am doing the reconstruction now and will let you know in a tick

thanks again

damn that means i was doing the right thing before??

anyhow, let me go through the steps, I will let you know in a tick, thanks!

I have done exactly what you said but the result is still the same. I get no displacement showing up in maya, basically just a smoothed object. If I up the settings to a ridiculous degree I get artefacts like before. If i do not use AUV tiles but a preliminary UVmap the problem is the same - no displacement and artifacts if the alpha gain is upped too much.

what the hell is going on.

In the picture you posted below:

then i set up my 32 bit displacements like this:

You have your SubD level set at division 4 - is this intentional?
You should have this set to its lowest level (level 1) to create your disp. map…

Also, having your disp. map’s file node with ‘Filter’ (at the top) unchecked may help things along toward a sweeter result.

Hope it helps :slight_smile:

Chris

i am generating it from level 1. I still dont get any results. Its so bizarre.

another wird thing i am encountering is (and this is probably unrelated, but i am so desperate i might aswell give it a go)

… when i use the model from my tool palete i can NOT draw it onto my viewport. The only way i can use it is by being in draw mode, clicking ONCE and then going into edit mode and scaling it up via double click on the scale icon.

with any other tool i can click and then drag the object until it is my desired size. With this one it doesnt work?

hi there i too am facing the same problems as u are i am using zbrush 3.1 and maya 2009 64 bit and i am also getiing weired art effect i used the same method suggested by scott spencer also i used the script he has written first there were texture tears then after using the script that was solved but i started geeting art effect in my renders on the model i took the same file and tried it in maya 8 and well it worked without any glitch i guess it is maya approximation editor problem and i guess some more thing have changed and script provided is not sufficent . :confused: plz if any one has a solution do post it

I’m using maya 09 x64 and zb3.1 and everything works fine , I’m using always this tutorial zbrush to maya guide :slight_smile: http://www.zbrush.info/docs/index.php/ZBrush_To_Maya_Displacement_Guide

Hey I’m having the same problem with Maya 9. I can guarantee you, it has something to do with Maya 9 because I’m able to render it in Maya 7. Maya 9 refuses to get me a proper displacement. I’ve been trying to figure this out for weeeeeeeks. I still can’t freaking figure it out.

My other problem I’m most concerned about are distortions in my maps! If you have that same problem, let me know!

i worked it out in maya 2009, it was nothing particular really but a combination of issues. Basically do what is described in Scott Spencers thread but make sure that when your render in mental ray you switch the filter optioin off in the file-in node for your displacement map. I was alwyas under the impression, that it was switched off, but if it says anything int he pull down menu (like quadratic etc) it actually is filtering the map. This might not be an issue with proper uv-mapped models, but if you use auv tiles and have quite a lot of faces it will blur out your detail and it will appears as if you dont have anything. thats what I had.

thanks to everybody who helped me!

Ha! Maybe I should have bolded this:

Quote from post#12

Also, having your disp. map’s file node with ‘Filter’ (at the top) unchecked may help things along toward a sweeter result.
No matter; you sorted it, that’s the main thing :slight_smile:

My displacement maps are working fine without using the CCMesh script.
Although i am having this issue with Normal Maps.
I still setup the AlphaOffset as usual and the MR Approximation.

Also try turning on and off
use Maya-style alpha detection on file textures
under Preferences/Rendering.

m_pref_snap.jpg