Hi, I’m a newbie trying to make a MatCap (4R6). I’ve done the MatCap tut in Eric Keller’s “Introducing ZBrush 4”. That worked fine - with his tut files. But when I come to load my own reference image/tool - I cant draw a tool beside that one to see it update as I sample. It only draws within the confines of the reference image - and of course, drops when I select the MatCap tool. Can anyone please point out where I’m goofing up?
Cheers
Mike
Hi!
I don’t know the tutorial you are referring to but I have made a few matcaps, can you explain more what you are trying to do?
The MatCap brush is sort of sort of a 2.5D thing where it will be grabbing stuff directly off the canvas. This means that if you want to grab from an object you need to drop it first.
Not being clear on what you are up to however Im having trouble grasping the problem…
Cheers!
Mealea
Hi Mealea,
thanks for replying. I’ve tried a few of the ways to create MatCaps that I’ve come across. The one in Kellers book differs in that it has a source image - a photograph ‘dropped to canvas’ and saved as a .zmt file, and that this document can be loaded and a new tool drawn in beside it - that updates with the MapCap in re-time each time you sample. Works fine! But when I try and make my own reference image - whenever I go to draw in the tool and watch it update - it only draws within, or part of, the image file. Something blindingly stupid I am doing, just not sure what…
Cheers
Mike
|
|
Sorry it took me so long to get back to you, normally ZBC sends me an email when things happen, this has stopped again for some reason…
Anyhow it doesn’t sound like your problem is stupid at all, it sounds like a problem and one I don’t fully understand…
I don’t know the book but I think I understand what is happening…
What you are doing is bringing in an image onto the canvas, adding an object and then using the MatCap tool to make a new MatCap right?
If so that workflow SHOULD go like this:
- In the Texture Menu at the top hit the Import Button.
- Select your image, it should now be in the little thumbnails in that pallet.
- Click on its little Icon.
- A little below that click on the Crop and Fill button, your picture should now fill the Canvas.
- Draw an object (a sphere is usually good) somewhere on the Canvas where it won’t be in your way.
- Turn on Edit.
- Now select the MatCap tool, you will be asked if you want to switch from one mode to another, say yes (or in this case Switch).
- Now try doing your samples with the MatCap tool.
- Now make a new Canvas and plop down a new object, it SHOULD have your new MatCap (which will have temporarily replaced the one you started off with, usually Red Wax).
- If you want to keep it because its insanely cool, go into the Material Pallet on the Left and hit Save (this is actually Save As, so don’t worry you didn’t destroy the one you made this over) and pick a place to put it.
Remember this tool grabs color and basically ramps it from one place to another and doing it a few times seems to make the best stuff. This means that if you are doing skin you should be able to get the color and some of the lighting but you won’t get little things like pores, pimples, hair and gigantic warts.
If you are on a PC and you love your MatCap and want it to load into ZBrush automatically whenever you start it up you need to go into your ZBrush directory under /ZStartUp/Materials/ and plop it in there.
Also there is a GREAT program called MaCrea for the PC that Taron made, its AWESOME and you can grab the latest (I think) version of it here:
http://www.zbrushcentral.com/showthread.php?92157-MaCrea-Material-Creation-Tool&p=722506&viewfull=1#post722506
You would use a slightly diferent process for getting these in but if you have trouble with that feel free to yell at me about it ok?
Cheers!
Mealea
|
Hi Mealea,
thanks heaps for taking the time over this. I’ve still got the ‘issue’ but perhaps slightly closer to getting what it is. I’m going to fiddle around a bit more, then maybe post some pics to explain better…
Cheers
Mike
OK, I’m dreading how this might look once its posted…
-
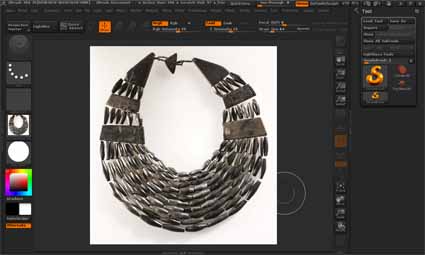
I can import my texture image, use a flat white material, crop and fill
-
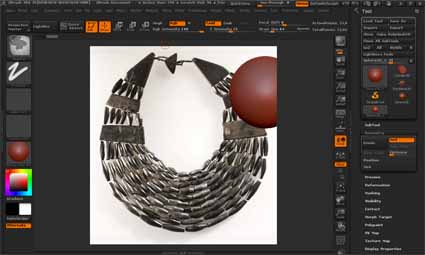
Then change to red wax, draw in a sphere and go into Edit mode. However, the sphere is restricted to the bounds of the image (I guess because of the Crop and Fill, the bounds of the image are the bounds of the Canvas?). In the image below I’ve moved the sphere to the edge to show it being truncated.
-
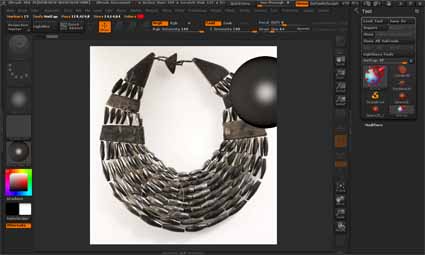
I can go into MatCap mode and sample the image…
-
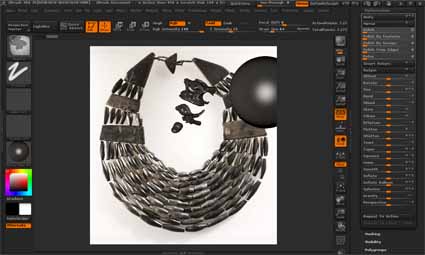
I can then load another tool, in this case, Ian Keller’s “monster”. It has the qualities of the new MatCap - but it is restricted to within the texture image, and basically bisected by it:
-
Although I can rotate it, its still annoyingly cramped by being within the image:

-
Now, in Keller’s book tutorials, he gives you a document to open - an image of raw chicken (!). This opens nicely to one side, then when you upload the ‘monster’ tool - it is entirely outside the image, and free to be rotated in any way with being obscured - and to change in re-time while you use the MatCap:
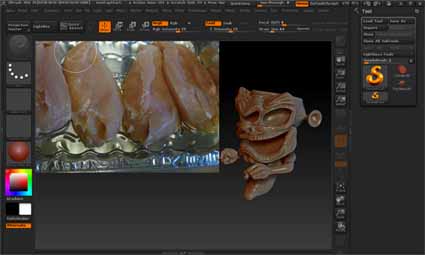
-
But… if I try and make an image into a document, then upload a tool - it only loads within that image/canvas space. I cant get it into the ‘free space’ to one side.


Any ideas what I am doing wrong?
Thanks for any ideas!
Cheers,
Mike
Sorry, Point 6 should read “to change in real-time while you use the MatCap”
That’s very interesting, Im not sure how he did that but try this, when his image is up hit Shift Z on your keyboard, does the image disappear?
If so I think he’s using spotlight…
The more I think about it the more I think this is the case, meaning he used SpotLight.
Spotlight is terrific tool but its slightly more complicated and allows you to do some outrageous stuff.
To get your image into SpotLight and then onto (or sort of floating very near) the Canvas:
- Dock the Texture Menu (the one at the TOP of the ZBrush window) by clicking the tiny little icon in its upper left corner (a little circle with a line in it, all menus have it). Docking it makes it MUCH easier to get at.
- Import your image by clicking the Import Button at the top.
- Click your images icon or thumbnail to make it the active texture.
- Just below the texture icons you will see two rows of other icons, click the one on the top right, its “Add To Spotlight”. Hovering your mouse over each of these will show you what they are with ToolTips.
- For some reason clicking this pops up LightBox, close it, its obnoxious and in the way.
- Your image should now be on screen with a circle thingy full of tiny little incomprehensible icons.
- If you click on the Canvas the circle thingy will hop to where you click, if you click and drag your image will move around.
- Hit the letter Z on your keyboard, the circle should vanish. Hit it again and it will pop back up. Shift Z will turn the circle thing and the image on and off.
- Make sure the Circle is off using the Z key.
- Draw your object onto the Canvas.
- Turn on Edit Mode.
- Go nuts with the MatCap Tool.
You can now place your object any place you like and using the circle thingy move the image anywhere you like.
Turning on the MatCap Tool will still drop your object to the canvas but you can always re-draw it so that isn’t an issue.
I bet that is what he was up to.
Raw CHICKEN???
YUCK!!!
Aha! Thanks so much for this - sorry, now my turn to say this didnt come up in my alerts… I’m only getting a chance to fiddle with this every few days. I will run through what you suggest and report back.
Cheers!
Brilliant! Perfect! Thanks so much for your time in this, it’s got me over one more hurdle…
I’ll risk one more question.  I’m still not clear on the sampling directions for MatCaps. For example:
Eric Keller (Introducing ZBrush4) says “For best results, you’ll want to aim the arrow in the direction the light is coming from, if you want the light of the material to match the light in the image”
Wayne Robson (Essential Zbrush) says “drag on the image in the direction the surface normal is facing. Remember that a surface normal is best imagined as a short line pointing perpendicularly from the center of an imaginary square outward. For every point you sample, make sure that the surface direction. … So make a number of points, making sure that all surface directions are covered.”
Andrzej Kuziola (online tutorial – Create your own Matcaps) says “dragging the cursor until a red arrow will point outward normal direction.”
Kosova (ZBrush Central tutorial) says “Start capturing the material by pressing and dragging in different directions.”
So, is the idea to get the arrow to point out perpendicularly from the surface of what you are sampling:
Or always in the direction of the light:
Or … maybe doesnt matter? Again, appreciate any comments. Cheers, Mike