I bet part #3 will be released tomorrow. hint hint 
Ok, I guess not for Christmas but I bet we’ll get part 3 as a New Year present. :lol:
Ok, I guess not for New Years either. Too bad. I’d love to see part #3 and get some additional tut info on the techniques.
I agree- 
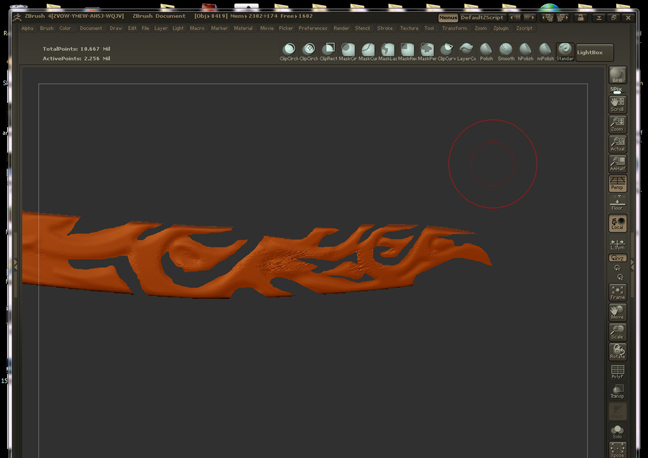
I have been all over the web and all over here on ZBrush Central and cannot find the answer to my question below (I have wasted a week doing so). Anywho, I am simply trying to ‘cut’ into my model (see below). I believe the old Eraser brush did this, but don’t know as I never used it. I have attempted to use the clipping options but, need to hide one side of the model or of course, it cuts on that side as well (even with symetry off). And to do so, I would then need to Smrtresym which takes forever. I have attempted to mask and HidePT but, this leaves HOLES in the mesh and of course, Close Holes will not work on a subdivided mesh. So no go there. And anywho, clipping does not seem to work to well for what I need. The first image is using clipping, the second is what I did in Photoshop to simulate what I want to do in ZBrush. I could probably use an Alpha, but, again, how would you delete the mesh you no longer want (without leaving holes)?
Any help is much appreciated.
- ZBrush and Clipping;
- What I am going after (simulated in Photoshop):
Also, after using the clipping brushes, how does one reset the CTL+SHIFT key to go back to use as a HIDING option again?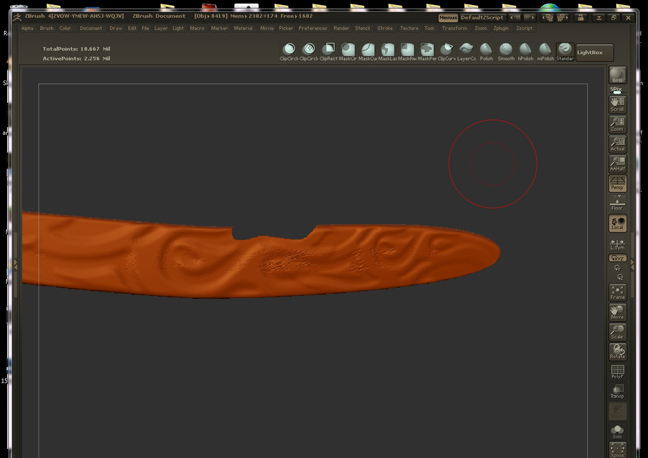
I’m not really sure if this will work with clipping brushes … but why not use the extract funktion in SubTools pannel? … easily make a mask (ctrl + LMB) of your ornament (the area you want to cut out) and invert it (LMB outside of your model) … then go to SubTools and adjust the Thick value (around 1), then hit Extract!
Hey, thank’s LetoAtrell, I had actually thought of doing it this way (it’s how I created the tool I am looking to ‘cut’ into) but I was looking for another option besides extraction again. But, seems the way to go. I was also looking at doing Remesh all, but does not seem an easy task for what I am looking to accomplish. So, again, thanks for responding.
If anyone else is interested, check out the video below. Just awsome-
http://www.autoblog.com/2010/11/30/video-ever-seen-a-v24-diesel-rock-the-dyno/#continued
Enjoy
Still anxiously awaiting part 3 of this cool 3 part motorcycle build. Hopefully Pix will get back to it soon.
Hi EZRA52, ya, the third part would be cool. But, I have a feeling this one’s dead in the water (or, forum). I am sure Pix’s is very busy right now improving/adding features to the next version of ZBrush. I am amazed he comes up here at all. But, one can still be hopeful right?
One thing that I’m struggling to follow is how the extracted subtools are bevelled?
I draw a mask, extract the mask to a new subtool, hide the front face and add an edge loop to the sides, so far so good. However when I then show the front and hide the sides I go to the deformation tab and use inflate just like in the video, but it doesn’t work as expected - it doesn’t create a bevel but moves the faces inwards.
I didn’t rewatch the video I just tried this.
- I extracted a new subtool frome a plane of about a million polies.
- I hid the front and back leaving the edge polygroup.
- I create new edgeloops so that there are now 3 plygroups running around the tools edge.
- I then hid those new edgeloops leaving only the ceter polygroup around the edge of the tool not hidden.
- I inflated that in the x and y axis creating a bevel of the added edgeloops when I show everything again.
- I used mask and transpose move to make the bevels wider or narrower in the z axis.
I’m sure Pix’s method was much more elegant but this works.
Thanks - I needed to disable the Z axis in the deformation and now it’s working like in the video.
Part 3 of this is going to be sooo educational and inspirational.
EZRA52, your funny. You seem to be ‘daring’ Pixolator to finish part 3 and post it. I hope it works-
Been out in the wild for a while, working, dealing with a very sick wife for about a year.
Life is back on track so I came back to ZB for some much needed “me time”.
And what do I find when I return? THIS!!!
Pixolator, I know you have talent, but this is just mind blowing! You make it look so easy! Props to you mate.
Hope to see more from you.
Mark
The music! Please let us know where you got that theme from! Please!
A downloadable Quicktime or similar of these please! I would really boost my knowledge of the program and it’s potential if I was able to fullframe this and step through it frame by frame on some places. As it is now, things just whirl past without much chance of seeing what commands and moves were used.
Thanks
Thomas