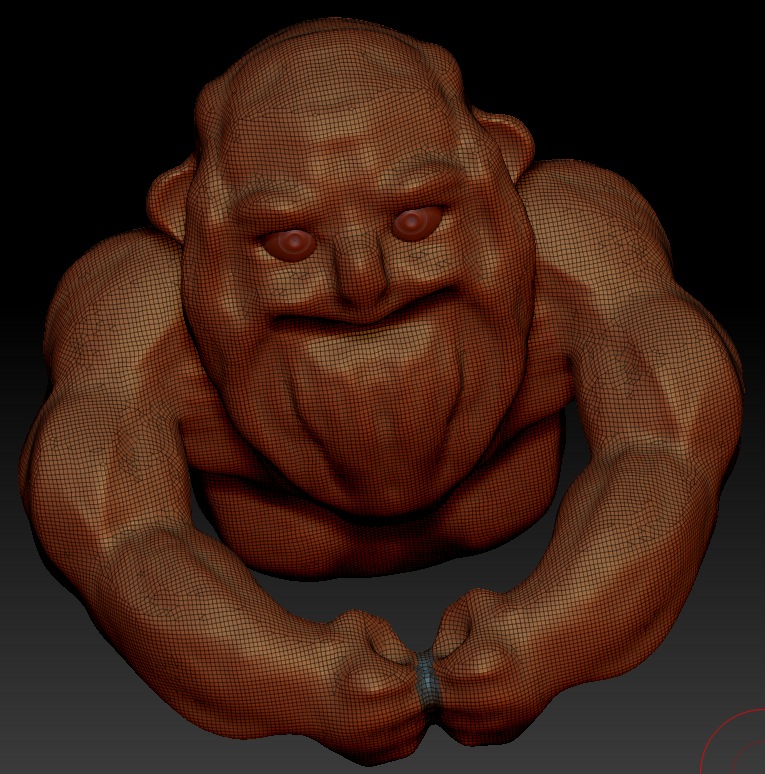
Currently I am going to sculpt a muscled-grandpa … I am new to Zbrush so do not ask me, how I got to the point yo see in the screenshot – all I want for now is to split the mesh between the fists. But I just do not get it! I’ve tried a lot of things from dynamesh subtractions to slice-curve and polygroup-stuff, but I just can not get rid of the blue-marked polygons. Simply pressing »Delete« does not work, too.
What am I missing? How can I get rid of the connecting polygons and how can I close the mesh there if it is necessary?
That blue area is a polygroup, and so it’s possible to split that right out. In this case, it appears to be one of two polygroups, so that makes it even faster.
Go to Tool > Subtool > Split > Groups Split
This will make each polygroup into its own subtool. Simply delete the subtool you don’t want (the one that results from that little blue area).
Now, you are using Dynamesh I see. The holes in the hands will probably be small enough that doing another Dynamesh (Ctrl + Click Drag in space) will seal those up.
Then you’re good to go! You can proceed to sculpt out your character.
As a side note, there are several other ways to get rid of an unwanted Polygroup. This is just the one that I use often, and for a newer user, it gives you actual buttons to hit where another method involves hide/show actions which, I remember took me some time to get used to back in the day.
Please post back and let us know if that’s working for you.
In Subtool > Split > Groups Split everything was greyed out – no matter if I turned Dynamesh on or off. So, one try was to click on “Make polymesh 3d” – this made the splitting-options available and after “Group split” the polys between the hands were succesfully removed.
Two problems:
I lost the eyes of the guy (they were a subtool)
when I reactivate Dynamesh to seal the holes as you suggested, the mesh is closed again as it was in the first place – only without the polygroup and without the eyes. When I click on “Close holes” it is working as expected, the wholes are closed. But clicking on dynamesh (which I would love to use further at this point), reactivates the “glued fists” again … weird. Maybe the distance is too, low? I’ll try a little more, but I am not really understanding what’s happening there.
If you have any more ideas … very much appreaciated! I have a lot of projects where I stopped at a certain point because I could not find a solution for a certain small problem just like this case.
At least I finally think and see that ZBrush is worth the trouble. SO great!
I loose the eyes-subtool, but it works as you decribed. My previous selection had left over some tiny, almost unvisible connection between the fist. I made a bigger poly-group between the fists and now the are divided. Also in Dynamesh.
OK, our first problem here in troubleshooting this is that we need to make sure the mesh doesn’t have weird things going on before you do the steps to remove the polygroup. So do this and let me know:
Preparation:
Let’s isolate your mesh for now to control the circumstances. Select the mesh you wish to change in the Subtool palette and hit Tool > Clone. In the tool palette, a clone of your mesh appears. It’ll be the one that has no subtools. Select it.
Turn OFF Dynamesh for now.
Make sure every bit of the mesh is showing. Ctrl + Shift + Click in open space and the entire mesh will show (if any of was hidden in the first place)
Eliminate all Polygroups. Click Tools > Polygroups > GroupVisible.
Mask the area you wish to remove. Rotate the mesh so that you’re above the hands and can clearly see what you want to mask. Then, Ctrl + Click + Drag a rectangular mask over the area you want to remove.
Make a polygroup from the masked area. Hit Tool > PolyGroups > Group Masked Clear Mask -OR- just Ctrl + W. The masked area becomes a polygroup. Be sure you have Polyframe ON to see it. (Shift + f)
Removing the unwanted mesh:
Now we’ll do a method that should help to seal the holes up first and really separate the two areas permanently.
Make separate Dynamesh groups from your Polygroups. Go to Tool > Geometry > Dynamesh sub-palette. Turn ‘Group’ to ON. Now press ‘Dynamesh’ to turn it ON. The two separate polygroups become distinctly separate and sealed meshes.
Hide the mesh you don’t want. Ctrl + Shift + Click on the mesh you wish to keep. This will hide the mesh you wish to remove.
Delete the hidden mesh. Click Tool > Geometry > Modify Topology > DelHidden. The hidden mesh is now deleted and no amount of hide/show efforts can bring it back. It’s gone and you have the mesh you wanted all along.
Getting the other parts back.
Find the Tool in the Tool palette that has the eye you want had before.
Select the tool and then select the subtool you no longer need from it. Press Tool > Subtool > Delete. Repeat this for all unwanted subtools. You will be left with just the eyes.
Up on the Tool palette, select the tool that we just prepared the Dynamesh turned on and the little unwanted are removed.
Go to Tool > Subtool > Append and append the ‘eyes’ mesh that you just prepared in step 2.
After all this, you should be left with a Tool that includes your old man, with his hands having a space between. And the eyes will be a separate subtool. SAVE the Tool!