ZBrushCentral

Keys To Your Soul!

Dman3d: Yeah sure I’ll do a little screenshot with some info on the settings and stuff over the weekend. cheers man.
Julian_K: Yeah this is the poster study I think more passes from zbrush are needed to make something nice so thats going to be my next step. BTW just been on your website love your art man great feel to it!!
:+1:

Dan

Dman3d: sorry forgot yes its comped in Photoshop, one fill ,one rim ,one key and a depth pass, then coloured the lights in Photoshop and set to screen blending mode for rim effects.

Dan

thanks man, very appreciated. This weekend I’ll do my first paintover of a Zbrush render on a 130x110 cm canvas. Just got the printed Canvas today and the print worked out fantastic. tomorrow I’ll start messing it up badly and intenionally so :wink:

btw, your gymnast is breathtakingly graceful. wonderful piece. I bet that would look amazing printed out on a really huge canvas hanging on the wall in a large room with nothing but on a chair and a piano standing there to the side :slight_smile:

Julian_K: Nice man keep me posted at the address below when you get going I’d love to see the wips :+1:

Dan

most of the wips are/will be in my thread( link below)

I just edited my previous post, forgot to mention how impressed I am with your gymnast.

Julian K. Cheers man yeah I can picture it now, be good with a glass of red too lol I think printing onto canvas is a great idea too I keep watch for yours.
Cheers

Dan

Awesome thanks:+1:

Julien K: Yeah it’s fine I usually check zbrush central so no fear cheers
:cool:

Dman 3d : short screen breakdown as promised.
Cheers

Dan key.jpg

The depth cue and rim are set to screen in Photoshop or your editor of choice then you can add your colour overlays etc for your image adjustments like I did on the poster style shot. I hope this helps. Have a play with the focal curve the effects can be cool.

Cheers

Dan

Attachments

rim.jpg

depth.jpg

cool lighting tips. Thanks for sharing :slight_smile:

Ah yeah, thanks a ton. Started to get straightened out on z lighting and mats finally. Makes more sense now.:+1:

Fantastic thread,brilliant model and thanks for the help!!

Excellent. I love your Nosferatu. Excellent. I love your Nosferatu. The eyes have transparency, could you put the settings file?

Thanks for sharing.

b2przemo: No problem thanks for looking. :+1:
Dman3d: Good man glad it helped, its the little things that can throw you off I found so its really good to just mess around with it glad you are getting results :+1:
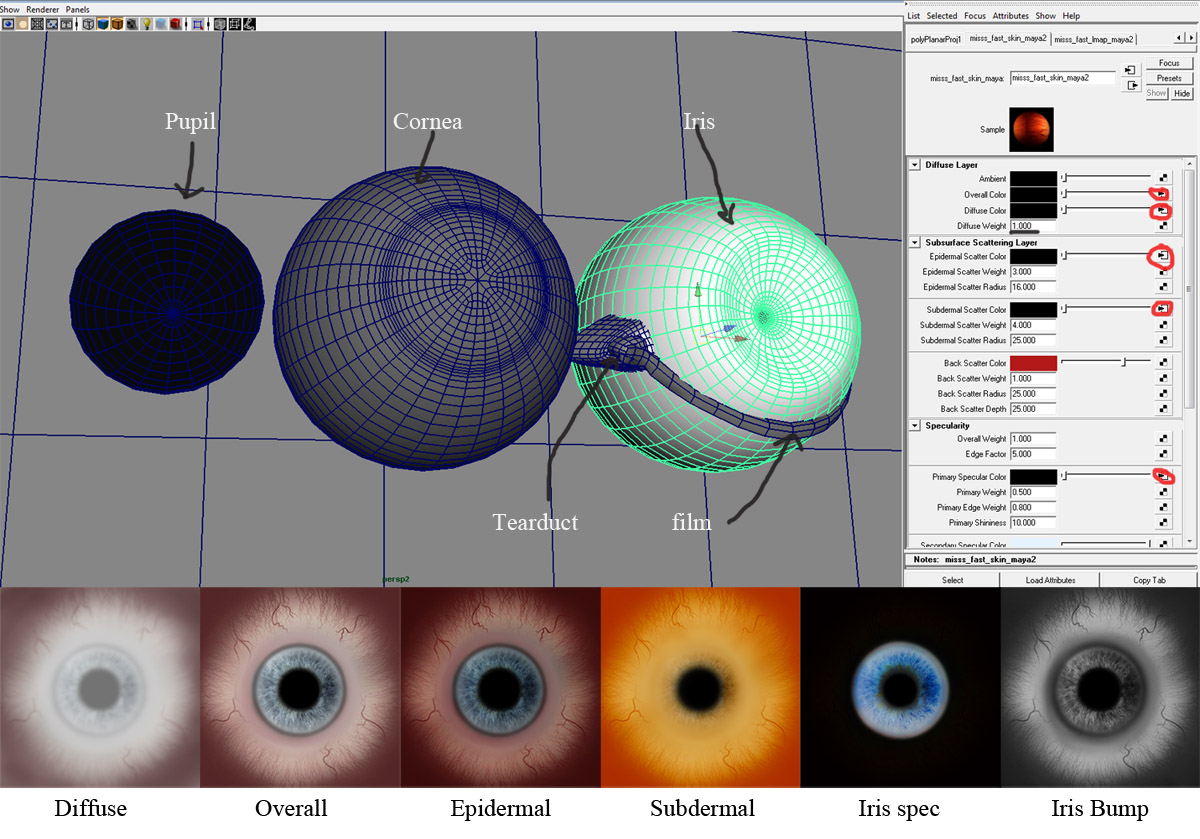
saltapiedras: Cheers fella I have a little breakdown for you. I used 3 components for the model itself Iris, Cornea with corneal bulge modelled also as one mesh, and pupil set to black so no possible light bounce off the back of it, the cornea set to 100 % transparent and set to receive hdri only so no additional casting of shadow etc etc. Iris has the following detail: SSS shader, with a bump and all the maps you need the important task in getting it to look right comes from balancing up the overall and the diffuse maps and the diffuse weight at the top I played with these quite a lot to get the effect I wanted start off with very low colour in these maps and use your base colour meaning your full colour map into the epidermal slot and work your way up till you feel it looks natural. Also really important here is gamma I used a gamma correction curve also attached to all of my maps for the render which corresponded to my scene gamma on my camera lens very important for true colour match from photoshop. I hope this part will help and have fun.

Cheers again

Dan [attach=213045]eyesheet.jpg[/attach]

Attachments

eyesheet.jpg

calum5ZB: cheers man! :wink: