I really like this female concept. It reminds me of a Mike Jensen piece from a tutorial. Very nice.
Thanks rdubya82. I actually borrowed some ideas from Mikes awesome helmet design. Great tutorial as well. Cheers!
Very nice work.  Snyggt jobbat.
Tack för titten och kommentaren Ghostman_. 

Wow looking great!
Thank you very much Nyx702.


very clean!
Crikey that’s amazingly clean, great work indeed
Icebox64: Thank you, and thanks for stopping by again.
scottleroc: Thank you very much! Your work is great and good luck in the contest.
So I just finished my latest work. The Character is rigged in Maya and rendered in the beautiful Marmoset Toolbag 2.
Tris: 13126
2048*2048 diffuse/specular (gloss in alpha)/normal/emissive maps.
Tools used; ZBrush, Maya, Xnormal, Photoshop, nDo2, dDo & Marmoset 2.
(Bigger and better images can be found on my Deviantart. I had to resize the images and save them with less detail to be able to get under ZBCs specific number of kbs used per image. :mad: If anyone has a solution to this, please let me know).


Snyggt! 
Gillar mönsterna på dräkten, dem fick du till 
Måste uppgradera mitt marmoset jag med…
Tack som fan! Stressade sönder för att hinna klart på slutet men blev rätt nöjd i slutändan ändå. Marmoset 2 är lite smått underbart. Du borde fixa det till dig själv i julklapp. God jul!
So I’m starting this year off by stepping out om my comfort zone and creating some real environment art for the first time.
The enviroment is going to be made for a school assignment and I’ve decided to do a “post-apocalyptic safe room” very much inspired by one of my favorite games - The Last of Us.
Here is a rough block out, trying to visualise what I want to achieve.


Here is my modular set for the walls. All (5) parts use the same texture. Sculpting was done in ZBrush and then some rendering inside of Marmoset 2, trying out some different lights.


Sweet couch. Would you mind sharing a little about how you made the worn fabric part of it?
Thank you.
Sure thing! Since some more people asked I thought I might as well explain it in pictures, maybe someone else might want to know in the future. I’m afraid it’s just all very simple so I hope you won’t be disappointed.
I got the alpha (picture) from a website so I don’t think I can share it here unfortunately. But what I did was to bring it into photoshop and cleaned it up a bit. And if you feel like it you can create different variations of the alpha inside of Photoshop .
Keep in mind that I create a new layer every time I do this process. That way I can control everything individually and adjust different strengths to each part of the torn fabric. It just gives you more control in the end.
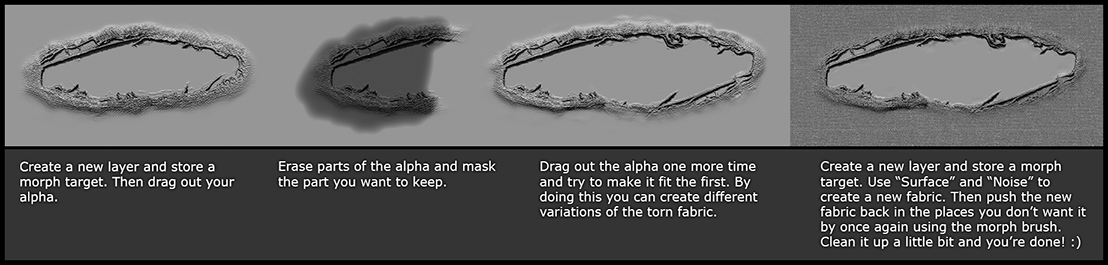
This is probably the crappiest tutorial ever but it will have to do. Anyway… just repeat the process and have fun!