Hey!!! Excelent Stuff here!!!
Congratulations!
Hi,
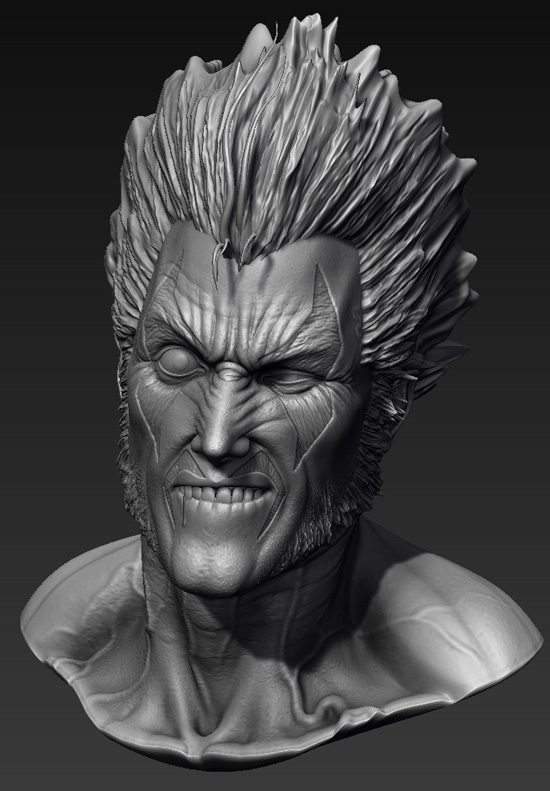
Long time no nothing. Been busy working. But over the last few days, to stave off boredom, I’ve sculpted Lobo. Partly for the fun of it and also to refresh myself with sculpting a human-like head.

The hair is just blocked in. I’m planning to photoshop the hair in for the final image.
Hope you like. Feedback welcome.
MX
These are all great models!
Great Lobo! Nice head! Cool expression!
i like too much this last one, congrats 
Beautiful works !!!

MX
Attachments
great bust man!!
Lobo is a really hard likeness to get, i think yours is too young, looks like a hollywood interpretation of the character.
Keep it up the great work!
Grassetti, thanks. I agree. I got that vibe off him at this stage. I’m a bit rusty on my human sculpting. Spent the last 9 months sculpting dinosaurs so this felt a bit clunky. That said, most human sculpting I’ve done feels clunky.
Just checked out your website. very cool. I’ll bookmark it for inspiration and reference. 
Oh… a glimpse of the dinosaur program I’m working can be found here:
http://www.youtube.com/watch?v=GKdufNS4DcU
Although I didn’t sculpt the baby Sauropod.
MX

I may take this down and upload an improved one.
Feedback welcome.
MX
Attachments

Really, really cool work. 

Thank you Minty. 
Here’s some other views.

MX
Nice. I like the Photoshoped one.
having the black areas on his face actually be sections of his skin that has been removed is brilliant, i never thought of them that way and its pretty bad ass like Lobo would be.
Damn your amazing work! , please o please make a tutorial (:
Walk us thru your techniques and steps, I’d love to see and follow them so I can get skills like you
Amazing work!
Thanks guys,
-
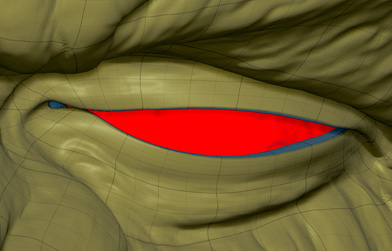
On the lowest SubD hide the rest of the face leaving behind the eyelids/lash-line edge-loop (Shown in the image as blue polygroup), create Polygroup by visible, Set Crease in the Geometry Pallet to 0.
-
Go to highest SubD and store Morph Target.
-
Go back to lowest SubD and hide the rest of the face using the Polygroup set in step 1, leaving the lash-line visible then unCrease, invert visible polygons and UnCrease again. View all.
- Go to Highest SubD and you’ll see that there is a bit of an indent where the Crease used to be. Useing the Morph Target slider (or the MT brush on lower Zadd) bring the creased geometry back…

… this way you have control over just how fine you want the crease of the eyelid/lash-line without hacking away at it with the Clay Brush and the likes. Make sure not to make the edge too sharp and unnatural. Also, make sure there is enough thickness to the eyelid. The eyes are a natural focal point in a character and the eyelid need thickness to it to look real. If you want to change the shape of something like the eye it’s good to push points around on the lowest SubD level possible. You get clean results this way.
And my other tip is… use lots of reference! You can’t beat it. I had to fudge it with this model as the expression was very unreal/conventional.
Edit: The reason to add and then remove the Crease is so you have more control over having a set crease. If you smooth the creased polygons off at a later date it can cause some artefacts. MT saves the crease but allows you to have more control over just how sharp it is.
Also! The image I’ve used in this post is to just illustrate what edgeloop I’m referring to. The result you see there is too hard as I had done this process earlier on in the model… so it’s exagerated the shape of the eye.
alright thanks for the tip, I will give it a try today and see what happens thx again, and keep up the good work (:
very inspirational! you are extremely talented!
how long have you been sculpting? any schooling?
thanks,
jw
Kici, hope it is of some use.
Solidsilver, thanks. I’ve had no real schooling with sculpting. I did a sculpt once but it was rubbish and the teacher didn’t seem to care for it. I lost heart with the idea of sculpting soon after that.
I’ve only really sculpted anything when I picked up Zbrush 2.5 and I haven’t looked back. Now I find the process very enjoyable and challenging in a good way. While on a trip to take photos in the British Museum I noticed something that all the sculptors were doing that I was overlooking, so I hope to make some changes to Lobo, finish his hair and post that up when I get the chance.
For any of you who want to see these photos go here:
http://www.flickr.com/photos/54174269@N08/sets/72157625835789224/
I’ve just started to learn about how to take photos as well.
And I admit now that I still have a lot to learn about sculpting and photography. But I love the challenge.
Thanks again.
MX
I have to say, the amount of wonderful Zbrush work around on the furom is astounding. It’s a wonderful thing that so many people have taken to it.
Here’s a front cover that we got for the project I’m working on. I sculpted most of the theropods for the program, about 28 in total (theropods, that is).

He’s one of the early dinoes. I kinda go to town on scales on the later ones. I worked on a pre-modelled mesh, which was quite low in polies which gave me room to sculpt away. That said, I had to keep the proportions and joint pivots the same for rigging purposes.
Hope you like,
MX