ZBrushCentral

Human: Old Man

ltrain7: thanks man, glad you like the site! thanks for the comments

ben: thanks dude, i agree, the spec could use a little more pushing, i’m going to get onto that this evening. i will brighten up the eyes a little bit as well. Thanks. how’s the new pad? keeping busy over there?

stavrev: it was sculpted in Zbrush and rendered in maya with mental ray using the fask skin shader, and IBL node and one key light

a bit of an update, tweaked the spec a bit and did a first pass at hair/fur. still needs a lot of work, but i feel it is a pretty good base to work from. i will try to finalize the hair this weekend.

OldMan_hair.jpg

“still needs a lot of work”???!

You’re being waaay too hard on yourself. This is stunning. Just bloody stunning work. Congrats.

great work! Particulary, I like his wonderful expression, the shader looks good too. He seems to bear a likeness to Telly “Kojak” Savalas?
keep up the good work, looking forward to see some hair on his baldness :slight_smile:

[st-352.jpg]

greets
froyd

Great work man, this totally blew my day, i had to think and slowdown for a sec.

nice extreme well done job.

id like to see a slight 3/4 view :stuck_out_tongue:

coming along nicely.

:grimacing: excellent sculpt very well executed nasal labial folds. 5 stars from me :+1:

great!!! mental ray with what prog?

oops, sorry, mental ray with maya 7. i tweaked the shader some more over the weekend, i’ll have an update with some better hair this evening. i realized that i was getting too much back scatter at the top of the head where that would never happen. the tones at the top of the skull are way too saturated…

still not happy with the hair totally, but i tweaked the shader and here’s what i think i might call final

oldMan_final_threeQtr.jpg

Attachments

oldMan_finalFront.jpg

Nice update man the skin looks very real. Do you have any tips on using MISSS_fast_skin_maya you obviously have alot of control over that shader.

Im not sure why this image hasn’t made the gallery but im sure it will soon.

is this a high poly render in maya, or did you use a low poly mesh with displacment mapping ?

thx a lot,
capu

… really an eyecandy !!!:smiley:

Really great work!

Very cool man! One thing that sorta sticks out to me is that the distance from eyebrow to the top of the head seems a bit short, the cranium seems small or squashed. Could be the camera angler/lens, dunno… but overall look good, your getting the skin shader down nicely :+1:

could you post the steps you took to get this wonderful skin?

I have the same feeling than bneal…thought it still looks FANTASTIC!
5 stars, I can’t believe you’re not in the top row yet!!
It it all displacment maps or you used bump map as well?

:+1:

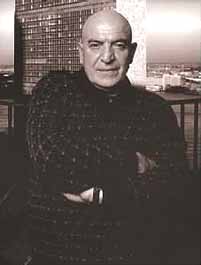
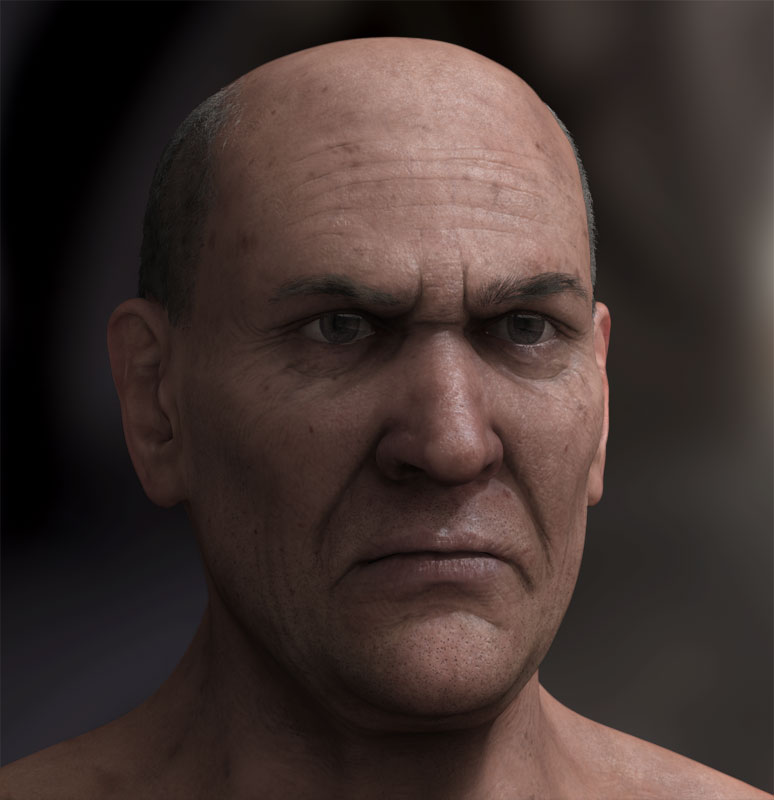
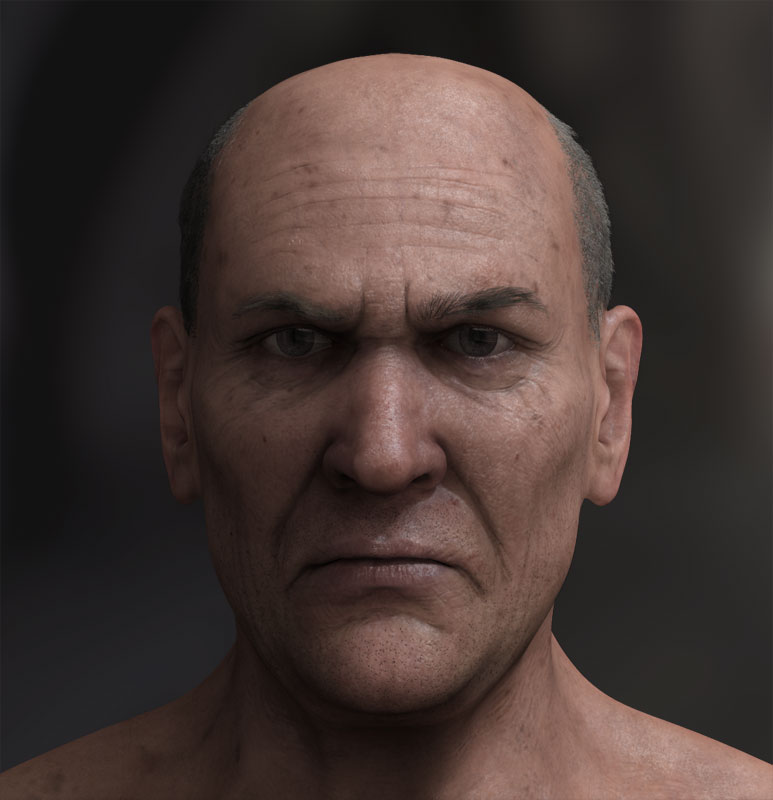
thanks for the comments guys, much appreciated. you guys are right, the head could be pulled a bit higher at the top…simple fix for Zbrush! i’ll get to that in the next couple days.

i decided not to render displacements. the model went up 5 subdivision levels in zbrush, 3 million polys i think. so i brought the level 3 mesh into maya (level 4 mesh kept causing maya to crash on import) so i had a nice res mesh in maya and generated maps off of that from zbrush to get a base for the bump map.

here is a quick rundown, you can follow this tutorial as well to get you started. my little write up sort of assumes you know a little bit about the shader. if you dont’, you can learn from this tutorial http://forums.cgsociety.org/showthread.php?t=214189

i’m using the maya_fast_skin shader in mental ray for maya

my color map is input into overall color my epidermal map is basically the color map desaturated and slightly toned blue. (not really the way it is supposed to be done, but it worked for me) subermal color was set to a peach/beige color my backscatter map is put into bacscatter section my bump map is put into a bump2d node then dropped onto the bump of the shader. my specular map gets put into primary specular color both my keylight (spotlight) and IBL get put into the lights section of the SSS shader under Lightmap i created a mental ray texture, samples were set to 512. the mental ray texture was set to 3200 x 1200 b/c I renderd at 1600x1200.

in the lightmap check the ‘local’ checkbox and type in a path to a the file. most people, and if you read gpepper’s tutorial at the link above, will just put c:\sss but…for some reason i wouldnt’ get any sss unless i put c:\sss.tif

once that mental ray texture is created, i make a misss_fast_lmap. the mental ray texture i just created gets dropped into the Lightmap Write section of that and i also put a checkbox for Include Indirect Lighting so that the IBL is used for SSS. and again, drop my Keylight and IBL into the light sections. and last, i go to the shading group of the fast_skin shader and drop that misss_fast_lmap i just created into the Light Map Shader under 'Custom Shaders' and that is my shader, really simple if you look at it graphed out. no extra nodes, nothing fancy. just a lot of tweaking of my maps and the values of each attribute in the shader. hope that helps...if not, let me know and i'll try to be more clear

thanks for the info on that ZippZopp, I had to do the same thing when i made the SSS file but I did SSS.map not that it would make much a differnce but it could cut back some of rendertimes :confused: maybe. I had been putting the spec map in the overall weight, ill try putting in the spec color and tinting it blue.

thanks again that was big help.

Great work!
I am reading more and more about these different SSS shaders for Maya and XSI however I have not been able to find a resources regarding Max’s variation. I was curious if anyone could point me into the right direction for achieving this type of skin shader in Max.

not sure how the shaders and things work in max, but i know of a few renderers which i always see producing nice results. look into Vray and Splutterfish’s Brazil for Max. i’m sure those have their own options for skin shaders