Thy this page, you might be using the habware plugin for the wrong version of max:
http://www.habware.at/ente.htm
Cheers,
Scratchy;)
Thy this page, you might be using the habware plugin for the wrong version of max:
http://www.habware.at/ente.htm
Cheers,
Scratchy;)
Thanks I was looking at the wrong vesion, I’m getting some nice results out of zbrush I can’t wait to see what I get once I learn the interface better.
Hello
I am a new to Zbrush and I have some question.
When I import a mesh from Max to Zbrush howe do I get Zbrush to flip my editing to the
other half of the object (like instant mirroring in Max)?
Is it a god idée to put UW before exporting from max.?
:qu:
I know now.
hello,
i am a beginner in the domain and i have a question concerning the quad thing.
I wanna make normal maps into ZB, so i model in all quads and unfold in 3ds max, i sculpt in zb, so far its ok.
BUT i want to optimize my base mesh cause i want to put it in a game engine i.e. making triangles in some spots.
Can i load the optimized model in zb and ask him to bake the hi sculpt (made from the quads model) on the new optimized low poly ? and how can i do that ? :o
thanks alot
thanks for that hint shandaman.
Sorry, I didn’t see an exact answer to what I’m looking for—or I don’t understand…I see a lot of discussion about using displacement maps, subdividing (or un-subdividing), etc…and forgive my ignorance, but this all just makes my head hurt…
Is there no way to just create a model in ZBrush and simply export it as a mesh/polygon object for [.OBJ or other] import to 3DS Max? When I tried it, my model looked a little squashed…actually, stretched horizontally.
I don’t care about any textures, etc., I just want to use ZBrush’s intuitive sculpting features, and take it from there to 3DS Max 7 for skinning, rendering, etc…
Thanks!
I should add: I did get hold of the “ZBrush to 3DS Max pipeline” guide; but as with most of the posts, it seems oriented towards starting in 3DS Max, importing into ZBrush for further work, then sending back to 3DS Max…why not just start in ZBrush…?
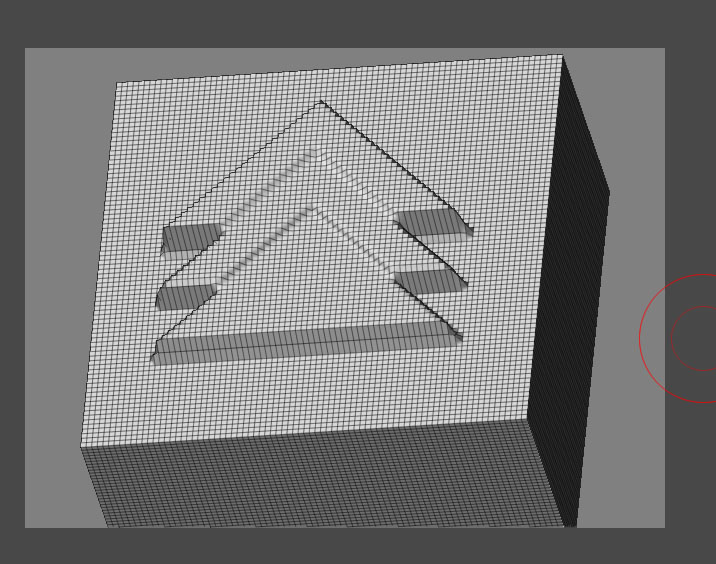
Great thread here. Picking up alot of good info. Bit of a question here. When I export a displacement map using the MD2 32 bit exporter I’m finding that my displacement maps seem to get displaced at all the edges. See image below for an example. Even though I only sculpted the top surface of a box by dropping it and using an alpha image, it seems that all the major edges are getting displacement info so that when I render in Max the edges all move inward in an odd way. Any ideas here? I feel like I’m missing something basic.
~ JamesCG
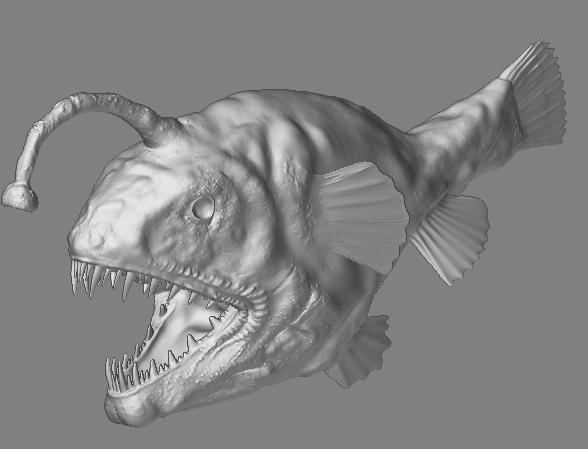
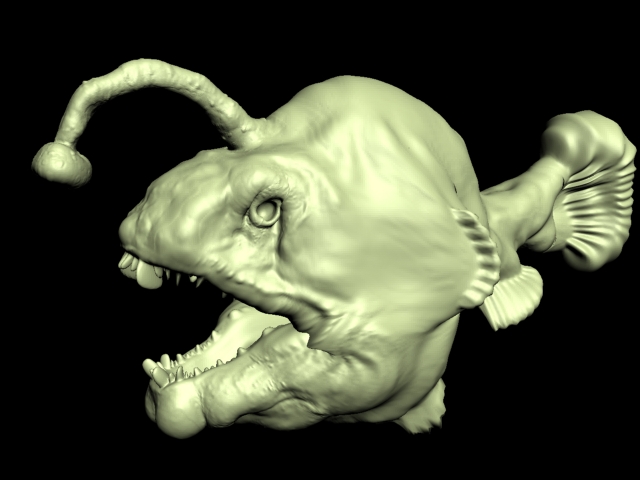
Attached is a picture of a fish, modelled only in ZBrush. (Bitey:)) If I follow the step by step tutorial, I get the following results - Bitey3ds
I used a 2048*2048 map, and the correct ZBrush model has 1.5million polygons
Does anyone know whats going wrong? 
I am using max 5 and am unable to import ANY .obj’s.
Does anybody know ANY other way to get the importer other than paying the 200 dollars to pay for the importer??
Please Help…
I have a very proficient workflow with ZB and MAX, but I still don’t know how to export the lowest level of ZB to max, apply a Skin or physique and import again into ZB with a nice pose instead of the T pose.
I allways get some weird artifacts, and if I use morph target then I can’t get the pose…
I don’t know if you can understand what I mean…
I want to sculpt the base with symmetry, then come back to Max and pose (asymmetry), sculpt the wrinkles and folds for the new asymmetric model.
I’ve tried different import/xport settings… and same result, the faces comes crazy.
Have you tried saving the file, collapsing the stack on the model, exporting the model in the pose but not saving upon closing Max, doing your Z-Brush thang and then bringing it back into the file that doesn’t have the stack collapsed?
The only way that I can get it working is saving the max file after I’ve exported to OBJ, but if I do any change in the stack then I cannot export again because I get this crazy faces again.
so I have to keep the mesh in max without any change in the stack and move the vertices by myself (move rotate scale) without any modifier.
What I want to do is export from Max to ZB, sculpt the symmetry details and muscles, export from ZB to MAX, apply a skin or physique, pose, sculpt asymmetrical details (folds, wrinkles…) and get my final model done for a illustration.
Thanks for reply!
The problem is the sort of the vertices, with so many exporting actions I allways get a different order in the vertices of the mesh, even if I don’t change the number of vertices.
I just need some settings in Max and ZB that don’t change the vertices sorting, so I can import again in ZB with the changes done.
Making Displacement Maps Max–>Zbrush–>Max without setting UVs in max:
In Max:1.make a basic mesh in 3ds Max.
2.File–>Export Selected–>save as OBJ.
In Zbrush:
3.Tool–>Import–>Select your OBJ.
4.Subdivide and sculpt as suits your desires.
4.Tool–>Texture–>GUVTiles
5.Tool–>Texture–>UV Check
6.Tool–>Texture–>Fix Seams
7.Tool–>Displacement–>pick a resolution (1024, 2048, 4096 etc.) and click Create Displacement Map.
8.Export the map as a TIF or whatever.
9.Switch to lowest subdivision level of your model and export it as an OBJ.
In Max:
10.Import the OBJ you exported from Zbrush.
11.Make a map via the material editor of type “bitmap”:
Load the displacement map, flip vertically (type -1 in v tiling instead of 1) hit “enable color map” and drag the low point to -1.
We did this to have the map displace both outwards and inwards.
12.Make 2 new modifiers for your imported mesh: Turbosmooth (2~ lterations) and Displace modifier on top of it.
13.Drag the bitmap you created to the Displace “map” slot, raise the strengh (you can try 20 at first, but make sure to play with it to get the best results) and…
14.RENDER!
Viola. Worked for me.
Notes: You might need to use mental ray as renderer. (Rendering—>Renderer—>bottom scrolling menu has an option to pick a render)
You might also need to pick the lowest subdivision level of your model in Zbrush BEFORE you hit create displacement map.
the video plzzzz
i’m really new to ZB and i was wondering if these normal maps work for rigged/animated characters or is it only for static characters. and how does the normal map effect morph targets?
Superb tutorial man.
I only just got Zbrush about 2 days ago specifically to paint and edit my 3dsMax Models. I’m working on a Scorpion atm and I’ve been FRYING my brain trying to learn how to do it all, cramming it with tutorials and this one was just what I was looking for.
I have faith that you can easily explain this to me, while I’m busy playing around with my model (and I’m sure it has an easy answer), but how do I export my texture that I will have created in Zbrush back into 3dsmax onto my model (which I also exported from Zbrush) fully UVW mapped?
If anyone can answer me this I will be eternally thankful 