ZBrushCentral

How to use "transpose edge" in ZModeler fluently

Using the transpose tool not so efficient, like I would like.
May somebody have an idea:

When I would like to select 3 edges for example,
I will need to select first, then transpose it
then I will need to do same to 2nd and 3rd edge.
I can´t , or do not how to select all 3 edges at once
and transpose them in one step.
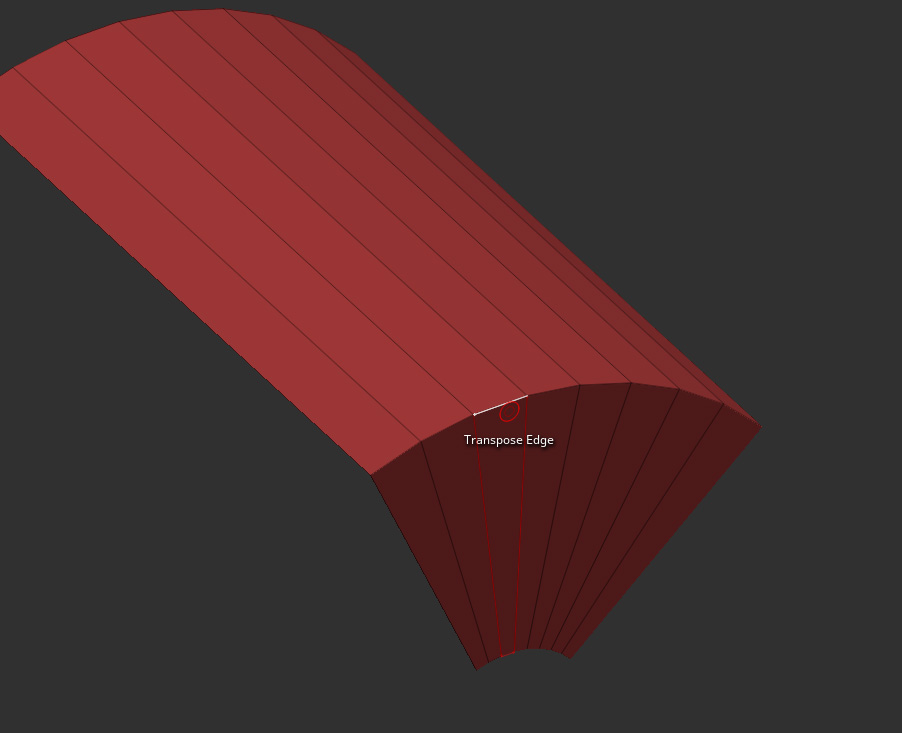
For better understanding, just have a look in the following
image and think, that i would like to select as well the other
two edges left beside the already selected one in the middle.

Transpose_Edge

With “transpose poly” I am able to do so, by holding “alt” and left click.
May there´s in edge mode another way to process…?

After apply transpose I am choosing the direction to pull geometry.
Standard is pulling by normal.
So if I want to choose world axis, there´s a need to reset orientation.
To work more efficient if i think to box model a lot of edges in a mesh which is
twisted, etc. and is a nightmare to pic always different edges and need to reset
at any time the gizmo again to world axis.

Is there any control, to tell Zbrush to use for that subtool just world-axis?
So I can focus just on picking and draging?

Thanks a lot.

Regards!

Hello @DarkStar ,

ZModeler is a box-modeling tool designed for modeling “in the round” as you turn the model arbitrarily in the viewport, and most ZModeler functions work by moving points along the surface, screen plane, or along polygon normals. Transpose mode is necessary to transform along a global axis. Resetting the Gizmo manipulator to a global axis is as simple as holding ALT to unlock the manipulator, and pressing the “Reset mesh Orientation” button.


The only thing that the ZModeler Transpose actions do is to auto-mask the target geometry selection and activate Transpose mode (Gizmo or action lines depending on whether Gizmo3D mode is active). At that point the geometry is manipulated with the Transpose function like normal. ZModeler isn’t necessary for this–the Transpose operations would perform the same way if you masked the geometry by any other means.

The most basic ways to isolate points in ZBrush to either mask or hide them. If you have not yet commited the shortcuts for partial mesh/polygroup visibility and masking to memory, many things in ZBrush will seem more difficult than they need to be. Masking and visibility status controls how the mesh is affected, even with many ZModeler functions. If the available targets selections for a ZModeler action do not entirely target the selection you are aiming for, it will be necessary to partially mask the model to shape which geometry is affected.


There are many ways to mask and isolate points in ZBrush. ZModeler simply has some additional options. For complicated target selections sometimes a combination of actions is necessary. This requires that you be familiar with all those options to know how to combo them together.

  • For instance, one of the most basic isolation maneuvers is to simply mask the target points by brush or selection marquee then invert the mask by Ctrl - clicking in empty canvas.

  • If a ZModeler target action would select more geometry than you want, for instance an entire edge loop instead of only a portion along that loop, simply auto-mask the loop, invert and then manually mask out the unwanted points.

  • For complicated edge selections , try using the ZModeler > Point> Crease> Shortest Path to quick crease all the points between two target points, and then keep chaining section together. Then convert the crease to making using the Masking> Mask By Feature> (Crease Option).

Good luck!

1 Like

Thank you @Spyndel for your detailed answer.
I tried out your recommended moving points strategy.
You´re right it worked much better for me.
Thanks a lot!!!

Also I discovered the deformer tool, for major changes.
Combination out of this two methods will be the solution.

Thanks again!