ZBrushCentral

How to smooth "mold lines" (joint edges) once armature's rendered into a Polymesh?

Hi,

Newbie here.

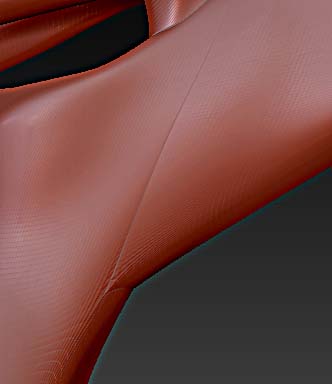
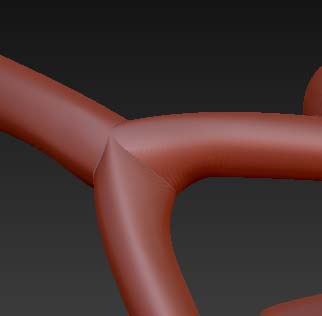
I completed my 1rst armature and then rendered into a polymesh 3D. And it didn’t smooth everything out. It’s sort of branch like model, and at pretty much every branch junction (where zshperes were added and extended), a crease-like is left on the model which I’d refer to as “mold lines” (see pic).

I tried to rub them out with the smooth brush or uncrease them with the clay brush, but every time I try to smooth it back a little, those damn lines reappear… Have I done something wrong in my render or there’s a way to clean those up?

Attachments

zbrush-how to correct.jpg

I havent seen a use for amatures myself but I would guess you would have to remesh it to get rid of the issues you are having. Thats just my guess but I am sort of still noob to Zbrush.

hlp.JPG

Your suggestion sounded great and logical, but I tried a variety of versions (with better resolution, higher polish, grouped polygroups, different axises of the remesh, merged down, etc) and none actually seem to make the model “open to the idea” of being able to be smoothed at those particular joint edges…

My guess is that, something has to be done prior to the Make Adaptive Skin step and/or make a polymesh 3D. I read an old post with a somewhat related issue, where someone mentioned that the armature joint might have been too close and shouldn’t. But if you look at another part of my model that can’t be smoothed, it’s hard to believe that those branches were too close to begin with. I mean how do you go about making a tree if all those joint edges can’t be tempered with?

Here’s the other example:

Thanks for the help!!!

Attachments

zbrush-how to correct02.jpg

Originall posted by Lionize:

But if you look at another part of my model that can’t be smoothed, it’s hard to believe that those branches were too close to begin with. I mean how do you go about making a tree if all those joint edges can’t be tempered with?

See this thread for a clue, then see if you can figure it out on your own.

Hi again, (**below is a wmv VIDEO FILE link to what occurs)

I have a hard time trying to figure this one out… I mean, when I make the armature and make a regular Adaptive Skin, all is fine, but the instant I put “extra clay” in the draw mode, whenever I render and try to smooth out the needed area, it keeps making these separating lines that just won’t go away!

Looking at the junction of these branches, I don’t see how the geometry can be problematic (or is just not obvious being a newbie?!). And why is this extra clay not blending all the way with the armature???

All I want to do in fact, is make this sort of palm like effect between those branches…

Thanks again!<VIDEO EXAMPLE HERE:
http://www.youtube.com/watch?v=zhwVW3ReIfo

You really should convert your ZSpheres or ZSketches to skins before you do any sculpting.

I totally hear you and that’s what I previously thought too… I also tried before to turn it into a PM3D after making an Adaptive Skin and/or a Unified Skin. But I still get those joint lines that simply can’t be smoothed like the others.

Unless I’m really missing a step here, which could be the case. Could you give me a step-by-step guide for the process? I can also send you the file so you can see if that happens on your computer too. Don’t want to be a bother, but either would be of GREAT help!