ZBrushCentral

How to make blood vessel networks

Hello,

I am considering purchasing Zbrush to help me in the process of creating medical illustrations. However I have never used the program and I don’t know if it has the features I need. Specifically I am looking for software to help me create networks of blood vessels. Here is an example of what I am trying to create: http://www.joelertola.com/tutorials/heart/img/b10.jpg.

My goal is to create blood vessel networks that conform to the surface of an object. The vessels need to tapper from one end to another and they need to merge nicely at branching points. They need to be independent objects, not merged with the object they conform to. Can you use Zbrush to make a blood vessel network like this? If so what would be the steps you use? Would there be a speed advantage over polygonal modeling? I would appreciate any advice.

Thank you,
-Joe Lertola

There are any number of ways to do this in zbrush, and yes, this is a situation where I think you sculpt it faster than actually modelling it. The reverse is not always true, but it is here I believe. Or at least, I would choose to do this in zbrush.

It’s a broad inquiry though, as you could approach this any number of ways.

Simple sculpting with a pressure sensitive brush on a high poly object will let you sculpt in detail like that. Lazy mouse will aid you in keeping the stokes smooth and flowing.

Zsphere chains are ideally suited for precisely modeling out long branching cylindrical forms, like a tree trunk.

Last I checked there was a feature that allows you to convert topology lines to zsphere chains, which does tend to produce these “nerve-like” networks.

The new dynamesh feature with the snakehook brush excels in “snaking” out tendrils, then remeshing as you snake out others.

The curve tubes brush could be used to quickly lay out “tubes” along a surface, merged with dynamesh, and sculpted with “inflat” to add or subtract thickness.

There are probably others. The point is yes, Zbrush would be well suited for this sort of thing, but one cant expect to pick zbrush up and be completely proficient with it the next day. There will be skill and artistry required to get the best results. Understand there is a learning curve.

Some of these features can be explored in the existing zbrush demo, others are only in the new version, of which there is no demo yet.

ZBrush definitely can accomplish this and as has been mentioned it will take time to learn. It is a unique application with virtually unlimited possibilites and as such can be a bit daunting at first. You can use the following workflow with the current demo version. I will explain it in some detail but it’s really a pretty easy process and very quick once you get the hang of it.

For blood vessels, after you build your organ of choice. Have it on the canvas in Edit Mode.

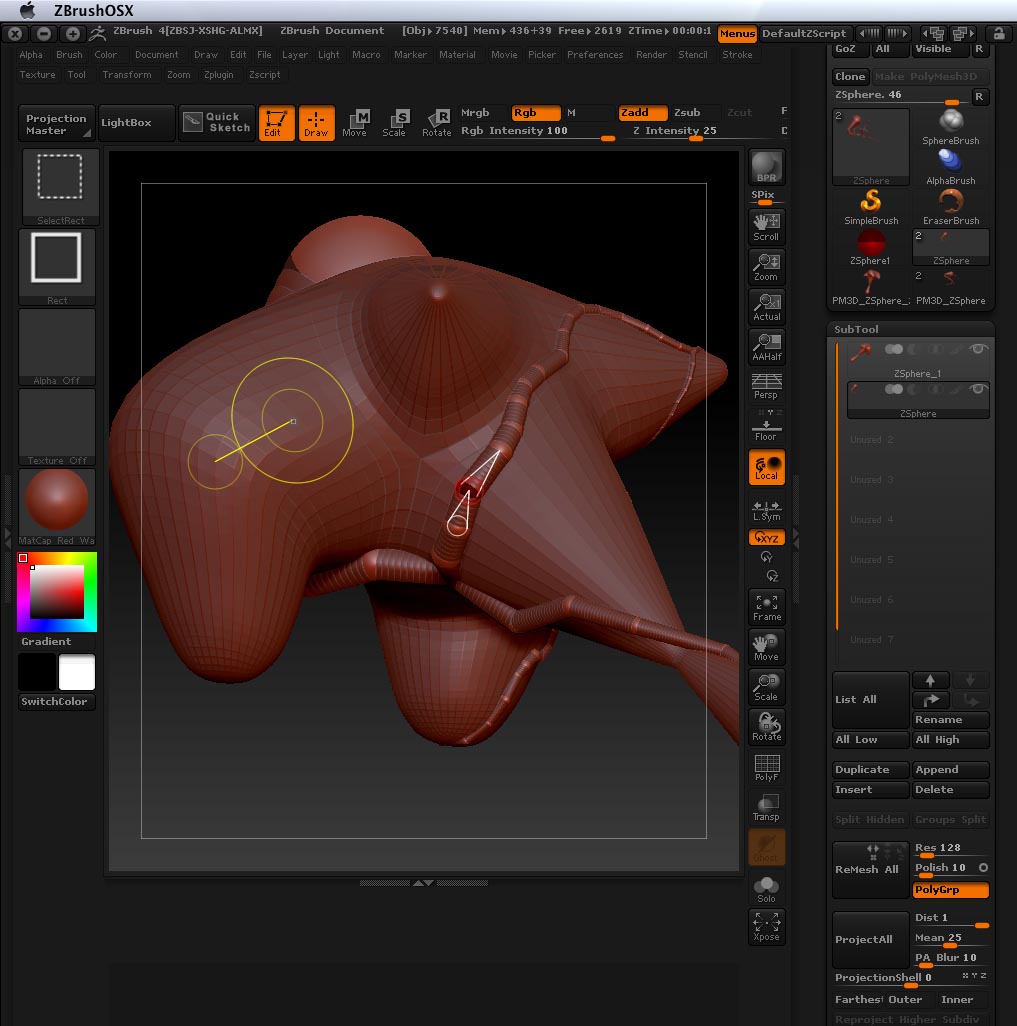
Append a ZSphere as a subtool.

Select the ZSphere subtool and turn on Transparency. (you will now see the ZSphere in relation to the organ model)

Set your brush draw size to 1 and enter Scale mode; click and drag to scale the ZSphere to the starting size you want.

Enter Move mode and move the ZSphere to the surface of the model making sure it penetrates the surface about half way.
While in Move mode make sure the ZSphere is selected by clicking on it (it will have a two concentric red circles around it).

Enter Draw mode; now you can click anywhere on the Organ model’s surface and a new ZSphere will be drawn with a connection back to the previous ZSphere. If you hold down the Shift key the new ZSphere will automatically scale to the same size as the previous one.

You can continue this process until you have your main vessel drawn out. I would recommend you start with fairly long distances between ZSpheres as you can add new ones, in between, later for fine tuning. When you want to start another branch just enter Move mode click on the ZSphere you want to branch from then go back to Draw mode and click on the surface of the organ as before.

To preview your vessels press the A key. You can adjust individual ZSpheres using Move and Scale by clicking on them and dragging (make sure you are not in Preview mode). You can move and scale sections of a branch by clicking and draging on the connecting links. They will move like forward kinematics. You can add additional ZSpheres in between others by clicking on the link while in Draw mode. Don’t try to get a perfectly smooth flow by adding tons of ZSpheres the next step will take care of that.

Once you have the vessel network the way you want, go to Tool; Adaptive Skin; set the density to 1 and hit the Make Adaptive Skin button. A new tool will be made with the prefix Skin_…

Now Append that new Skin tool as a subtool. and go to Deformation; Relax and pull the slider all the way one or two times; divide the mesh once then use Deformation; Inflate on all axes slightly. You can use relax, divide, inflate as much as you require.

The nice thing about this approach is you have the seperate piece you require and the ZSphere set up remains available for tweaking and creating additional blood vessels based on the original or replacing vessels that don’t turn out as expected. In theory you could use one ZSphere set to make as many different blood vessel parts as you need simply by editing the ZSpheres. You can move the entire ZSphere rig by Ctrl Click + Dragging on the first ZSphere while in Move mode.

That should get you started you can experiment from there.

Thank you Spyndal and DLangley for your suggestions. I will download the demo and give the zsphere work flow a try. When drawing the zspheres can you have them snap to the surface of the organ you are drawing them on or do they need to be positioned by hand to conform to the surface? My workflow at the moment is to create a network of 2 point polygons in Lightwave modeler and then expand them into tubes. Its relatively easy to draw the branching network and snap it to the surface of the organ. The hard part is tapering each blood vessel and making nice joins between branches. That is the part of the job that I want to speed up. I am assuming that zbrush will excel at making nice branching joins.

-Joe

There used to be a function where ZB would convert topology lines you had drawn out on a surface to a zphere chain, but I cant find that now. Perhaps its achieved differently, possibly with rigging. But zspheres are easily positioned.

Regardless, zbrush has better tools for that sort of thing. Using Z-sketching, you can sketch out long curvy “tubes” on the surface that cling to it, and then position them after the fact, and inflate or deflate them (add/subtract thickness). You can generate a ballpark seamless mesh from that, and use the normal modeling tools to smooth and refine them.

In the new version, you dont need zspheres at all. There are “tube” brushes that can draw out tubes over a surface, with adjustable curvatures, and meshed together with dynamesh, inflated/deflated as desired.

But as I said, it requires an understanding of the tools, and artistry. You’ll have to know how to use those brushes, and have a feel for what tool best achieves the effect you’re after, and have the touch to shape them correctly.

If you append the ZSphere as a subtool as mentioned and have it partially penetrate the surface of the organ model then new ZSpheres will snap to the surface embedded like the original. Of course you can create the ogan in ZBrush too but that’s a whole other topic.

The new Curve brushes and the other methods mentioned by Spyndel can also achieve this type of thing.

Spyndel is right; you need to learn the tools and develop not only the technique but also the “feel” for it. Thre is a great community here that is can help you so be sure to ask if you get stuck.

I’ve used Zbrush for my freelance medical animation/illustration off and on for a few years. It is a much better workflow for modeling and texturing organic internal anatomy as well as forms on a cellular level. Its well worth the effort in spending the time learning how to use the program. One of the best ways to learn the program is through Ryan Kingsly’s ZBrush Workshop site - worth the time and money even if you don’t need the character modeling and anatomy that he excels at teaching. Much better than the digital tutors videos and the books I’ve seen. Good luck

Thank you for explaining this work flow. I downloaded the demo version of the program and after a few days I have learned enough about the program to try the zsphere approach you suggest. I can draw zspheres and position them manually on the surface. But I am not able to consistently create them automatically on the mesh surface as you suggest you can.

You can see in the attached screen shot that I have a zsphere selected. I am in draw button mode. I have moved the cursor to where the big yellow circle is. I don’t know what the little yellow circle and the line to the big one means. When I click I add a zsphere to a vessel on the far side of the object instead of making a branch from the selected one. I occasionally have had the create zspheres on the mesh surface option working. But I don’t know what I am doing differently when it is not working. Any help or suggestions on getting this to work would be greatly appreciated.

Thanks,
-Joe

Attachments

zsphere_blood_ves.jpg

Hi, what is happening is ZBrush is recognizing the existing ZSpheres through your model. If you turn on the Transparency (and Ghosting) button you can see it more clearly. The fix is easy; set your Draw Size to 1 and rotate your model enough to make sure the ZSphere you want to draw is not over top of any existing ZSphere.

FYI draw size “senses” everything within its icon’s sphere of influence. Another thing to keep in mind is that although the brush icon is two dimensional the brush influence is 3 dimensional i.e. spherical. So reducing the brush size reduces the sphere of influence allowing you to draw ZSpheres close to others without “snapping” to exisitng ZSpheres.

It might help to think of it this way; while you are drawing ZSpheres in this manner your model is more like a 3 dimensional reference image than a physical object. You might even find it helpful while you are exploring this method to turn on Transperency and Ghosting while you draw ZSpheres to reinforce your understanding of how this works.

Thank you for explaining draw size and the influence. You did explain that in your first post but I am so new the program that I did not understand what that meant. Can you have the zspheres snap to a surface when you move them? That would be helpful but I think the answer is no.

Thanks,
-Joe

Can you have the zspheres snap to a surface when you move them? That would be helpful but I think the answer is no.

I’m pretty sure that is not possible, at least with this methiod anyway, but as you are really tweaking at that stage you shouldn’t need to. For a major move it’s probably faster to delete a ZSphere and redraw it. You do that by holding Alt and clicking on the offending ZSphere while in Draw mode. To redraw just follow the same procedure as I outlined.