ZBrushCentral

how to control BPR shadows. is getting odd results from the start?

Hi

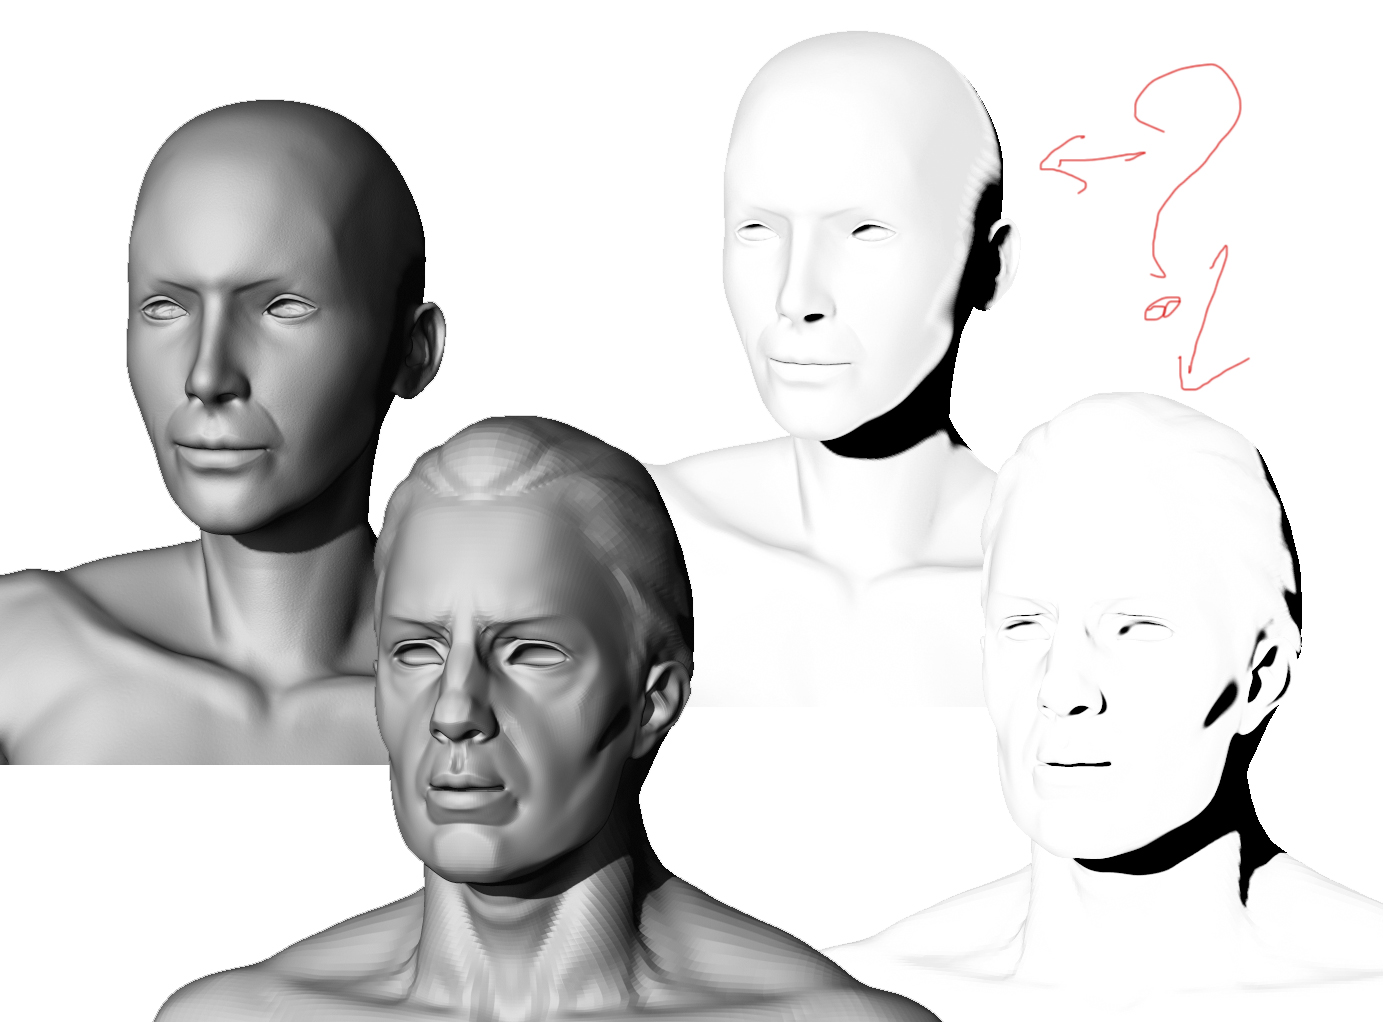
I have for some time now experienced some odd behavior with the bpr, in terms of how it create the shadowpass. Before i go all the way and contact support, I hope i could get an explanation on what is happening in the following attached image, regarding the shadow pass.

to clarify the settings of the demo head and the female head. The shadows on the demo head is what i would expect, but the bleeding on the womans head is not.

both heads are rendered in the same document (only switched between the 2 ztl files in the tool palette), with identical render settings.

render settings: is the default render setup when you open up zbrush.
lights: is the default settings with the main light placed a bit to the left.
size: the scale of the heads is the same. no zooming done between the 2 renders.
BPR settings in the tool pallete: is identical (default and both have double sided turned on)
preview/unify: this part is one of the only aspect of zbrush that have doesnt make alot of sense to me in what is the purpose of using it and what effect does it have on a render if any. however the preview box of the 2 heads is as close to identical as possible.

i would expect the shadow renders to be similar, but they are not and it is causing a nasty kind of oil effect that is really hard to get rid of. The oiling effect is mostly visible on color textured surfaces.

i hope someone have some idea of what is going on.

Attachments

zb_inigma.jpg

Lots of ideas. Look here for settings and more info etc.
http://docs.pixologic.com/?s=BPR+render+passes

Hi Doug. i am not sure if you read my entire post. i have been playing with the render for quite a while.
I have allready read the documentation, but it help me very little in this regard.

due to other post, threads and similar concerning this topic it is adviced not to change the parameters of bpr shadow except for size, resolution and maybe angle to achive shadow to fall of in manor you would expect them to.

I do thank you for your reply, but as of why the shadow tend to get oily and not due to the my explanation above it dident help much.

Defaults will only get you so far…You’ll probably have to tweak some things.
EXCERPTED FROM DOCS
"SPixSubPixel Anti-aliasing Render Quality. The SPix slider controls the quality of the anti-aliasing: The higher the value the better the quality but the longer the image will take to render. Set the slider to 0 for no anti-aliasing and quickest render time – this is useful when trying out other effects.
SSharpA positive SubPixel Sharpness slider setting increases the sharpness of anti-aliasing. A negative value gives a softer, more blurred anti-aliasing. The default is 0.
VBlur RadiusThe View Blur Radius slider adjust the View Blur. Higher values give increased blur.

"

I think we are talking about different issues. i know the transition of the colors are uneven and **** quality. what i am focused on is if you look at the demo head. The areas which recieve no shadow is white. there is alot of area that is white and that is to be expected. From there it need to be tweaked ofcourse. Yet if an image starts with this oily mask it is very dificult to tweak.

the woman head however have are more overall tint to it. it is this tint i do not understand why is happening. when both heads come from the same scene with same setup. here i chose default setting to emphasize my problem. that why is one tinted and the other isent.

when the tinting shows up, it is ver hard to get rid of if i can at all without brutally destroying the actual shadowed parts.

What is your document size? You didn’t mention material used.
Lots of stuff needs to work together. http://docs.pixologic.com/user-guide/materials-lights-rendering/

unless transperency is involved, where shadows is involved material should have no effect. yet the material is just basic material with no tweaks for both models.

to create a good image everything need to work together yes, but atm i am trying to analyse a simple piece. the shadow pass. can we agree on the fact that where the sun (light) hits directly, there should be no shadow. that part of a shadow pass need to be pure white. pretty much like the shadow pass of the demo head. yet on the female with the exact same setup the places that need to be pure white are not. this is alone is corrupting the aspect that everything needs to work together.

i cant see how document size should matter as both object exists in the very same document. 1728x1022

can it be the topology? look at it with the grid on, see if there is any stretching or some other distortion of polygons.

whenever i get bleeding of any kind, its either from low poly count as expected, or unexpected from distortion of polygons.

have you tried turning on “smooth normals” in the render properties palette? unless a mesh is high res enough or has been subD with smooth on, the faceting of the underlying
topology may cause unanticipated normals behavior.

i’m just trying to come up with some ideas.