ZBrushCentral

How do I utilize traditional UV setups in ZB?

How do I use a Model where the UV layout is in unwrapped form and use it in ZBrush?

I have tried all kinds of ways. None work. I always get overlapped UV’s when I UV check the model in ZBrush. I only get success with UV layouts when I use GUV or AUV forms. AUV’s has so much unwanted oddities and most of the time doesnt work with other softwares in my pipeline. GUV works a little bit better for my work flow but there are limits to GUV when compared to AUV tiled layouts. So now I am forced to UV setup manually instead of relying on this new technological feature.

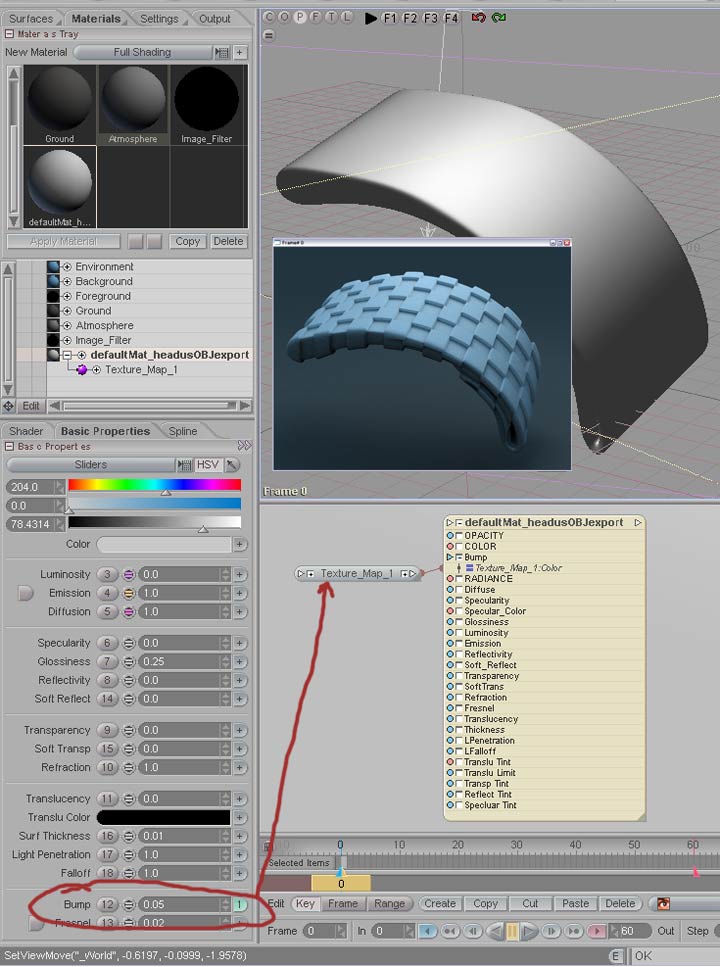
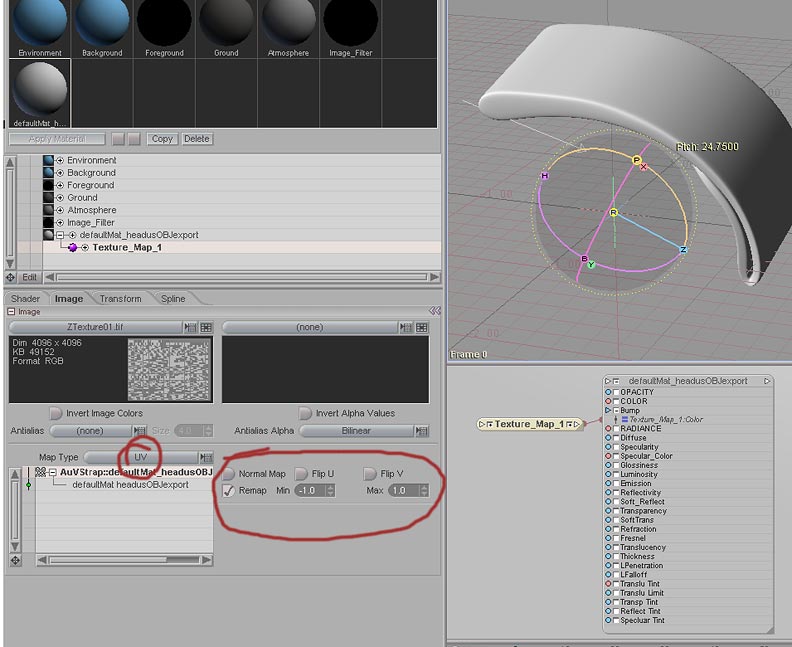
None of my artwork matches when the painting is picked up in Projectiion Master.

Is there something I need to do in ZBrush in order for the software to read the traditional UV setup properly?

I know this is a simple question and I have seen people do it all the time but I cant figure it out. Doesnt work for me.

Thanks for any responses.

JH

Oh incase any Obi one Kinobi out there wondering what my pipeline is, I work with Messiah workstation, Lightwave 9, Vue 5 Infinite, Zbrush and RealFlow. So any integration tips on these softwares would be highly appreciated. Mostly wanting responses on UV setups and integrating ZBrush maps into Lightwave, Messiah and Vue Infinite.

Thanks to all.

Best wishes

I’m using the exact same workflow as you (except Realflow) and I’m getting very good results especially with rendering ZBrush displacements in Messiah, so I can at least tell you that you have a good group of software that works well together. I guess the best way to solve your problem is to examine your object’s uv maps. Could you upload your object, or send it to me so I could try it? I’ve had alot of trouble with uv mapping in the past so I know your frustration.

what i found out is that you can create the basic shape in zBrush, with very low subdivision level. Export it as obj into maya, and use PeltingTools to lay out the UVs as one stretched out mesh. The once you do that, export it back as OBJ, it will have the new UV’s. Bring it to zBrush and you’re all set, now you can do detailed work.

You can send me an email that way I can contact you (Zoid) and send you a dummy model on how I set it up.

[email protected]

I am not at my actual workstation at the moment so I will upload a working file here on my next visit to this forum for others to use for show and tell.

Now all my project models have been UVed through AUV tiling system. If you found a way for messiah to read such technological formations in such UV creation, let me know. So far I hear that Messiah works well with GUV but you know there are limits to it compared to AUV layouts.

I want to avoid resetting up UV’s and repainting textures for I do have alot of models to consider.

If I have to create traditional UV layouts (which would be a drag), then how would I allow ZBrush to read the unwrapped UVed model with no overlapping results when you UV check in ZB?

The unwrapped UV from another application was tested and had no overlapping data, it worked well in Lightwave but when I integrate such data into ZBrush and UV check it, I get overlapped UV’s.

Right now its not much of a big deal because for the moment, I am hosting all my animation into Lightwave. Lightwave is setup to read AUV tiled information for rendering my detailed textures. So my problem is not severe, just really wanting to learn other techniques in UV creations because AUV’s doesnt work with Vue 5 Infinite and maybe also Messiah.

If someone can make the AUV tile information convert to traditional UV layouts, then boy we artists can have such versatility and less hills to climb for mapping integration.

I know that there is a plugin being made to do the opposite, from traditional UV to AUV, but I want it the other way around (makes more sense to do it that way because you can UV your object with a click of a button (AUV form) and any other 3D programs that cant read AUV technology, optional traditional UV conversion is at hand through a plugin and another click of a button! Your maps will be saved and be able to be used in ALL 3D programs! Eliminate the UV manual labor for the love of God!). Traditional UV layout is not so traditional. Need some genuis to make a superb plugin to make it concrete.

That is all,

:eek: Cypher:eek:

P.S.- I dont have Maya unless I crack it. Good input though! Modo sounds good too with traditional UV creations. Morphing your model into a plane then UV it is another technique (so Ive read through “Taron” passage) then use Modo for its ease of UV creations and smoothing tool, then export OBJ. Thanks for the input, need more though.

I’m not sure I understand your problem well. If a uv map is not overlapping in Lightwave then it wont be overlapping in ZBrush. ZBrush doesnt change the UVs when an object is imported, it sees them the same as Lightwave sees them except the vertical orientation is flipped. Likewise Messiah reads AUV mapped UVs the same as Lightwave does. AUV tiling is probably the best “one button” solution to uv mapping an object ever invented, but the only hitch is you have to do everything in ZBrush for best results, no editing in other programs. I don’t see how you could ever convert AUV to other uvs but that would be a cool feature to have :cool: Here is the best “one button” uvmapping program I have seen http://www.headus.com/au/

Your black font on a dark grey background is highly annoying. I stopped reading after the first couple of lines.

Sorry
Lemo

Wow Zoid, that UV layout plugin is awesome! That is something I was definitely looking for. I must get it. Thanks for that awesome link! Now I have to spend more money:rolleyes: but thats okay, solves my UV problem as far as doing it traditional style.

Now you say that Messiah can read AUV’s like lightwave can, how so?

Write out the steps and procedures you do in order for the AUV’s to work within Messiah.

I have done everything in my power and failed. I have made sure the maps where flipped. Both in ZBrush then in Messiah and altered the variants seeing what will work with what and nothing. I can see that Messiah is reading the map but the color is gone and there is distortion involved. I have made sure that the ObjectUV wasnt in bypass mode, made sure the node wasnt in bypass either and nothing.

I have converted the maps from .psds to tiffs, pngs, and bmp. Nothing worked. I was told that AUV doesnt work within Messiah and its just GUV’s that seem to work well-per Taron and Chris Reid.

So please show me how you do it because I am lost and definitely confused. Show me an object that was set up with AUV cooridinates and render the image in Messiah (before and after).

Thanks and I appreciate all your wonderful inputs.

Cypher

P.S.- Better Lemonado:qu:

You obviously know the basics and are trying the right things and I know the frustration of not getting it to work, but dont give up cause it can be done. I’m doing some screen grabs of my Messiah setup with an AUV tiled object to show you my setup and I will post it soon.

Yes UVLayout is a great program. It actually makes uv unwrapping fun to do, and if you need to do alot of uving I think it pays for itself.

OK here is a walkthrough for taking an AUV tiled object from ZBrush into Messiah for displacement rendering. It will go from ZBrush to Lightwave Modeler to Messiah.

For this demonstration I didn’t generate a displacement map in ZBrush, I simply painted a texture onto the surface of an AUV tiled object. Messiah is capable of making a displacement with any image applied to an objects bump channel. The object must be subd or “metanurbed” in Messiah, so that means no ngons allowed.

First step - in ZBrush import your object and press “t” to enter edit mode. For this example I am using one half of a leather watch strap I created in Modeler. Go to the “texture” panel in the “Tool” box and click the AUV button. Next go to the Texture toolbox and create a new texture for your object. 4096 x 4096 is best. I divided the object to level 4 and used projectionmaster to paint a checkerboard texture on the surface. in the Texture toolbox flip the texture vertical and export as a tif. To use the AUV tiled UVs in another program you must also export the tool as an object from ZBrush. First lower the division back to 1 and export as an .obj file.

Next take the object exported from ZBrush into Modeler and give it a surface. In the surface editor assign the texture created in ZBrush to the bump channel using the UV map created in ZBrush and save the object.

Now in Messiah load the object and press tab to “metanurb” the object. To prepare the object for displacement first go to the surface panel in the render tab.
surface-screen.jpg

Attachments

render_screen.jpg

messauv.gif

bump_panel.jpg

Yes! much better Kamakazzi 8-).
And Zoid you ROCK!!!
Cool tutorial. You should cut and paste that into the tutorial section with a better titel!

And in general, AUV, GUV, Cylindrical etc. etc. etc. are only ways to map texture/3D coordinates to a 3D Mesh. Any program which can read one set of UV’s can read the other one. In an extreme, the UV map can be a single point. WHich would mean that your entire model will change it’s entire color when that single pixel in the texture would change.

Cheers
Lemo

PS:I have the Headus Software and think it’s pretty cool. It will be REALLY REALLY cool when the edge straightening is build in. THEN I can use it for my crazy geometry… Now it’s perfect for organic stuff and does not crash or mess up. It’s really nice. However, I would recommend that you get the Dongle Version so you can switch machines and maybe sell it where it’s hassle to do that with a node locked version. The Author is also very aproachable.

Wow Zoid, nice tutorial and snapshots. I will try it later on today and let you know if I have any problems.

My main problem is that I cant get my color map going. That was my original problem. I will try and do the same procedures for color instead of displacement mapping.

Thanks Zoid. I’ll be back to let you know how things went. Anymore problems, I’ll just give you the scene and mod to test it.

Thanks again,

Cypher

For LW, these are THE pelting tools en vogue:
http://homepage2.nifty.com/nif-hp/index2_english.htm

Lot’s of discussions on how to use the tools. Also, I’ve noticed that sometimes with a uv check, at level 1 I have overlapping polys; yet after a subdivide (or four!) I don’t have any. And though I’ve seen statements that this will crash zb, I can’t say that I’ve had such problems with the above toolkit.

Hi Kamakazzi, hope it helps. Sorry for the extra information about displacement, I’ve been searching the forums for information on displacement maps lately so I’m seeing the world through that perspective right now, but yes you can follow the same steps but just attach a texture map to the color channel instead of the bump, and no need for remapping. I’ll definately look at your file if you’re still having trouble.

Thanks Lemonnado, That’s a good idea about putting it in the tutorials section but I want to do a more comprehensive one that includes using the displacement exporter plug in to make more useful maps for Messiah, because right now the ones that are directly exported dont work so well. I think it has to do with how Messiah reads Tiff files.

UnCommonGrafx, Those Plug ins are really nifty, especially the map packing one :cool:

Oh one more thing before I conduct my own tests with Messiah and ZBrush maps.

For Color texture, I wouldnt have to necessarily save it as a TiFF like how you save a TiFF for a displacement map?

Other than that your input really helps. Sorry for not testing it out yet but I have been sidetracked on adding softbody dynamics for capes and other wardrobe for my characters.

Looks nice!!!

Still need alot to do and wish I can show.

Will show once product is released.

Anyhow, thanks for your lovely input.

Any comments on animating textures within Messiah?

Like how Taron demonstrated with the “neckling” clip when a head morphed into something else and the texture was animated with the morph.

Anyhow, talk to you soon Zoid and I will let you know what I came up with.

Many thanks!!!:+1: :+1: :+1: :sunglasses: :sunglasses: :bulb: :bulb: :bulb: :smiley: :smiley: :smiley:

Cypher