Thanks Megamorph for checking out my model!
Creating the normal map with Zmapper wasn’t a problem for me, but trying to render it in maya i got a lot of seems, same problem with the displacement map and i didn’t get the details i had in zbrush on my model.
to the DpSubPix:
I set it to 4 depending on the tutorial from Jason Welsh:
http://www.zbrushcentral.com/zbc/showthread.php?t=49121 Lesson 11
I’m a beginner and this whole stuff is new for me and i think i’m far away of understanding this all correctly at the moment 
I will try your tutorial now and will post my results here later.
Dear Train22,
unfortunately, I was not able to open Jason Welsh’s tutorial right now (I know that his links don’t work all the time, I’ll try it some other time), however, I was able to note from the “icon” image of the tutorial on the page you referred to me that:
- Jason made a tangent normal map. I am not familiar in-depth with the Mental Ray restrictions in Maya, but I can only guess that the tangent normal maps (instead of the formerly-popular Mental Ray displacement maps) can ONLY be used in the latest versions of Mental Ray (which comes by default with Maya 2008 and Max 2008.) I know about Max MR for sure - I’ve done it there multiple times, I’m a Max user. If you have Maya 2008, you can try using that. But I know that in previous vertions of MR (even in Max) you can only use the displacement maps of the olden days - which have to be done with Displacement exporter (16-bit height maps, not 32-bit normal maps)
- Jason’s uvs are… Well… Not very optimal at all… He uses less than 50% of the texture space, which means he’s wasting a lot of his resolution. I also noticed when I was looking at your model that you have your UV coords done like that too. Remember that the higher the resolution, the bigger the image’s size on disk and the longer it takes to generate OR process it, even if you have a lot of space just blank and even if you’re using JPEG compression. Here is an example what my UVs tend to look like (note how much space is taken up in the box by the UVs):


Going back to the SEAM problem now: I also have a clue of what’s happening there. First off, when you’re using the ZMapper OR the Displacement exporter there is a seam ovelap setting, and if you’re getting seams (with your current UVs) I would try to ether (1) setting it somewhat higher or (2) setting the resolution of your normal/displacement map higher and setting ovelap lower.
The second method should produce better result but take up more time to generate. HOWEVER, there is a third way to eliminate this problem: correct your uv map - to do this:
- Eliminate extra seams - you have the guys back separate from the front, this is not the conventional way to UV a person. Make ONE seam go down the back of the guy, and disconnect the arms with seams going around the shoulders. Weld all other seams so that you have ONE piece for the torso AND pelvis AND head together, and ONE piece for every arm and leg. Usually, if you would also have fingers (which at this point you don’t), you would also have one piece for each finger. Also, It pays to have your UV coords set up symmetrically (only if the model is symmetrical) but it is not neccessary. It also pays to have your seams in least visible places (i.e. - arms can be seamed and unwrapped from the line going from underneath the armpit, to the poind beneath the elbow and to the beginning of your wrist.)
- Make sure you use up AS MUCH UV SPACE AS POSSIBLE. This way, you won’t have to worry about generating the normal/displacement map at a higher resolution and you don’t have to set the overlap setting high - you con’t have that many visible seams. I know, there are DISTORTION CONSIDERATIONS to have in mind as well. You will have to ballance between distorting the UVs and taking up more space. The more you do this, the better it will come out - practice makes perfect.
Ok i tried your tutorial, but at step 7 i couldn’t go further, cause i came back to my seam-problem when setting the intensity to 2 and applied my displacement map:

so first, i will now correct my uv map, befor i make the next step.
Thanks a lot! 
ok, i tried to create new uv-maps, but nothing worked 
i always have these sh** fu*** seams :mad: and everything looks wrong 
i really don’t get it…
How did you make this uv-map?
Hi there Train22
I feel ya pain 
Try turning OFF filtering in your Normal Map’s texture file node in Maya - that should do it.
cheers
Chris
Hey Chris!
Thanks for your tipp 
With filtering OFF it’s really a little bit better, but still not the result i want.
I have to get rid off the seam-problem first
Train22, question: what is the resulution that you are setting your displacement and normal maps to when you generate them?
I have an idea that may possibly fix the problem…
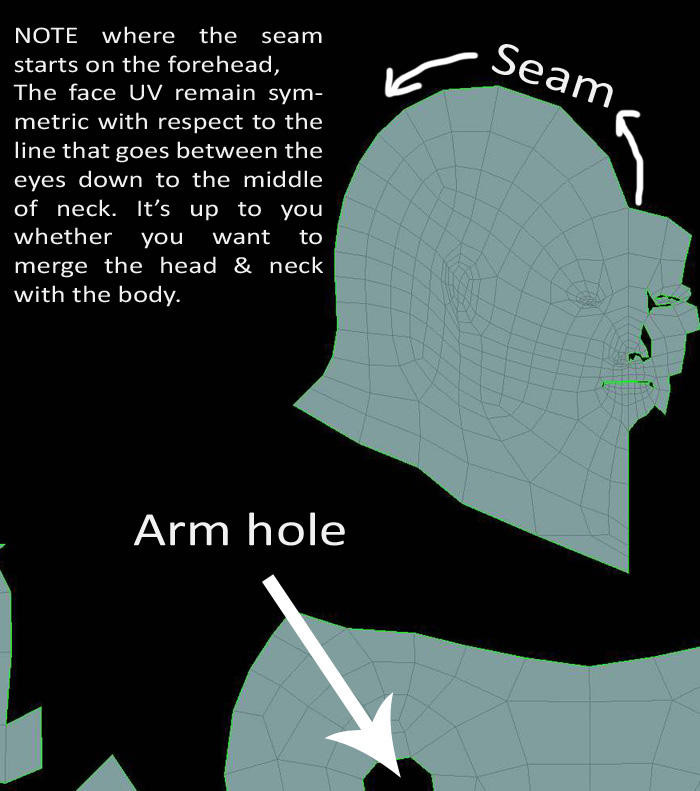
My prime sugguestion is, regardless of the responce for now, first off, IF you are still getting the seams that you got in that picture you’ve posted with the displacement map (meaning, the UVs you’ve used for the face) this is because you have the face UVd not entirely correct. The face (+ the rest of the head and neck) should have one continuous seam starting at (varying with model) either the very top of the forehead or the top of the head, going down through the back of the head (not even touching the facial features) and going all the way down the spine, or to a place where, in theory, it would join the spine-shoulderline intersection. Leave the face intact as you UV!
My second sugguestion, also before you respond, is that instead of going through the pain of re-uving your model and then using the morph tools to plug it back into ZBrush (which is like additional 7 steps that I described in detail as a response to someone with similar problems, check the same tutorial page, scroll down) is that you can use a small, yet increasingly convenient freeware program called xNormal. Here is the link:
http://www.xnormal.net/Downloads.aspx
The drawback is that xNormal cannot handle meshes that are above around 7 million polys (I tried), but it will surely be able to handle the 3.3 million poly .obj file that you can export from the highest detail level of your ZTool AS IS, no need for uvs or anything. Then, just export the new LOW-END model from maya AFTER re-uving. Mesh those two in xNormal (the tabs for hi- and low- res models are on the right-hand column, don’t forget to turn off any dilation or other filters, other than that - pretty self explanatory, just don’t forget to right-click on things for options like “load” and stuff…) and generale your normal map. You can do all sorts of other good stuff (i.e. height/displacement maps, ambient occlusion maps, etc.) with xNormal.
Cheers
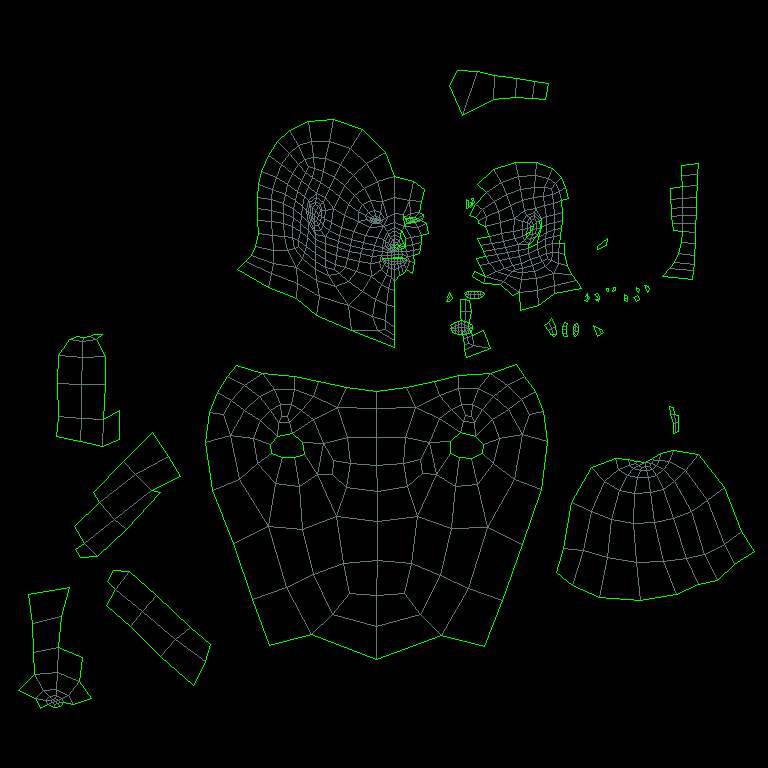
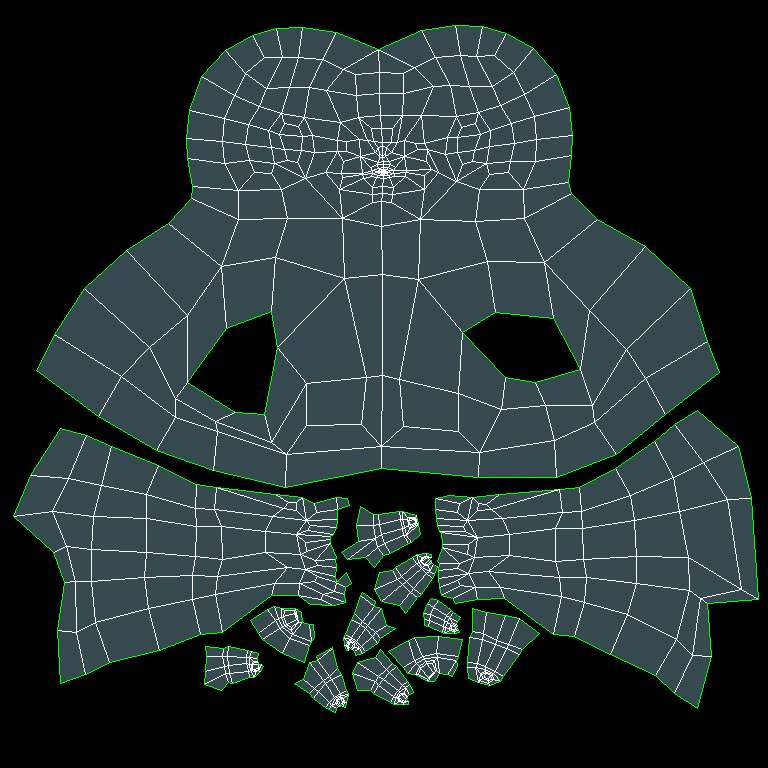
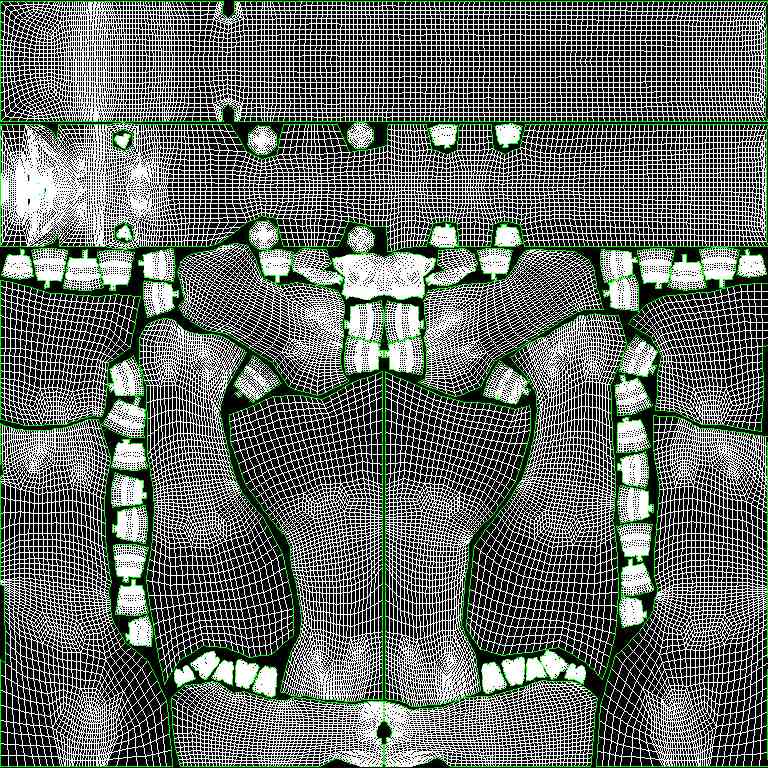
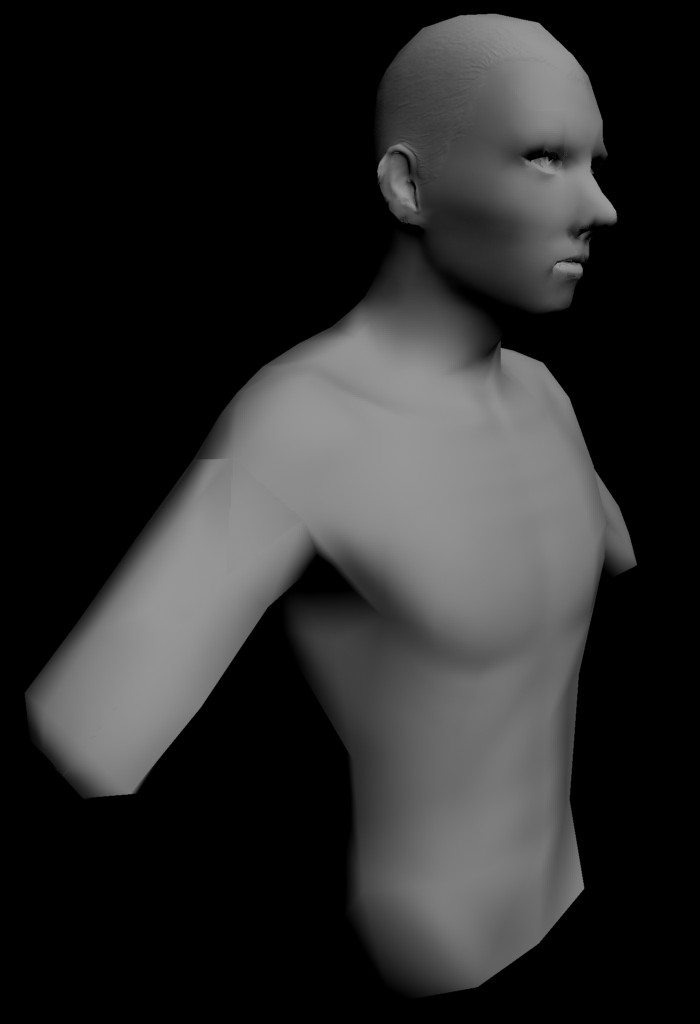
Man, I felt sorry that I didn’t explain everything about the face UVs earlier, so I began it for you. Here is your model (portrait) with the UVs for the torso and the left (righthand for viewer) upper arm & shoulder done (bottom) and half of the face done (top.) All that is left is follow the example of what I did when re-uving the right (lefthand) side of the face & head and the left (righthand for viewer) arm, then I recommend you resize those and do some minor tweaking (don’t be afraid to sacrifice a little of order by throwing in some distortion in favor of some more texture-space use, as I’ve mentioned earlier.) You can, sort-of, “stretch” the corners of your UV space to fit the box and the other UV parts better.
Zip file of .obj (IT’S ALL HERE ):
Attachments
portrait.zip (39.7 KB)
the resolution is set to 2048.
I will check now xnormal, befor i post new results and the uv-map.
thanks a lot
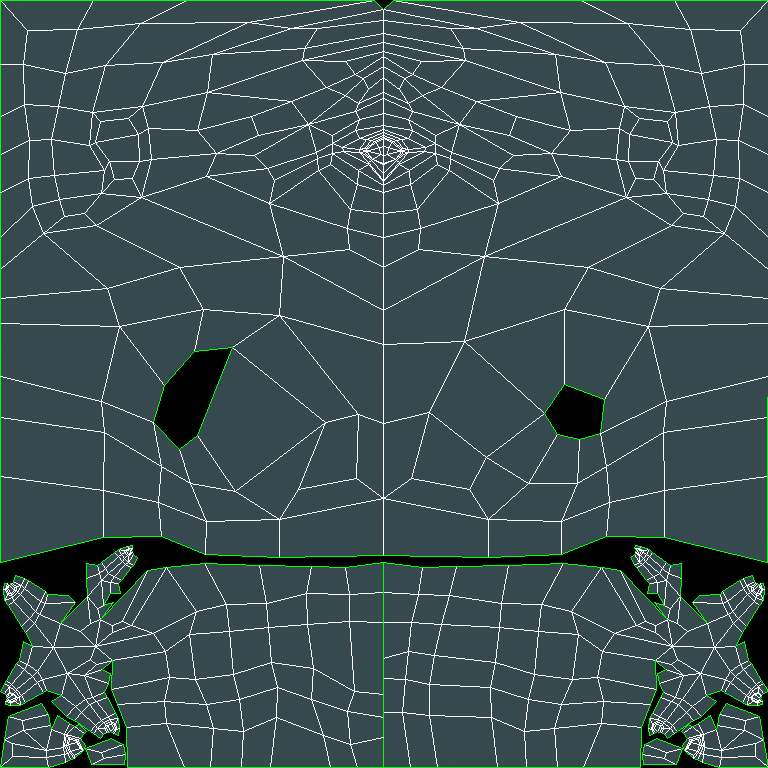
Here are my results now:
- new uv-map
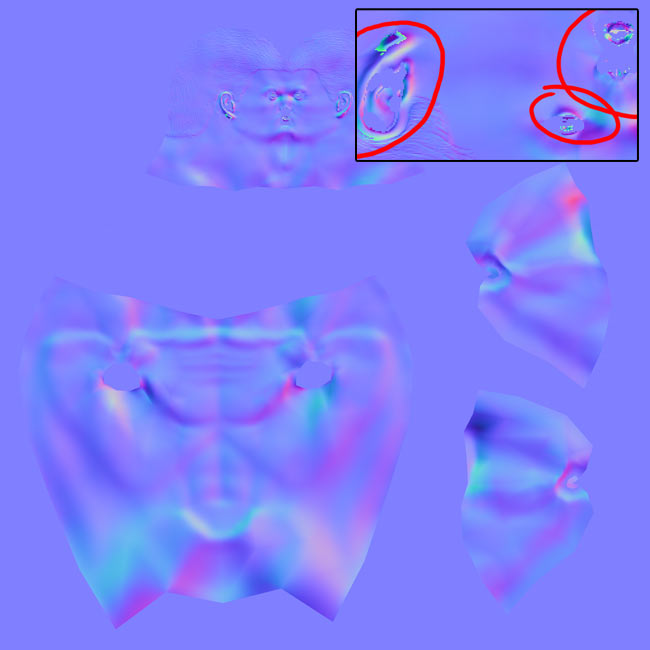
as you can see in the upper right, there are some kind of artefacts at the ear, nose, mouth and eye parts. I made some tests with different settings, and with an subd-lvl. 2 obj as my lowest obj-file in xNormal. I also scaled the face-uv up a little bit, using more space to fit the box, but always getting the same results.
What do you think?
Attachments
 1. First off- I think we’re on the right track
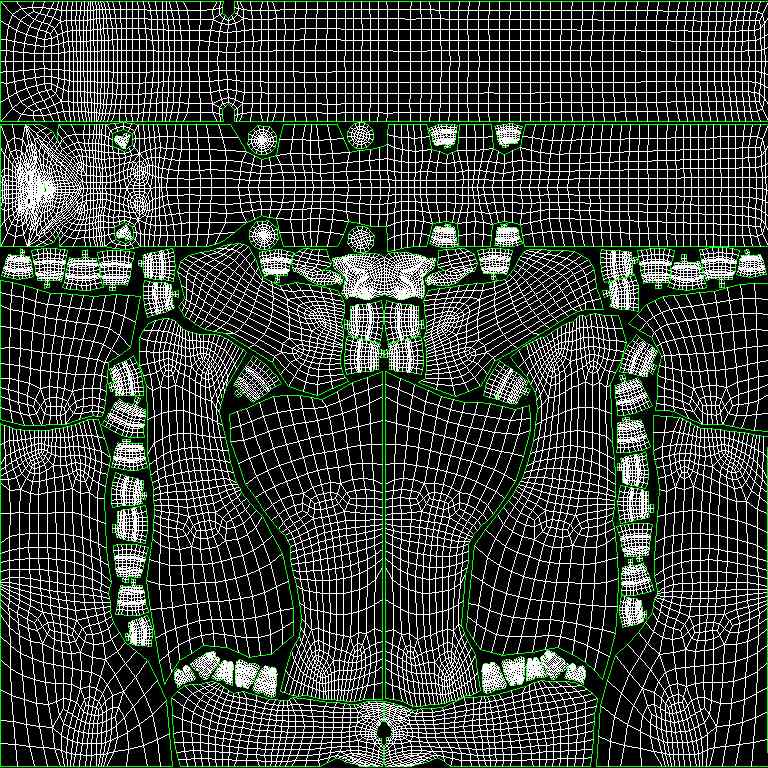
  . You are… well… Almost done with the UVs. Marvelous job so far. You have to fill in the space where you don’t have any UVs (efficient space usage, efficient space usage, efficient space usage! - I can’t stress that enough.) You are using roughly 60% of your texture box right now. This means that only 60% of the pixels are actually doing something. Simple to correct! Scale all the parts up (you don’t need that much nothing-like border space surrounding everything.) I think you already got in the jist of placing things correctly (I especially like how you put the arms, one this way, one flipped - the other way, so that they mesh better with less distortion.) Good job on that. I think when you scale all the things up and move the head and the body just a little towards everything else you will find that you have very little extra space
  . That’s a good thing. That means you won’t have to stretch the corner UV-points out to the borders as much. Now, again, don’t get scared when I say “stretch them out to the borders.” Just watch the overall distribution of your verts - so that the areas of your quadrilaterals in the uv box approximately resemble the areas of the corresponding polygons on your model.
I just wan’t to make this part as clear as possible - don’t be afraid of a little distortion. This will allow you to go from the 80% (after the scaling-up process) to the final targeted 93% - 97% of the total texture-space usage.
2. Make sure that when you subdivide the final base model before export (I assume you’re either doing this in Maya or ZBrush, but, anycase) MAKE SURE YOU STILL GET NO OVERLAPS in the UVs. This is crucial. This is what’s very likely causing those artifacts to appear in the ear and mouth. In ANY CASE, to EVEN MORE SO PREVENT THE ARTIFACTS or anything like this - stretch those facial features out a bit - make sure they take up more area that LESS IMPORTANT PARTS (effectively making even more distortion - but this sort of distortion is welcome, since it only increases the quality - you don’t care about the parts of the texture which are not that detailed anyway, since nothing’s gonna apear on the normal map there.)
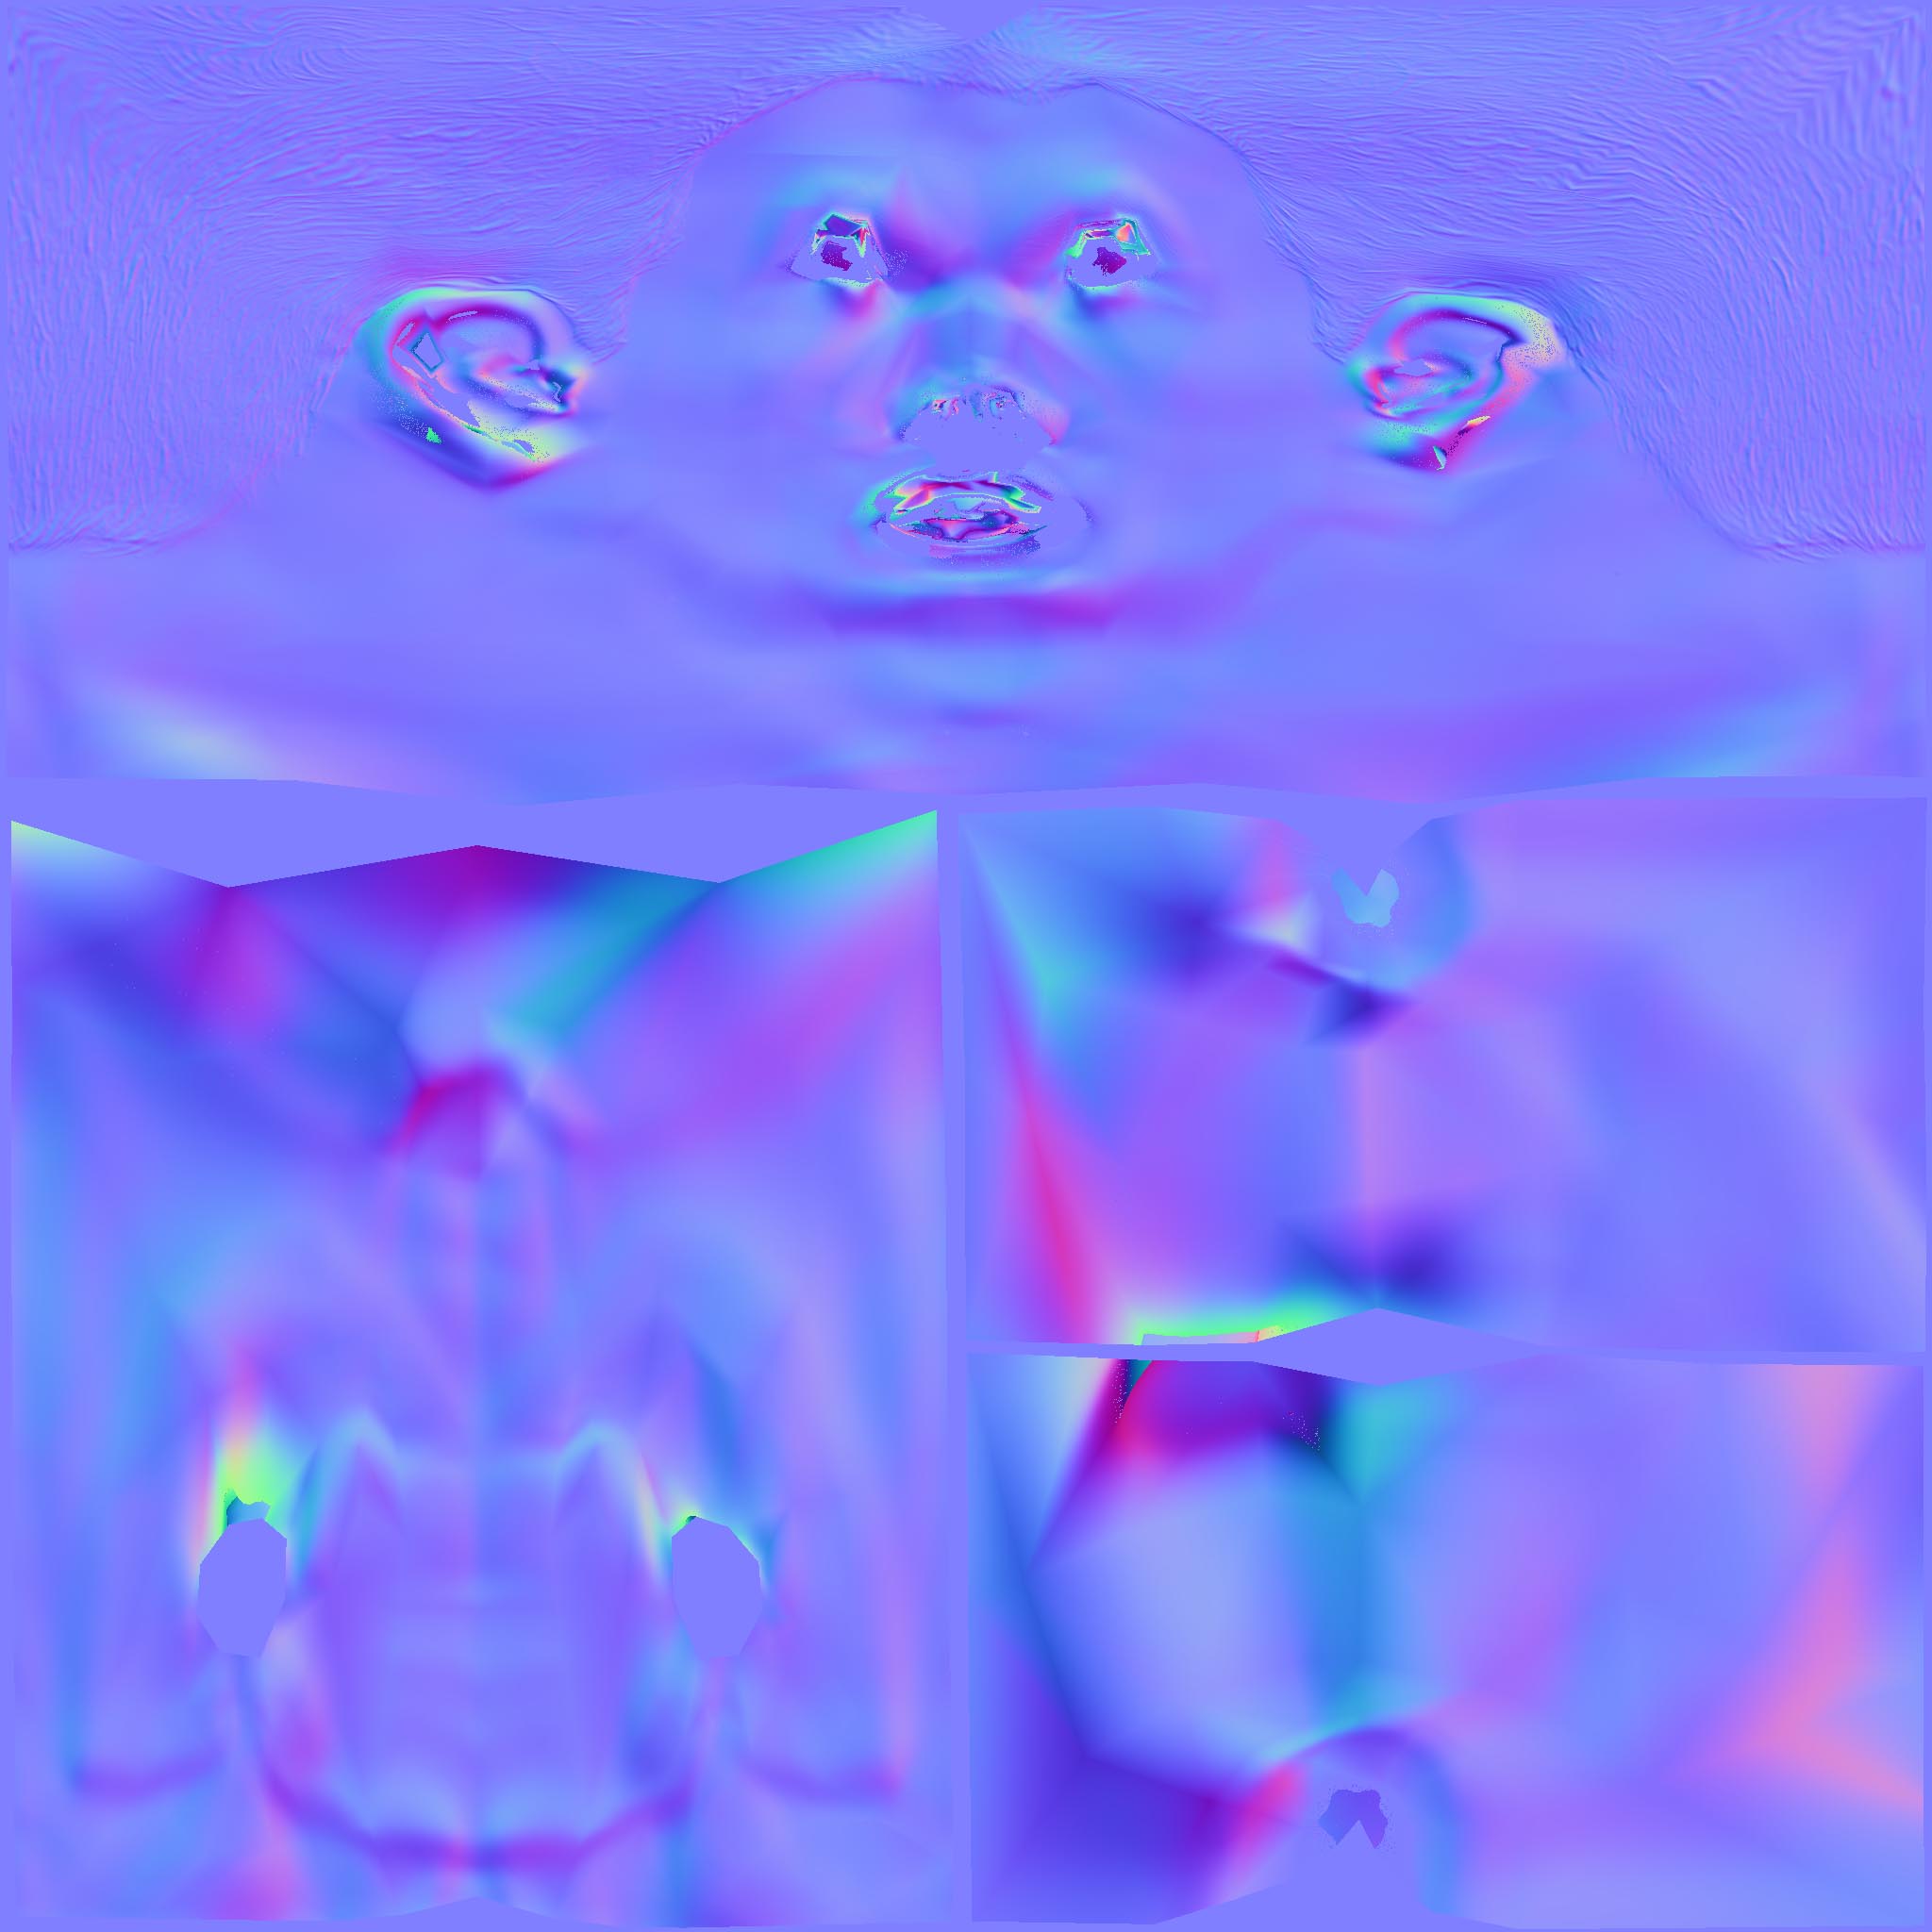
3. Make sure your RED | GREEN | BLUE settings in xNormal are on something like +/-X +Y +Z. It usually should be +X, but sometimes it’s the reverse. In any case, when you look at your normal map in Mental Ray, I think the colors should follow this pattern below:
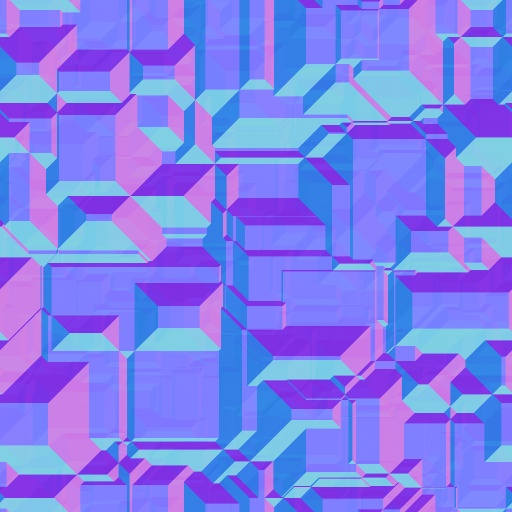
Note: DarkPurple == downward-facing, Pink == facing to the left, Light blue bright yellow == upward-facing, Bright/Medium blue == facing to the right. Don’t be confused by the optical illusion - the picture displays mostly dent structures, not bump structures.
Great job so far - you’re almost at the finish line!
Thank you, but i’m not sure, if i have understand here exactly what you mean now, my english isn’t perfect :lol:
First, my scaled uv-map:

so which uv-points i have to stretch now, and in which direction?
- Make sure that when you subdivide the final base model before export (I assume you’re either doing this in Maya or ZBrush, but, anycase) MAKE SURE YOU STILL GET NO OVERLAPS in the UVs.
I haven’t subdivided my final base model (the model with the new uv-map) before i exported it… why should i do this? :o
I created a high-poly mesh.obj-file from my model with the old uv-map in ZBrush for xNormal, and of course a low-poly-mesh.obj-file with my new uv-map for xNormal. When i import the low-poly.obj in Zbrush and make the uv-check in the texture-palette, everything looks ok and there is nothing red, so i think there are no overlapping UV’s.
- stretch those facial features out a bit - make sure they take up more area that LESS IMPORTANT PARTS
stretch them out in my uv-map? i tried it (not sure if i did it correctly), but i still get the artifacts, while trying to create the normal map 
LOL, my english isn’t perfect either (by far) :lol:
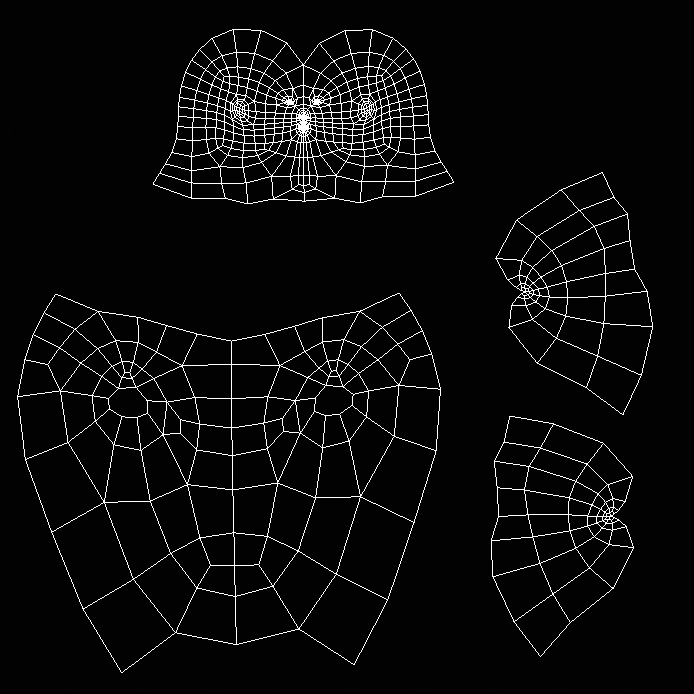
Let me try and show an example of “textuebox-fitting.” This is not really my best UVing ever, just for the demo, but you will get the concept; bear with me:
UVs before stretching:
Also, too explain myself a little better on the facial feature stretching - make sure that your polygons around the ear (as well as the back part of the ear) get some comparitively significant area on the UV map - despite the distortion.
Also, the artifacts may sometimes appear in places where there is poor correspondance between your hi-res model and your target, low-poly model, meaning that if you put one on top of another, they don’t fit very well specifically at the places where these artifacts appear. If I were you I would try to render this normal map out on the low-res and see exactly where they (wierd places) appear on the model. Then, try to import the new low res into ZBrush and draw it side-by-side with your Hi-Resolution tool, just to compare these places and see if you can adjust the hi-res geometry (or the low-res, only then use low-res exported obj for low-end.)
You can do this easily with the “tweak” or, now in 3.1, the “move” BRUSH - not the transpose move - formerly, it was the move tool if you remember ZBrush 2). Only little adjustments are usually necessary, if any at all. Make sure you just adjust the hi-res as far as to fit the low-res (or vice-versa, whichever you prefer,) don’t do any drastic changes…
That should about take care of anything that may go wrong… Besides possible software malfunction (which is NOT the case here.)
Hope this helps 
Attachments

my UV’s now after stretching:

WTF??? :evil:
if its always such a pain to create a 3D character… i will quit
I also tweaked the low-poly a little bit to get closer to the high-res in Zbrush.
I attached it to this post, maybe you can take a look at it…
One more question btw. to xNormal:
I always get two maps, one is the normal and one is called mask.tif. What is this map for and where is my displacement map?
Attachments

- Are you sure your low & high models match? From your n. map and the result on the model when I rendered it it seemed like you had quite a few places where they didnt…
- Did you make sure to remuve all filters (Dilation is on by default) from the zNormal?
- I think what you said earlier - applying your map to the 2nd subdiv - is a better idea in this case than just your plain 800 poly mesh. Ther is a limit to which you can go on conserving your polycount with normal mapping. Consider that for best quality results with normal mapping, you need at least 2000 polys (what Epic are using.) Again, in this case, also check for the inconsistencies between the low- and the high- res, tweaking when necessary.
The “wierd spots” on his head appear in ray-miss places (the inconsistent places). xNormal will not mark these places with any red or othewise warning color by default - you have to check for them yourself. If you don’t want to bother with xNormal anymore, why don’t you try the first method (the all-zbrush method) using Morph Target tools which, as I pointed out, is on the same Rapid and Nice Normal Maps in ZBrush on the first page?
Man, be patient. You never get anywhere withot patience.
Look at the normal map. It has no messy spots like that ear was anymore -its better. Look closely at your “monotone-blue” head spots. They could not just have “sprang out of nothing,” and we know they weren’t there before. Tweaking the UVs cannot in any way make these, unles you added overlapping somewhere by acsident, which you didn’t. But you must have done SOMETHING wrong, right? Check the model center point. Did you, maybe, tweak the pivot or change the model’s xform or position in any way when exporting? Maybe, put it a bit lower or higher?
These small things could be what’s causing this one to happen. Figure it out, man, I’ve helped as much as I could, but, no disrespect, I’m not a babysitter…
HEY, WADA YOU KNOW!!
Here, I made a normal map for you using the process I described, the result:
Looks like you’re gonna have to figure out what went wrong yourself! BUT, I’ll give you a hint: you don’t even have to tweak the geometry - just compare your ZBrush-exprot at level one to the last file you posted;) . BTW… Never, never forget to apply the SMOOTH SHADER to the polys of your .OBJ BEFORE you re-export the low-poly and bake it in xNormal! That would be your mistake #2.
Attachments
Also, the small wierdeness in the ears (still remained, though less now) can be simply edited out in photoshop. Just use the smudge tool to cover up the inconsistencies with a blurred-down tone of the surroundings…
I’m sorry but i don’t have much time at the moment. I hope i can post new results in a few days.
Thanks a lot for your help, i really appreciated it!
I’m back
Ok, after a long break i continued my work in the new year 2008.
After testing a few things in the last weeks, i decided to completely retopo my mesh and with the new topology my uv-problem was gone. (but i always still don’t know what the reason for my strange normal-maps was…)
Now i was able to create my normal-map with ZMapper and my displacement-map with multi-displacement-3.
result:

Thanks again Megamorph for your help! I learned a lot!
I will show future results now in this thread:
http://www.zbrushcentral.com/zbc/showthread.php?t=50770