ZBrushCentral

Help Desired - Better understanding of 3D to 2D.

First off, please allow me to start this request by noting that I have very limited modeling experience and that my attempts to teach myself Zbrush has been something akin to cleaning a china shop with a sledge hammer. Amusing, if questionable in it’s productivity. I have worked with Ued, Blender, Second Life, Rokuro and only recently Zbrush to limited degrees as what I mainly do is texture art in programs like Photoshop and Painter. I generally only learn enough to make and view textures which tends to give me a skewed idea of how these programs work.

True to this pattern I came to Zbrush to aid me with a texturing project and ended up finding it to be infinitely unique and enjoyable to work with- though my initial problems remain. It is my fondest hope that someone here can point me in the right direction and perhaps streamline my initial understanding in a way that will allow me to produce cleaner results with more efficiently techniques than my crude clubbing around in the system.

Here is the function of my work in Zbrush, thus my understanding of it. My current project is in a game called “Second Life” which accepts .bmp files which map out three dimensional parameters and essentially create shapes. After trying several programs in an attempt to learn how to make these I fell in love with Zbrush and succeeded in bringing many of my designs into the game. The problem I am having, is in the texturing. Most of the work for people I have done in the past, involved modelers who already had a template of the texture ready for me to work on but since in this case “I” am the ‘modeler’, I am having to figure this out for myself.

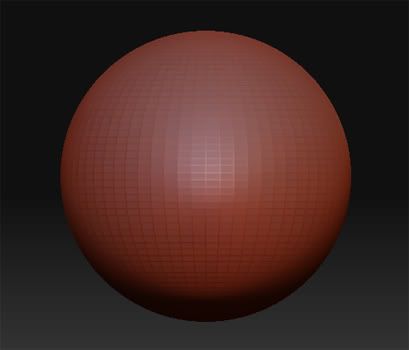
The process in full (Again, outside of this, I know sadly very little about the program, but I am learning.) is that I open a .obj sphere with the max number of polygons already preset into it… (Since I do not know how to make my own yet.) which is about four thousand. I push and pull, add and subtract that initial sphere into the shape I desire after which I export as a .obj file. I import that file into Wings3D, and export it back out as a SecondLife Sculpty file .bmp, handled by a plug-in which turns the model into a texturemap.
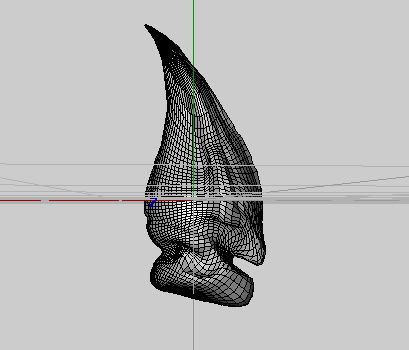
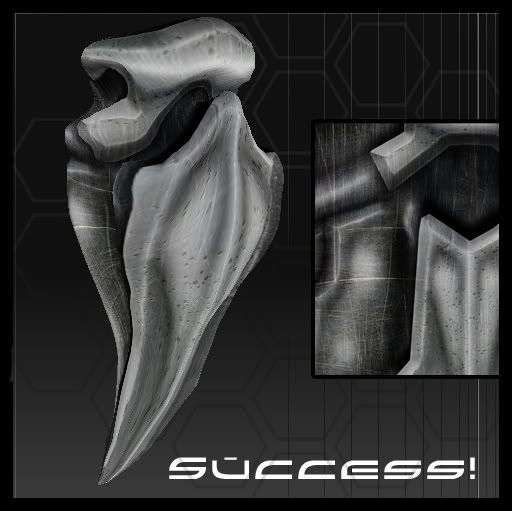
Like this.

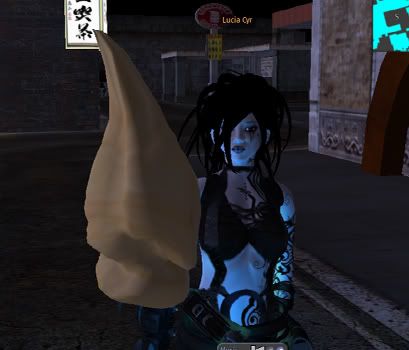
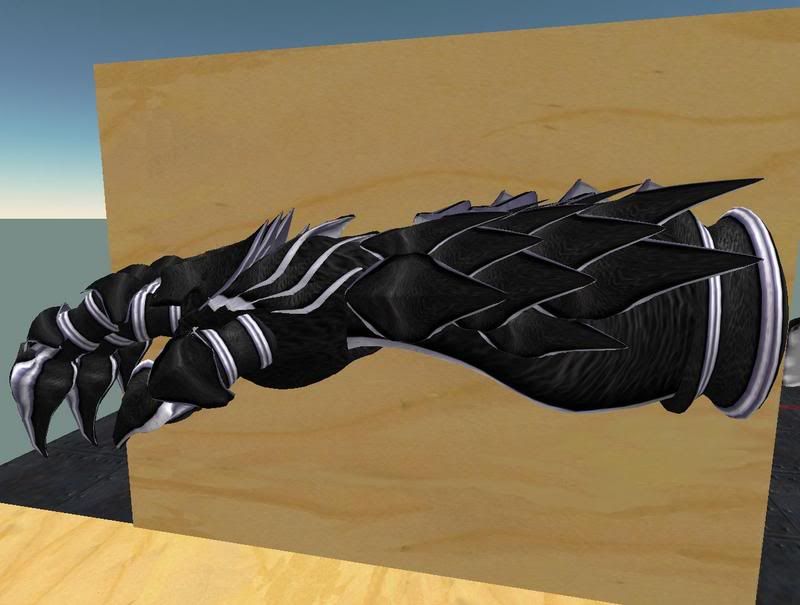
This is the gauntlet of the current piece I am working on, made in Zbrush and imported into the game. The texture that is currently on it is just a leather with metal lining that I slapped on to give it some definition (Else it would look like the woodblock behind it, the games natural base texture) and I have had great difficulty in trying to use my obviously flawed methods to texture these peices. Again, other than the slapped on leather texture- the gauntlet is untextured. Size was a bit large to post in this window so the link is below if anyone is interested.

http://i7.photobucket.com/albums/y266/Rykka/a2j_Gauntlet_001.jpg?t=1183711881

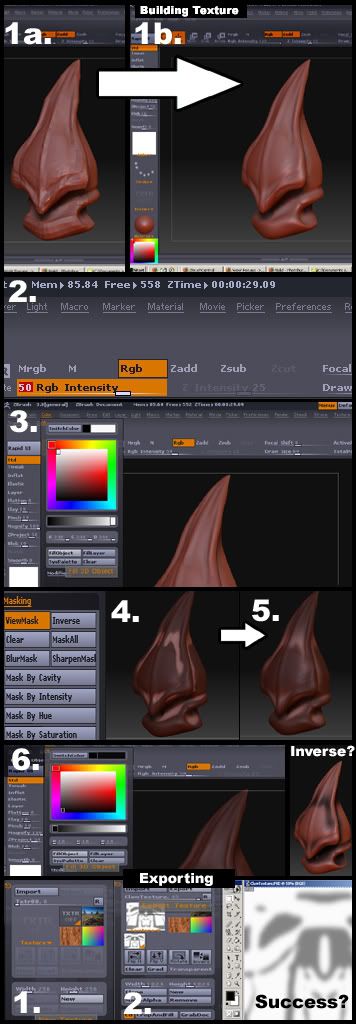
This, after much swearing and reading, I figured out how to do. What I need aid with, if you will be so kind, is figuring out the best way for me to make textures for these models. At the moment I am painting a rough texture- uploading, and repainting it by eye to try and fit the object better. It is exceedingly time consuming and nothing ever fits quite right. I know there has to be a way to make the templates that were given to me before. (Feel free to laugh now. Neanderthal poking a supercomputer with a stick.)

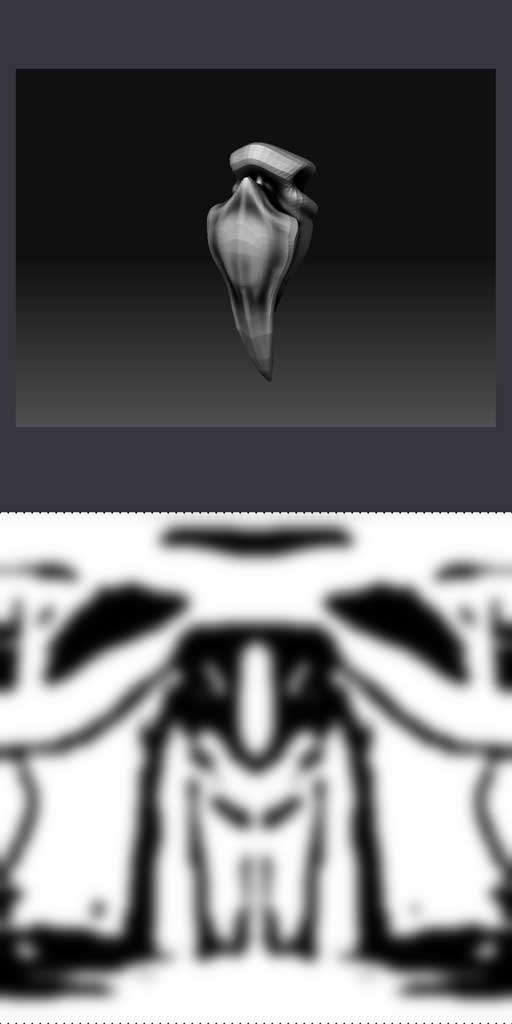
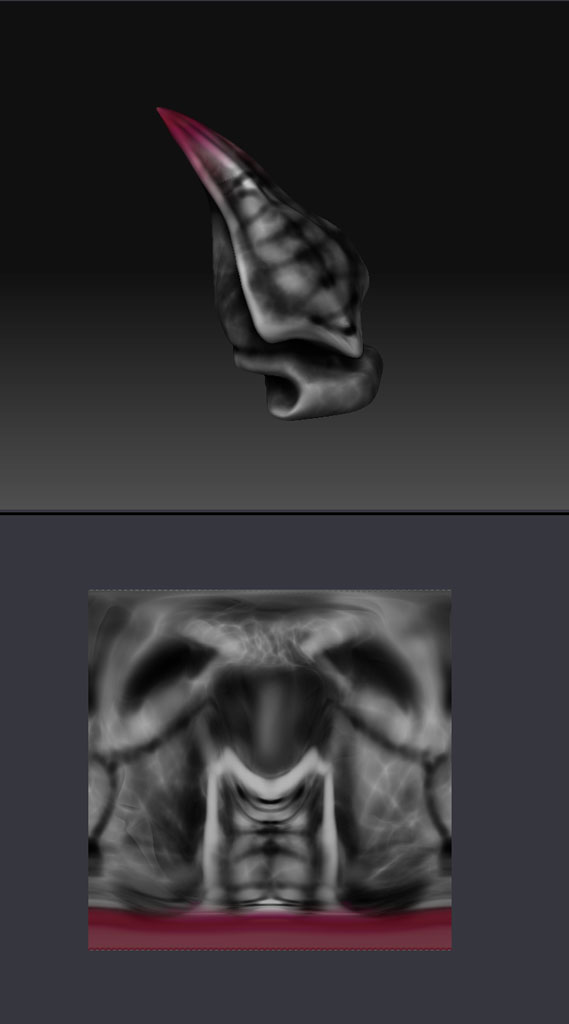
After some research I read about some way to take the highlights and shadows seen in Zbrush on the model and make a flat texture out of them. That would be an -unbelievable- help, but unfortunately due to the experience (Thus usage of terms I do not yet understand.) of most of the people talking about it, and the fact that what I am specifically after did not coincide with their work, I understood next to nothing about it.

I’ve been trying to figure out the in-program painting tools, to paint onto the model itself, and maybe figure out a way to export that off of the model but I have yet to figure out how to do that correctly. I keep resetting the entire model when I attempt to poke around and figure it out. On top of that, I fear that it will not save those wonderful highlights and shadows that would be such a huge boon when painting the actual texture. (Especially since the game it is being transferred into has no dynamic lighting, texture shadows are all the more important.)

So please, if anyone knows how to help me I would be most grateful for any aid at all. If I am rambling and making no sense, please say so and I will try to reformat my uneducated understanding of the program and problem in a way that will help clarify.

Many thanks in advance.
Rykka

Have you read the Practical Guide? It was written for ZBrush 2, but most of the info also applies to ZBrush 3. There are some good tutorials in there about texturing. Also, have you visited www.ZBrush.info?

I’ve been digging through various sites and posts by people trying to dig up the information, always happy to have a new bit to look at. Thank you for the link, I’ll look into it now.

My biggest concern is, while I want to eventualy learn how to fluently use Zbrush, the project I am working on now calls only for a specific aspect of it. I suppose I ‘should’ sit down and begin a start to finnish tutorial now, but I really need to work on that project so I was srearching for a shortcut I suppose.

Thank you very much for the reply, I’ll look into those links.

Terribly sorry to keep harping on this thread but I am still having a tme of it trying to get this to work. My main problem is that most all of the tutorials I am attempting have me using shapes and configurations that would change the rather rigid parameters I have to abide by to have these models import correctly into the SL system.

Not only that I think I am making this more difficult with my explanations than it likely is. In short, I have a simple 4,014 poly sphere I am warping into new shapes, and I would like to save the highlights and shadows of this as a flat texture file.

The shape has to remain in it’s simple shape because it in turn is unwrapped into a texture file that explains the shape to SL. It stands to reason that since the shape is already able to unwrap into a texture, there must be a way to do so with the shadows.

Again, trying to maintain the parameters necessary to have this work in their system is making this incredibly difficult to learn. Thanks again for any help forthcoming, and I apologize for pestering you about it.

~Rykka

PS: If it would help if I upload the .obj sphere I am working with, please let me know and I will.

I think you may need to provide more precise info.

eg have you tried following the steps outlined in the wiki on polypainting here:

http://www.zbrush.info/docs/index.php/Paint_It%21

And if you have how far do you get before running into issues.

Also the kind of shadow/highlight map you mention is called a cavity map in zb. To get it we use the masking–>mask from cavity tool. Have you tried that approach and again if you have, at which particular step do you run into issues and what issues are they.

Note that even though the steps call for you to divide the mesh into millions of polys, you will never actually be exporting this changed mesh. What you will do is use the mesh to hold your textures and then export only those, never the mesh itself.

Instead you will export the low level unchanged mesh only.

And yes uploading the OBJ may help.

You are completely right about the subdividing not mattering in terms of the texture- I’m not sure why that never occured to me. Hopefuly that will help aleviate some issues. Unfortunately I am again at work right now and without the benifit of my home PC and it’s utilities, but I’ll be sure to follow the steps outlined in the link you sent me when I get home.

I will also upload the sphere obj.

These are, essentialy what I am working with.

http://wiki.secondlife.com/wiki/Sculpted_Prims:_Technical_Explaination

I know, using Zbrush for this is like it’s like using a Ferrari Enzo in a mud rally… but it works better than anything else I’ve tried and I eventualy want to fully learn the program anyways.

I will give a full, indepth explanation once I get home and hopefully clarify my ramblings some.

Thanks again for the help.

Doh’.

Ended up working a double- and passed out immediately when I got home. By the time I woke up it was time to come back here again and I didn’t get a chance to post the information I said I would. Very sorry. Will do as soon as I get home this morning. Scouts honor.

Okay, here is the step by step on what I have to do to get these shapes into the Second Life system as a sculpted prim. To quote their website “A Sculpted Prim, or sculptie, is a primitive whose shape is determined by an array of <x, y, z> coordinates stored as RGB values in an image file”

To make such a file the shape in question must both be able to unwrap into a flat, square texture as well as remain below their poly limitation which is about 4016 if I recall. I do not know how to set up the parameters for this myself yet but someone was kind enough to upload a premade sphere set and ready to deform/reshape and export. I have been using this sphere as a base it my work with successful results- my real troubles appearing when I attempt to texture it.

The sphere in question is included in the Zip file I am including with this post. Again, first I open it up in Zbrush.

Next, through use of Zbrush’s endlessly innovative tools (I use Photoshop alot, the idea of a modeler that allowed me to use the same techniques in it made me absolutely giddy.) - I deform it into the shape I need. In this case, the fingertip segment of the gauntlet I am making in second life. Due to the limeted nature of the game, one cannot simply make a gauntlet and animate it. Each peice must be added to the game seperately and peiced together there. In any case- I turn our friend the sphere here into this claw for the fingertips of the gauntlet which I will also include in the zip.

Sorry for the roughness of the model, the low polycount kinda makes it difficult to work with. In any case, this is the finnished model for the claw- which I so desperately want the shadow and highlight information from. Not only would it help me discern how to texture it, it would provide a beautiful reference for how the lighting should exist on the peice.

Having finnished the claw- I then export as a .obj file, and import it into wings 3D.

The reason for this, is a nice little plug-in someone made for the free software Wings 3D that will export this shape as the desired <x, y, z> texture file. I will include this in the Zip as well, just in case anyone needs it. Just drop the two files into your plug-ins folder and you will have the “Second Life Sculpty” export option. What I end up with is this.

This tiny image tells Secondlife how to make the shape I built. Unfortunately, alot of detail is lost by this time, and I end up with this in-game. Still, it is leagues ahead of the alternative, building things out of simple cubes, spheres, and rings, which is what the majority of the game is built on.

Again, as you can see a tremendous amount of detail is lost, making it all the more important to provide it with a good texture. (That is the games base woodblock texture on it now.) The game has no real dynamic lighting, it is only because I stationed a bright light next to it that the highlights showed up at all.

I hope this helps explain it better. I figure since the shape itself can unwrap into a square image file, there must be a way to make the shadows/highlights into a similar texture file. I did some research into UV mapping and shadow baking, and it sounds like I need to try and apply those techniques here, but I am a wee babe at this and I would greatly appretiate any suggestions I can get.

Thanks again!
~Rykka

Fixed the none-working links, sorry.

Well ok, try this:

  1. Draw your tool (the claw) on your canvas, go to edit mode and divide a few times.
  2. Make sure only rgb is on, and zadd/zsub are off
  3. Choose white in the colors and press color–>fillobject
  4. Masking–>Mask by cavity
  5. Press Msking --> blurmask a few times to get a smoother mask
  6. Choose black in colors and again press color–>fillobject

This will give you a paint of the shadow/highlight of the object. Now to export it to a file:

  1. Under texture, enter a width/height (i dunno what rez secondlife expects so you are on your own here) and press new to create a blank texture.
  2. Then press texture --> Col>Txr.
  3. Export the texture this creates.

Attachments

ClawCavity.jpg

First off, thank you very much for the help here- and for putting it in a way even someone like me (should) understand.

Unfortunately it seems I must be doing something wrong, because the texture remains blank white when I export it. I will list a play by play of exactly what happens when I follow your tutorial, and with luck, we can figure out what I am doing wrong. Again, thank you both for the consideration and help.

1. Draw your tool (the claw) on your canvas, go to edit mode and divide a few times.

I load up Zbrush, and open the .obj file for the claw. I then click on Geometry and divide twice.

2. Make sure only rgb is on, and zadd/zsub are off

Done and done.

3. Choose white in the colors and press color–>fillobject

Here is where I suspect I am doing something wrong, because when I complete this step- nothing happens. I open the color menu from the top of the screen, select white from the color wheel, and click on “Fill Object.” The screen blinks, but otherwise nothing happens. The model remains the same color, and I continue incase it is actualy supposed to be like that.

4. Masking–>Mask by cavity

I click masking on the right hand menu and “Mask by Cavity” on the drop down. This creates darkened, shadowed areas which make me hopeful I’m on the right track. The dark spots seem to be inverted from where I need them- but that is fine, they still tell me the critical placement information I need.

5. Press Msking --> blurmask a few times to get a smoother mask

From the same drop down menu as step 4., I click “Blurmask” twice, smothing out some of the hard edges on the dark areas.

6. Choose black in colors and again press color–>fillobject

This in turn makes the entire object black, and now I suspect my earlier fiddling with the invert button may be a cause for problem, because hitting it gives me exactly what I am looking for. For the sake of keeping this exact, I will continue with the exactness of your write up, leaving the inverse button alone.

This will give you a paint of the shadow/highlight of the object. Now to export it to a file:

1. Under texture, enter a width/height (i dunno what rez secondlife expects so you are on your own here) and press new to create a blank texture.

As I can scale up the texture as needed in PS, I leave the hieght/Width alone and hit new as you direct.This creates no visible changes but I understand the process behind it.

2. Then press texture --> Col>Txr.

Lo and behold, this time it actual seems to have worked, I’m really not sure what I missed before. Before, it would simply show a transparent box flicker across the screen and the texture box would remain blank. Either way, I am happy to see it there at all! Maybe in what I have posted here you will spot my mistakes? Either way, the new texture now appears in the texture window.

3. Export the texture this creates.

Exported and successfully opened in photoshop! Absolutely fantastic. It took me a bit of eyeballing to see where the seams and shadows belong, but I can tell now and it will be amazingly helpful in texturing this peice and many more to follow it! I can’t thank you enough Ghonma. The only thing else I can think of to ask, would be for tips in fine tuning, maybe how to use color to notate certain areas before exporting… but honestly I’m sure that with more reasearch and tinkering, I’ll discover these techniques over time.

If you do ever end up in the confusing world of Second Life, give Lucia Cyr a message and I’ll happily show you some of the neat things to be seen there. Admittedly a large portion of the online world makes for a bad example of what can be done with it, but there are some truely interesting dynamics to see. Being able to build, texture, script realtime with people around you helping is a pretty unique things, and it’s been alot of fun.

That said, the technology behind it would likely make big shot graphic artists like you guys cring- but it’s fun. Toss me a message any time and thank you! I’ll still be around here though, too much to learn. Smiles (As if there was ever an end to that.)

Thanks again!

Rykka~

Here is where I suspect I am doing something wrong, because when I complete this step- nothing happens. I open the color menu from the top of the screen, select white from the color wheel, and click on “Fill Object.” The screen blinks, but otherwise nothing happens. The model remains the same color, and I continue incase it is actualy supposed to be like that.
Yes, the first fillobject is mainly to tell zb that you are starting a polypainting session. We use white so that it deletes any previous painting the mesh may have. If you want to see the white color, switch to a material like ‘fastshader’.

I click masking on the right hand menu and “Mask by Cavity” on the drop down. This creates darkened, shadowed areas which make me hopeful I’m on the right track. The dark spots seem to be inverted from where I need them- but that is fine, they still tell me the critical placement information I need.
Dont use invert. What we are doing here is masking off the areas that we want to remain white. ie you are blocking the highlights from being affected by the next (black) fillobject you will do. And anyway even if you do use inverse you will get the exact negative of your texture and can invert it in photoshop.

This in turn makes the entire object black, and now I suspect my earlier fiddling with the invert button may be a cause for problem, because hitting it gives me exactly what I am looking for. For the sake of keeping this exact, I will continue with the exactness of your write up, leaving the inverse button alone.
It only appears black. What’s happening is that the mask on the mesh is already black. And you are filling the unmasked areas also with black. So it seems as if the whole object is black. But if at this step you turn off masking–>viewmask, you would see that you have gotten the shadows as you wanted.

I can’t thank you enough Ghonma. The only thing else I can think of to ask, would be for tips in fine tuning, maybe how to use color to notate certain areas before exporting…
Glad you got it working :slight_smile:

Also note that you can use the same process to do your texturing in ZB itself. Follow the steps till you get to the ‘mask by cavity’ bit and instead of that start painting on the mesh instead. You can use whatever you want, alphas, projection master etc. When you are finished, do new texture, clr>txr and export as usual. Worth experimenting with when you become more comfortable with ZB as it may save you a lot of time.

Attachments

ClawTex.jpg

I havent quite gotten the hang of the pixil painting process yet (I keep deleting/destroying the model somehow.), but the knowledge you have bestowed upon me has brought great success!

That is the low poly claw in Zbrush, not even subdivided. With the texture in place, it imported flawlessly onto the Second Life model without me having to resize or adjust a thing. It may not look like much to the model masters here around Zbrush Central, but in terms of what Second Life is Capable of rendering,this is fantastic!

I will include the final texture in a zip at the bottom incase you are curious to see it. Viewing it with Matcap Metal02 makes me really wish a game could handel that. Looks so very pretty. Thanks again Ghonma!

Nice work on the SL conversion! I have a similar template out there for Modo users to bake Sculpie textures:

http://www.lovecraftforest.com/blog/2007/05/17/sculpted-prims-in-modo-part-ii/