ZBrushCentral

Having trouble sculpting perfect ridges/loops on body armor

I am having trouble sculpting perfect rings/loops on my character’s body armor. Is there anyway to do this easier and more evenly in projection master? Maybe even a plugin or a script perhaps?

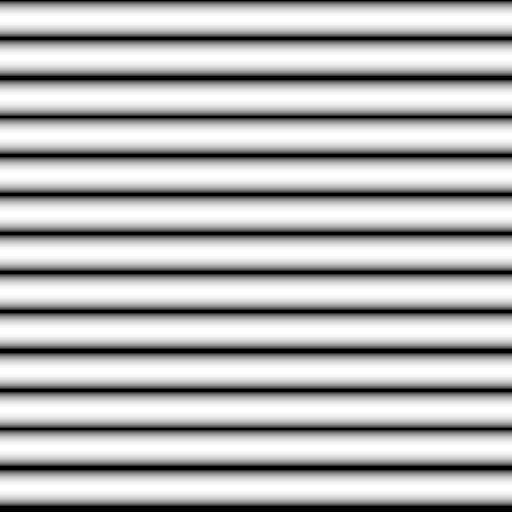
Anyways, here is the reference image of what i am trying to achieve in zbrush.

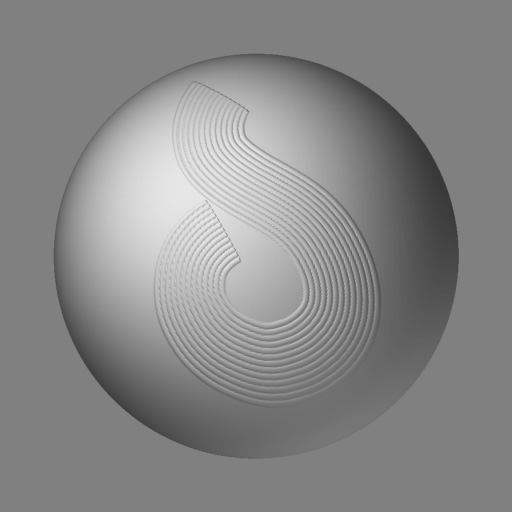
And here’s the lousy detail i have got so far. I am still struggling to create perfectly even loops. I wonder if there is a vector like in photoshop where you draw a vector in a form of a path as to where the ring or loop will go and then you just stroke it with a brush and then the detail automatically is done for you perfectly.

Something that you could do is use Photoshop to create a grayscale image of what you’re looking for. That can then be imported into ZBrush in the Alpha palette and used as a Stencil to paint through. Be sure to turn the stencil off before you pick the model up again using Projection Master.

Alternatively, create a square alpha with several perfectly parallel horizontal lines. This can easily be done right in ZBrush on a blank layer. That can then be used with the Deco brush (with its Tile Texture modifier active). If you set your Stroke>Mouse Averaging slider to a high value, you’ll get nice smooth strokes, and the lines will be perfectly parallel.

Remember also that you can move and transform a stroke immediately after you’ve drawn it. Just asctivate the gyro.

About the stencil, how can you import an alpha to change the default one. Under stencil in zbrush, there doesn’t seem to be an import button. thanks

Alpha>Import, followed by Alpha>Make Stencil :slight_smile:

I have tried the deco brush with tile texture on with the alpha that i made but this isn’t really going to work because you have to dab with the deco brush several times which as a result causes seams and discontinuations. It is also not really possible to line it up exactly with the gyro, or to scale it because it results in something that i don’t want. Here’s a pic of what i mean.

Also, i don’t find a make stencil anywhere in the alpha pallete either. I am using zbrush 2.0.

It’s shown as Make St in the Alpha palette. “Make Stencil” is its full name.

Regarding the Deco Brush – I said horizontal lines; not vertical. :wink:

Here is an example of a sphere that was modeled with this technique:

[DecoSphere.jpg](javascript:zb_insimg(‘15169’,‘DecoLines.jpg’,1,0))

The alpha was created using a 512x512 canvas and the Cylinder3D tool. A thicker cylinder would of course result in thicker lines. For the Deco Brush, I turned on Zadd with a ZIntensity of 5. I set Mouse Averaging to 8 in the Stroke palette, and in the Tool Modifiers I turned on Tile Texture as well as increasing the subdivision and decreasing the Minimum Segment Length.

Attachments

DecoLines.jpg

Thanks for your prompt replies. :slight_smile:

This now seems to be working a lot better. However, i still keep getting discontinuations where the end of the first stroke of the deco brush to the begginning of the second stroke. There’s just a seam that you can’t get rid of, and using the blur brush doesn’t help that much at all. (you know what i mean). Any advice in blending the second stroke of the deco brush detail with the previous one so that the ridges appear to be seamless and continuing. This is made all that much harder as well when you drop the detail in projection master and have to pick up a new projection. It is still very tough to create another stroke with the deco brush and line it up parallel and side by side with the previous one, but i guess there’s nothing that can be done to make that easier. Also, do you know how to scale down the stencil? When it pops out it takes the entire space of my document.

It can be a challenge to get the end of one stroke to seamlessly blend into the next. I personally try to avoid having to do that, but can usually accomplish it by using the Move and Rotate gyros.

Regarding the Stencil, once it’s active you can press Spacebar to bring up the Coin Controller at the cursor’s location. It has sections for moving, scaling and rotating the stencil. All transformations are based on the cursor’s location when the controller is activated. So you can choose the pivot point for your stencil transformation simply by positioning the cursor before you activate the controller.

Just to add a note: you may find it easier to add parallel strokes by changing the Deco Brush Center Offset value to something like +90. You will then be able to run your cursor along the left edge of the previous stroke and the new stroke will follow neatly.

For that matter, Stroke:Replay Last would follow the identical path – but thanks to the offset value you would get a parallel stroke instead. :slight_smile:

If you use the Stroke > Replay Last Stroke feature (Ctrl + 1) you should be aware that the Stroke > Mouse Average is also recorded with the last stroke. Therefore you need to set Stroke > Mouse Average to 1 in order to get an exact replica of the previous stroke.

That’s interesting TVeyes!

But repeating a stroke exactly is only any use if the outer curve fits inside the inner curve. :slight_smile:

Not really, there are a couple of reasons for duplicating a stroke exactly on top of the previous. If you for example lay down a line, repeat that stroke and enter transform move mode, you can edit the draw size the stroke spacing, the Zadd/ZSub etc. That way you can create details with only one stroke, the repeated stroke being the one where you edit the pixols interactively, so as to create patterns or shapes not attainable through adjusting the alpha shape alone.

As Aurick mentioned, with the Deco Brush repeating a stroke and adjusting the Tool > Modifiers > Center Offset will help in getting closer to an inner curve. A little repositioning is needed in most cases, all according to the alpha used.