When making stuff at Film Res or even for other purposes: What method have some of you been sucessful at getting seamless, unified single solution UVMAP. I think that the problem is that when one unwraps a mesh of full bodied character you are left with the problem of just how much space each part takes up and recieves the most detail. It wouldn’t be such a problem if we could figure out how to get 8K or greater maps out of Zbrush.
Are you referring to a single ‘pelt’ for a character for example?
The concept of a ‘seamless’ ( if by seamless you mean one UV per-vertex) UV layout doesn’t really apply if you wish to have clean, undistorted UVs for texturing and baking displacements.
In fact a seamless UV layoyt never exists as you will always have an overlap of some kind unless you model is planar.
With UVs there is always a trade-off between the amount of seams you want versus the amount of distortion. What factors affect your decision in a big 3d pipeline is based on the demands of a texture artist (ie will it be painted in photoshop afterwards, will a procedural script be ran on the the mesh using the UVs for some reason etc). I’ve found that having a very good UV ‘pelt’ layout is always beneficial, even if its not the UV layout you end up using for zbrush (as in , you can easily use a shader that uses a different UV set for color and another for displacement at the end of the day) So don’t think that you need a all-in-one solution for everything.
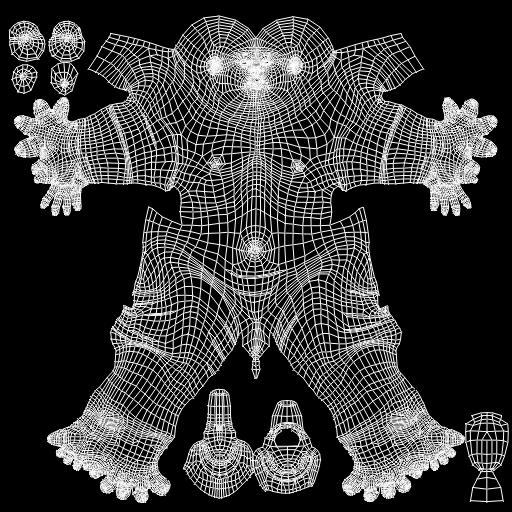
The best solution for a ‘one-piece’ pelt chacaters IMHO is a UV layout whereby the seams located in areas where they are seen less ( a seam running down the underside of arms and inner legs and under hair for example)
The rest is connected to the body and flows correctly (I have included an image of this) and is unfolded using a 3D package, in this case it was Maya’s UnfoldUV commands
The problem with this method in zbrush is that if you were doing hi-detail displacement you’d need a map of 16000 x 16000 because the head area occupies so little of the UV space and even an 8K map would lose some detail.
So secondary UV sets for the head, body, arms and legs could be created. Each of these areas of the model can then occupy 0 > 1 space (you could even cut the UVs from the pelt I mention and scale them up to fit so you stil have nice unfolded UVs)
Whats great in zBrush is if you then offest the UVs of each of these areas in U space by 1 (eg head is 0 > 1, arms are 1 > 2 and so on…) then zBrush can allow you to paint on a selected UV zone at a time by simply choosing polyGroups > UV groups (I think) from the tools menu. You can now select an area at a time with shift>ctrl>click
(this has been covered in other posts so won’t go into detail)
Even greater, zbRush multi displacement plugin will automatically created all of your disp maps for you (at 8K + if you wish BTW!) and output a separate map for each UV (0>1) space it finds. Basically, it will export a map for head, arms, legs, body all in one go.
Of course you may find depending on your model complexity and how many subdivisions that you want to paint on one area at a time, but thats for another post and has been answered already many times.
Provided the image upload worked, heres a shot of the all-in-one pelt from a char of mine.
Hope this helps
Attachments
just as addition to gunslingers reply: You can make 8k maps by importing a blank 8k PSD as texture.
How does one export an 8k Displacement map? The thing is my characters needs to hold up to the camera and have animated displacements. I am a bit worried if I go and start tearing apart the mesh in multi displacement uv setup that i will get seams like crazy! I wish a really good UV solution would come out that would make it much easier to get good UVs.
You can export an 8K map through the zbRush Multi Displacement exporter, which you can download and install from this site somewhere.
I think, using the method Erklaerbar mentioned and using the default Tool > Displacement option you can export greater than 8K. I might be wrong.
What do you mean by good UVs? Theres really no harm in having multiple seams, try to hide them in intelligent places that are not seen from camera. (for example if you look at my pelt image I can run animated disp map of 8K over that model and it will work great, but as soon as I zoom into, say the armpit area I may see some atrefacts as there is a UV seam there)
zBrush is not the best package for UV solutions, I created the pelt you see in under 2 hrs in Maya 7.0.
EDIT: Oops, all the replies were crammed up in a wee box instead of beind displayed like normal, so I didn’t notice the question was already answered.
If you are using Maya, a plugin/script suite has been released (for free) that makes pelting a breeze. UV mapping is actually fun now  And there’s alot of tutorial information on the guy’s site:
http://sunitparekh.com/pelting/
You can UV map a full human mesh about a half hour. If you need things in sections, like the head, arms and legs it can do that too.
If you’re using 3DSMax, the same type of functionality is built into version 8 and has a very similar workflow.
UV mapping used to be my least favorite part of doing 3d, now it’s actually kind of cool.
~Mike D.
I love making UVs, many people hate the process though!
The script you added looks great, I used that method loads in the past, however, the Maya 7.0 unfoldUVs command works much better (although there is still a bit of manual work) you can planar map a couple of areas of your model and the grab the UVs and hit unfold. Then stitch those areas together.
The script uses a soft body and springs method, and wil produce a good unfolded, but slightly distorted UV layout due to the way it solves.
If the interface doesn’t scare you too much, take a look at blender. The ‘pin’ functionality in its pelting tool is great.
nice reminds me of modo
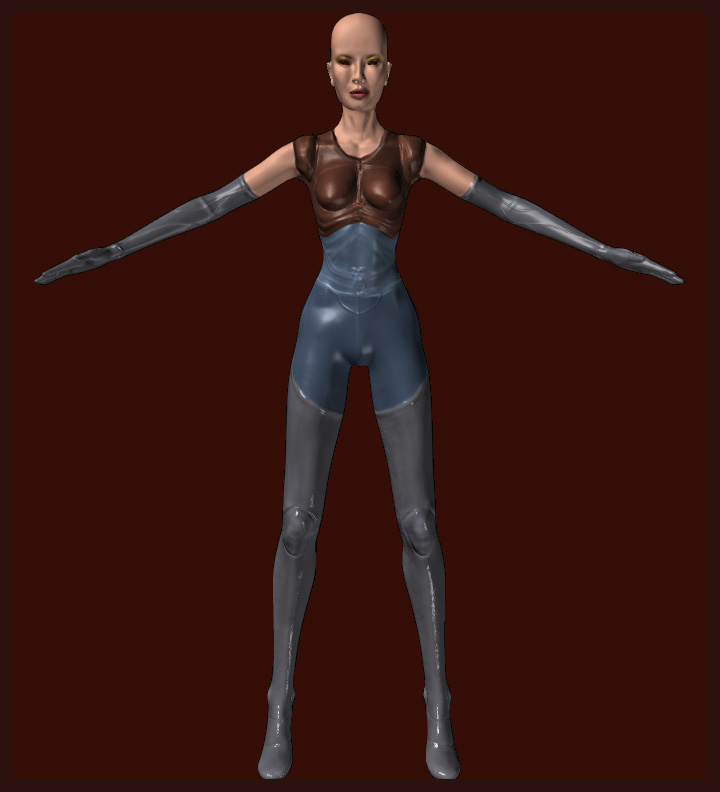
Or just go with AUV tiles if you are not having extreme closeups. In any case, extreme close ups will be better served with dedicated closeup meshes.
AUV tiles character here (not one seam anywhere):
Attachments
I noticed in the Underworld Interview just posted they talk about creating an 8k map in Photoshop thats blank and just inporting that.
Incidentally, if you’re dealing with displacement maps and your rendering engine supports 32-bit floating point maps, you don’t have to worry about seams at all. Each part of your model can be mapped into its own UV space, and the MultiDisplacement2 utility will create a separate map for each space. Displacement Exporter can then export those maps as 32-bit floating point maps, which will render in your engine without seams.
A Zbrush user told me about this. Jion the forum then download the beta. I really like this app. It helps you see and fix where seams would be a pain.
It works by cutting up you model in a 3d view then you flatten the parts the weld them back together.
I was at first turned off by the price ($250.00) but if you buy before the release it is $175.00
You can also buy a dongle key
I am only a hobbyist but a lot of people who are lucky enough to do their art for a living say this program has cut a lot off time off their normal UV mapping.
If one is going to spend more than $100 on a UV tool then BodyPaint is the best choice. Like Zbrush, it has no competition. It is also available built-in to Cinema 4D.
modo has a nice unfolde feature too, and isn’t too pricey. Once I get some time I’m gonna start using that for a lot of stuff
The real question I have is how to get distortion out of an unwrap and the best possible method to doing so. Time and time again I model things in such a way where I localize detail where I need it or for animation. I see these clean checker board patterns on some of these meshes and I’m blown away as to how that’s so easily accomplished.
Well, what other software are you using? Personally all I can comment on is Maya from experience, but ever since the new unfoldUVs options has been available it does the unfolding part for you (so all you need to do is do a planar/cylindrical projection which looks overalpping and distorted and then grab your UVs and press ‘unfold’ its that easy) It has cut my UV time down from days at times to hours or less.
So if you are using a more ‘primitve’ package that is not as involved as some higher-end 3D software then there mao not be a similar option.
The pieces or software mentioned above by others may be useful and affordable. But if buying new software isn’t an option for you. like many or you don’t haver access to Maya Personal Learning Edition., then you have to getthe best out of your current software.
Workflow wise you can still get good unfolded UVs through doing planar/flat mapping of different logical areas of your model and then stitch them together,slowly piecing together a pelt. … provided you don;t try to do things like planar map the whole arm or whole head, which will obviously give you lots of overlapping semaless UVs (whcih are a bitch to edit)
(So for eaxmaple you could planar map the front of the head, then the left, then the right all separatley and then stich the front to the each side, you will find it leaves you with much less distortion than, say cylindrical mapping the whole head. )
If you don’t have an unfold option to play with then you’ll have to apply a acheckerboard and tweak around until the distortion is acceptable to use.
Just remeber, zBrush doesn’t require anything but non-overlapping UVs to produce good maps from what I’ve found… so even if your UV layout is not good but is mapped out somehow then the maps will still work fine (just don’t expect to be paint on great in photoshop as there could be areas that are stretched etc)