Nice chair 
Nice work! I hope you post again, it’s really cool to see the steps of your work.
Do you work on level design or a guy is here to put together the elements created? And how you start work to epic, you always modeling?
(sorry for my english =])
fantastic 


hey ror, nice to seeyou over here, i see you keep mentioning polycruncher, have you tried decimation master plug for zbrush, i’ve had great results with it inside of zbrush, made exporting to max much easier
Hey! Thanks for the comments.
I started at Scion as a texture artist doing characters and environments. a little bit of modelling on characters amd environments on Unreal Championship2, some vehicle modelling and texture for UT4 ECE edition, then moved on to try hipoly on UT3, from that point on, being new to modelling still I got to focus on hipoly only as I had a lot to learn.
Since I learned to work modular like I do, they just keep me modelling now because thats where I’m most valuable. Sometimes I miss texturing, but more for that sense of finishing my work, I like modelling more as my stuff works better when I can see it and rotate around it.
I’m not involved in level design beyond talking to the LD’s and trying to find out what I’m doing right and what I’m doing wrong. I mostly just make lots of fancy Lego pieces. Sometimes I put together little arrangements of pieces to demonstrate ideas I had about how to use a set together, but not often, the meshers here are so good that they don’t really need any input from me.
I was actually using the Decimator beta while posting here before but couldnt talk about that until the Zbrush lads released it, its much better than polycruncher ( which is also a great program that helped me for years previously) for what I do because it tends to handle plain areas better, the transitions from plain to dense detail translate well and of course its internal to zbrush.
I’ve been a bit rushed this year with our youngest Nuala , she turns 1 tomorrow… when things calm down a bit, probably around the time of the xmas break, I’ll make time to post more and show some tutorial bits and bobs.
Wel I’m sure we’re all looking forward to that - impressive thread you got going here - thanks for sharing 
Hi Kevin
WOW - great work love it so much.
1 question how do you get ztools to line up just right like
http://www.zbrushcentral.com/attachment.php?attachmentid=134756
I tried so many times but using ~ but they never line up?
If anyone here know - let me know 
maxmax20093d he talked about his use of the grid in Max to make modular elements earlier in this thread. Read and all shall be revealed.
Hi,
Do you still have those brushes, I would LOVE to get a look at those 
Agreed, I’d love to take a look at some of those brushes btw! I can’t believe I missed this thread - fantastic resource to say the least.
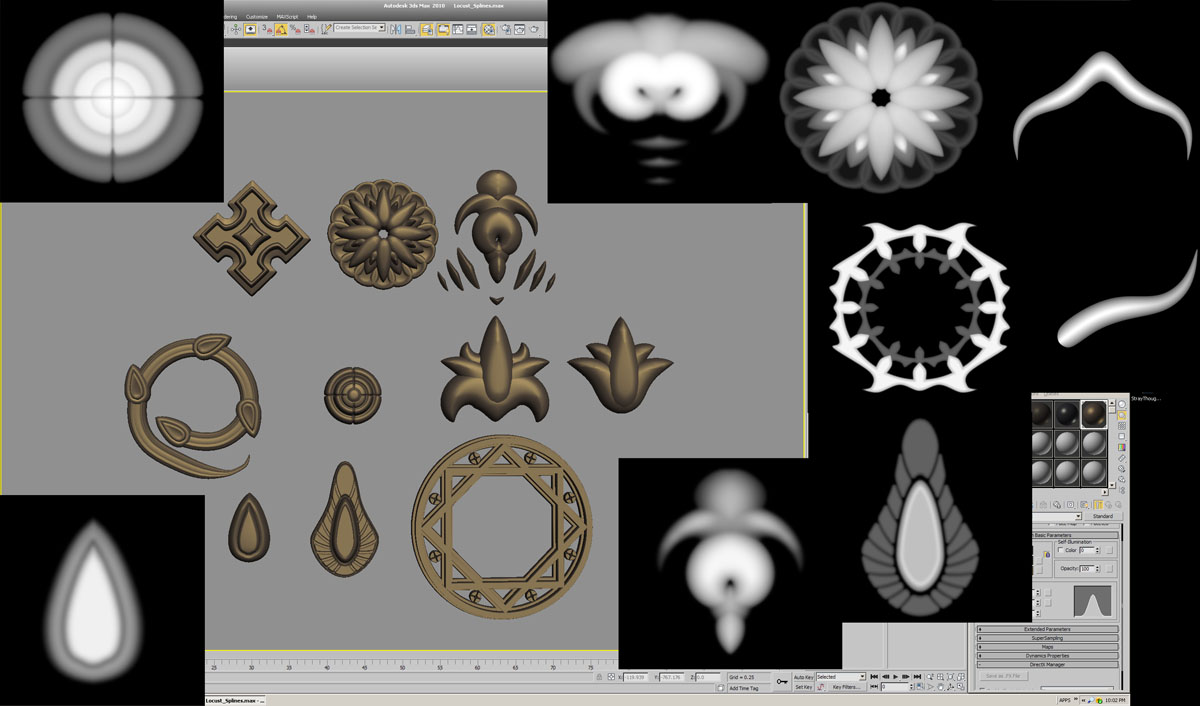
So aye… kind of promised to show these a while ago. Sorry for the delay!
I mostly just made some tribal shapes in max to start with, rendered height maps, edited a little in photoshop and then relied on lazy mouse with the standard brush in Zbrush to trail forms like in the upper right , or the leafy ones at the bottom left, across the main forms.
Then I’d just follow through on top of that noise with the clay tools and mallet fast, pinch, standard brushes to more boldly define the forms that stood out most to me. I tend to work this way a lot, throw big bold forms in, roughly throw a string of medium patterns on top and then pick out the happy accidents by hand and refine them.
Attachments

Nice! Thanks for sharing.
WOW,it’s awesome!Thanks for sharing!


Hi Kevin Johnstone
Are you going to make any videos @ http://kevinjohnstone.com/
I would love to see how you use your tools, Zbrush and so on 
This gets a bump for other people to see just because of how helpful you are at explaining your workflow. Everyone should see it.
Hey Kevin I have noticed that when I render height maps out of Max I get quite a bit of grain. Do you get this as well and if not, what do you do to counter it?
Nice work!
Love the Gate,
you can feel the weight of it.
After making the bricks in max, touching them up in Z brush, decimating them, and importing them back into max, how are you getting the ends to tile? And how are you capping what you crop in max? I understand how to make the tileable textur ein Z, but I dont understand how you got it in max.
Amazing work and thanks for taking time to share so much info with us.
Thanks for the comments.
Bipolar : Thats just a presentation thing I did for our artmeetings, I just made a copy of the side bricks and sliced in the middle and then split them neatly apart so I could convey that the scene I was showing translates into a tiling texture.
I try to be clear in what I am presenting, if I showed my ‘processing’ version of the scene with the bricks having jaggy outlines where the tiling seam is, it might look like a pretty useless model.
So I generally present what we call BSP models ( because when processed they are textures that are meant to tile along a BSP wall of the level designers choosing) in tidy squares like this.
As I mention though, when I process I make sure there are instances of the bricks extended a further 32 units outward from the area that I process my normal maps from. Sometimes I bang the bricks up too much in zbrush and reduce or enlarge their scale too much, so if I create extra at the edges of the process area I am ensuring I capture precisely how those bricks continue to repeat at the edge of the texture.
Not doing this sometimes results in seams where the repeat points are. If you made tiling 2d textures in photoshop on the last generation of tech, you know how invaluable the OFFSET filter there was to make sure the tile is correct at the seams, this is just the 3d version of that workflow.
rayo777: I don’t worry about that, I work messy and nothing I do is just imprinted and left raw, I always merge, overlap , combine, add and subtract from what I imprint with alpha stamps.
I think, honestly, if I could generate perfect 1 stop alpha stamp designs, once I imprinted them on the mesh, I would feel kind of nervous to touch them more, sometimes imperfection pushes me to be more confident about trying to improve it.
maxmax20093d: I don’t know, I do know that actually getting more than a front page up will come first 