Very nice Darkrusader! Looking forward to more tutorials from you.
Im curious, what are your PC specs?
Fantastic !!! no more words !!!
That`s very cool. And thank you very much for all the infos and making of pics. Very impressive!
Thanks for all the kind words guys!
DarkSharp - My computer specs are not that great. Im actually on a 32bit system. haha. I do have a Quad core and an 8800, but the 32bit is killing me. I was going to upgrade to 64-bit very soon. I think just getting some extra RAM will help with keeping zbrush and 3ds alive with those heftier meshes. If I was having troubles with meshes, I would just break them apart with polygroups to bake them.
I finally finished up this little pillar break down. Now let me pre-phrase this breakdown and say that this might not have been the best way of creating this asset. I learned some valuable lessons on this one. If I were to do this asset again I would make some adjustments. Figure 1-C was the biggest problem. Im sure some of you can see the problem just looking at that image, but I will explain it further below and how I would remedy it.
Changed the format a bit too for this tutorial. Im trying to work out the clearest and most concise way to lay out these steps. I wont go into much detail on exporting and importing because I covered that with the brick tutorial. This will focus more on the basic workflow between Zbrush and 3DS Max.
<table class=“fieldset” border=“0” cellpadding=“0” cellspacing=“1” width=“100%”><tbody><tr><td>
</td><td align=“right”> <input name=“Place image” value=“Place this image in your post” onclick=“zb_insimg(‘197162’,‘PillarOrthigraphic.jpg’,1,0); window.close()” type=“button”> </td></tr></tbody></table>
Step 1 - Base Mesh Creation
1-A: Created a very basic shape out of quads that was the shape of the pillar I wanted
1-B: Created some shapes that I will ProBoolean to get my base shape for zbrush. I abuse this fantastic tool all the time. It is so much cleaner and more reliable then the old Boolean. Still some clean up needed, but not like the old one.
1-C: Here is the basic shape I got from subtracting the corner peices and unioning the middle pieces. Looks great shape wise. I figured I can just beat this thing into submission in zbrush. BIG MISTAKE! That topology is terrible for sculpting and caused me much pain later on in the process, mainly in that I needed to crank the subdivisions really high to be able to sculpt reasonably. The reason it is so bad is because of the triangles in the mesh and also the uneven size of quads.
*solution for avoding this - I could have easily created loops from those corner tris and ran them right down the base of the shaft. Also, I could have just cut subdivisions of all the quads until they were all a similar size.
Step 2 - Zbrushing the Center Shaft
2-A: Import your OBJ from Max and subdivided it up. Dont forget to turn off smooth for those first couple subdivides or your model will turn to a doughy mess.
2-B: Started Masking across areas and using the deformations to inflate the masked areas out or in.
2-C: Still Masking away, getting those landmark cuts in. I use these cuts to guide me along for the rest of the process
2-D: More detailing. The top shape was created in the same way, except for I softened the mask. It gives that slightly curved shape.
2-E: Getting the more detailed masking and sculpting in. The top row of arches was created from a custom alpha
2-F: Finish up detail sculpting on shaft.
Step 3 - Creating the Moldings
3-A: In max I created these two quaded shapes and exported them out to zbrush
3-B: In Zbrush I did a remesh of these two objects with them set to union. This gave me a nice quaded shape to sculpt the molding out.
3-C: Sculpt the molding out
Step 4 - Sculpting Details
4-A: Duplicated moldings around base and around top of shaft. 8 total.
4-B: Ribbed the shaft
Step 5 - Polypaint and export High Res Mesh
5-A: Throw down a base coat of polypaint on objects. Block in basic colors.
5-B: Get in there and detail up the object with some grime and age. Export out your polypaint and High Res Mesh. (refer to brick tutorial if you do not know this process)
Step 6 - Decimate and Export low res meshes to objs
Step 7 - Import all meshes to 3ds max and unify them into a single mesh. I use ProBoolean for this as well. After you connect them you have to clean up and dirty areas. A ProOptimize for good measure can help too after it is all one mesh.
Step 8 - Unwrap in your favorite UV Unwrapping program (mine is headus!)
Step 9 - Bake out those base textures from Xnormal (or any program that can bake)
Step 10 - Cleanup/Optimize. I decided that I could cut this down a few notches in triangle count. 5400 was a bit on the steep end for a UDK mesh. Got it down to 3400 which is much better for memory. I could probably spend a lot more time on this stage and get it super clean and efficient. Just turn on preserve UVs and it is really easy to remove edges and cut new ones
Step 11 - Export OBJ to UDK or your favorite game engine!
So this was my process for this prop. Biggest lesson learned, stay clean on that base geometry early on or suffer the wrath of zbrush later on! Hopefully some will find this Tutorial helpful! Let me know if there are any questions!
Thanks again guys!
thanks man !!! …great work…
Realy AMAZING
You can explain how to import on UDK if possible any images ? Thanks man !
When looking at your finished environment it looks and feels utterly like “Badly worked clay”, at first I didn’t figure out why but there is the reason:
You are using decimation master to generate your low-res mesh.
This shouldn’t be a step… seriously.
Though decimation master is a great GREAT tool to mantain the shape of an object without changing it’s silouhette, it’s far from optimal when really really low polycounts come to be…
Your workflow is just fine, until DM comes to play as a low res mesh generator, (step 6 in the pillar).
The step that should be here is:
6 - Retopo using zBrush <------
7 - Uv layout
8 - . . . . .
you can get far lower polycounts to represent something like the pillar you’ve got there, from 3,500 triangles to something like 800…
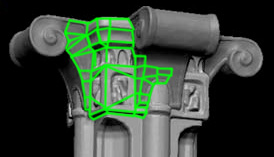
Here is a quick paintover of a proper topology for the pilar (not all, just a little corner)
Attachments
ISK, i thought the same thing too. I figured he used DM to save time since he’s making the level and the assets.
Using ZB for arch items is a nice excercise but an utter waist of time. Use a Nurbs modeler like MoI to get that column done in about the time it takes the DM to calculate the mesh… But again, an interesting workflow which can come in handy at times when box or nurbs modeling starts to fail and a tool in the grey zone is of need.
I love the look!!!
Lemo

Diablo: Incgamers - deviantART
Here’s the wallpaper I made based upon your work Dark. I hope you and everyone else likes. With this piece you are the second fan artist I have worked with in my Fan Wallpapers: The Fiery Runes Series One Two and Three; and the first to have their art used with my wallpapers. I had always hoped to work with fan artists to make wallpapers with what i do. So thank you for this opportunity and maybe if you/when you make another diablo 3 based level we can work again!
Also I can’t send you any PM’s for some reason on the forums they keep blocking me from using the PM and e-mail system. If you have another way to get in contact for that interview please let me know.
Thanks for the wonderful piece of art to work with.
Holyknight3000
The Runeweaver
Hey guys! Thanks for the feedback!
m0delista - For exporting out of unreal i import my low res OBJ back into 3DS max for one last time. I then do an ASE export. Here are the settings that I use when I do that. The easiest way to remeber the settings is the first two check boxes in each section. You can also do an FBX export on the latest versions of UDK.

ISK - You are correct sir. In an ideal world, I would have fixed the topology in step 1-C for sculpting and retopolgized my low in zbrush. I hear you on the fact that Decimation master seems kind of strange to use for deriving my low res mesh, but ive been using this in my workflow for a while now personally and professionally. It is a huge time saver and I was not going for “low low” polycounts. Unreal is pretty good with meshes that are a bit higher than “traditional” game art. The secret lies in the instancing. Once the mesh is calculated into memory, it takes minimal processing and memory to draw it again and again. The reason it looks like “poorly worked clay” is because that is the way I sculpted it. DM had nothing to do with that. The meshes look pretty close to what they looked like in Zbrush.
Unreal does not use quads. It uses tris. If you model with quads, it will just make its own triangle topology. What I find so powerful about DM is that it gives you a mesh about as close to your original sculpt as you can get and you tell it how many tris you want it to be. This doesnt mean there isnt any cleanup, but man, the bang for your buck is huge for the final result. (critical on small teams with tight schedules!) And, in the end, the players of the game are not going to give a damn how you derived your mesh. Just does it look good and is my framrate a steady 30 (or 60). Thanks for your feedback and crits though!
Lemo - Yea, I was really trying to force myself to use Zbrush as much as possible. Lofting would have been the way I would have done the arches if I were doing this in a more traditional workflow. I would love to see how it would be done in nurbs. That sounds like a really fast way! I dabbled in nurbs years ago when I went to school, but I always tried to avoid them for polygonal modeling. I never thought to use them to generate game art. If you have any links, or could provide just a brief summery of how that workflow would work, that would be awesome! Thanks for the tip! Glad your diggin the look too!
HolyKnight - Dude, that kicks ass! Nice Job for sure! I dig the runes. haha. Glad you got your PM working. Im really happy that the diablo fans out there are feelin the piece. (being a huge fan myself!) I really tried to capture the essence of the world of Diablo (or my take on it atleast) with this level based on the time I spend crawling the dungeons of D1 and D2 and all the new bad ass art coming from the Blizzard guys. I think the original concept art by Victor Lee just encaptured such deep story and so much content to work from. I found it very inspiring. I had to make it real!
I look forward to hearing your questions!
Thanks guys for all the feedback and crits. I really appreciate you taking the time to comment and leave remarks. Also thank you for all the 5 star ratings! Im really happy that you guys like the work! If anyone has any other questions about my workflow, any props, or any questions at all, feel free to ask!
Thanks Again!
Darkrusader
Thanks for the new workflow update. Great stuff!
“Unreal does not use quads. It uses tris.”
Duh… in an ideal world, any game engine uses tris… thats common knowledge…
And in an idealized world a game can be burn into 4 dvd’s and the player will love the sign that says “Please change from DVD 1 to DVD 2”, The lower polycount aren’t just for getting good fps, it’s also a matter of disk space… well, taking on account that you’re the professional and I’m the amateur… I guess that 50k polys have exactly the same weight as 500, And the quadratic edge colapse algorithm has just became magical…:lol:
Got a question about your professional workflow…
¿Why don’t you use your base mesh to generate the low resolution mesh??
It has far lower polycounts and better shape than the DM mesh…
I’d love to see some of your professional works, or videogames you’ve worked on using this workflow…
ISK - 86
I think Darkrusader is trying to show people newer methods of working zbrush into game pipelines. Hand modelling every asset will always be more optimized but working professionally means balancing time and quality.
It’s an unfortunate reality and I too find DM to be well worth the small hit to triangle counts versus using the low poly mesh. A pro tip for you is when you decimate you can mask areas off to preserve some of those crisp edges you might be desiring from your traditional low poly method.
Just some passing thoughts.
Cheers.
Hey dude, thanks for the workflow. I’m new to ZBrush and what you’ve got there is exactly what I needed. I’ve pretty much got to do as much as I can in Zbrush as its the only package that I can justify putting money against and this has moved me forward in leaps and bounds.
One question: Have you tried using UV Master instead of the Headus, if so do you get a large benefit from Headus (or do they do completely different jobs)? The price of headus is just low enough to maybe splash out on after the next payday 
Xcellent !
Great work, Travis!
(Incidentally, Travis: if you get a minute, could you drop me an e-mail, please? mail [at] jamesstant.co.uk - thanks!)
I think its great that you used decimation master small_orange_diamond:D
It shows that even with generated meshes something can look great.
Pretty important in times where polycounts matter less and less.
Hey Guys! Sorry for the delayed response. Ive been crunchin hard at work so time has been hard to come by! Hopefully ill be done with that soon.
ISK - Sorry if I offended you. It seemed like you were drawing out quads in your retopology example. The main reason I decimate my meshes is to save time, plain and simple. On this particular project, I was trying to figure out the fastest workflow possible for getting my sculpts out of zbrush and into Unreal. The team I am on right now is relatively small so it is critical that we have a very fast, efficient work flow. If I had to animate these meshes, then I would need to retoplogize so that I had clean loops for animation purposes. But that is not the case here. These are Static Meshes. They dont move. DM gets me a very close approximation of my sculpt at a polycount of my choosing so I can bake all that high rez detail to my low poly model.
Now im not sure where you got 50k from, but 2k tri models are very commonplace. The difference between 1k mesh and a 2k mesh is about 400kb. Not very much at all.
I cant really post any models from the project I am working on at this point, but I am using this workflow for this game and I couldnt be happier with it. Here is the trailer to my current project. (shipping on 1 dvd by the way!;))
http://www.gametrailers.com/video/e3-2010-hunted-the/101254
Thanks again for the feedback, and let me know if you have any questions!
SpiritFollower - Yes! I have found bits and pieces of info on this workflow from the zclassrooms and other tutorials online, but I find almost all info is for character work. I think zbrush is an amazing art tool for environments as well as characters. I just wanted to share with others because there are not many breakdowns for environments using zbrush. (Kevin Johnstone’s is really the only one I have found, and it is a goldmine of info from the GoW method!) There are lots of ways to create digital content, and this is just the way I approached this particular scene, but I thought others might be able to pick up a tip or two by seeing the way I worked through this. Good advice on the masking too! That works very well!
Beast698 - Im really glad I could help! As a matter of fact, I LOVE UVmaster. I use it quite often for more organic meshes. It is so fast and very clean. The way I use it is on my decimated mesh to get my low poly unwrap for baking. I use headus when I have to be super clean with my unwrap. It just gives a bit more control that UV master. I will always use UVM if I can! If you are short on funds, the guys at headus are cool enough to let you use the demo for free. It only last for a month or two, but then he updates it with a new demo when that one expires! Pretty cool of those guys!
Drakelot - Thanks!
James - Thank you sir!!
Disco Stu - Thanks man! You are very right! Polycount limits are certainly not what they used to be! And I find DM does a pretty damn good job of getting the shape of the sculpt with an efficient use of triangles. I do look forward to the day when we have dynamic displacement in games and we just import our high rez sculpts as our meshes and the low polys are created on the fly! But until then I will be Decimating away!
Thanks again to everyone who took the time to read through my stuff and post a response! I really appreciate it! Feel free to ask me any other questions you might have. Happy sculpting!