ZBrushCentral

Exporting High-Quality seameless normal maps in Zbrush3 without Zmapper

lol, not many softwares could handle 7-8 mil, I reckon Xnormal works fine with maximum of 2-3 mil, but why would you want to spend your time bringing models in to XNormal, when you can export a displacement map from Zbrush with as much polys as you want :stuck_out_tongue: 
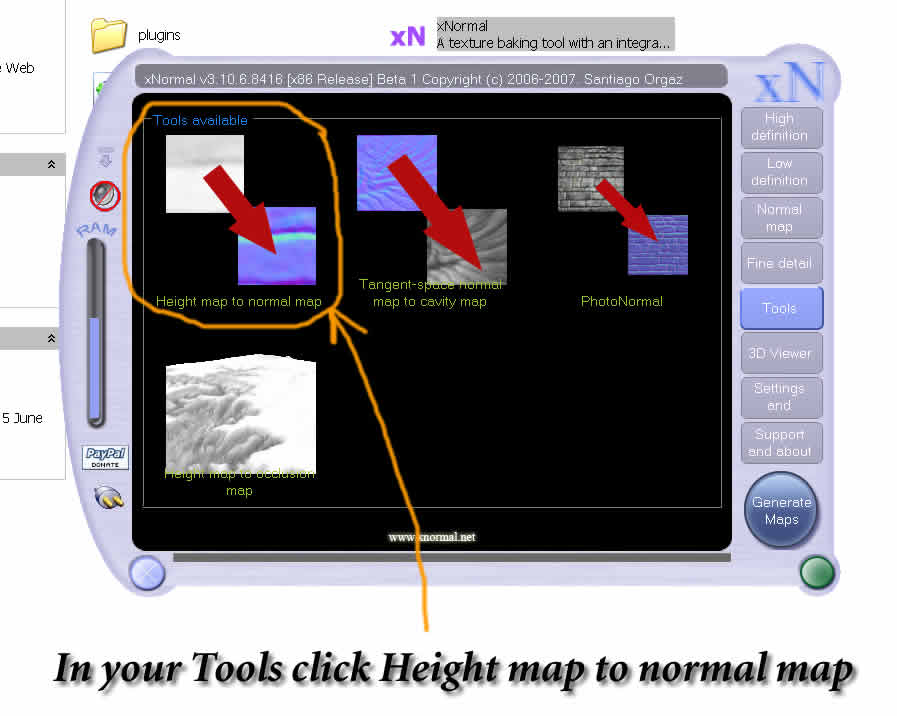
and then use XNormal to convert it in to normal map, I reckon it would be much easier comparing to bringing the models, building cages and exporting normals the hard way :slight_smile:

the tutorial on how to do it can be found here:
http://3dsmaxer.blogspot.com/2007/06/exporting-high-quality-nomal-maps-in.html

works for me, and also using those tools you can convert normal maps in to cavity maps and Displacement maps to occlusion maps.

just curious, has anyone used XNormal for 3million poly models. If so, how does it do with it?
How about 4 mill?
sounds like a cool program, thanks for the tutorial skarpunin.:slight_smile:

No worries :), I am glad that you’ve enjoyed it.

Personally I havent tried any other features apart from converting maps in Xnormal, but it seems like xnormal is a big package with many features and would take a lot of time to learn every bit of it :slight_smile:

I just used the XNormal-way for a ZBrush-model with about 4,5 Mio points and using a 4096 x 4096 DispMap resolution for rendering-tests in C4D-AR, Maxwell and FR 2 for C4D.

The results so far with all variations of XNormal-maps I used were, let me say so, not bad at all , but far away from perfect.
By far not as good as with the detail-resolution that the Dispmap from which I created the Xnormal-Maps produced.
I also tried variations of filter-settings, gamma, contrast etc.
All in all not good enough for what I need.

Maybe I have to spend a bit more time in further tests. :cool:

I’ve done some brief tests with a more ‘reasonable’ head mesh of 1.5m polys,
and I’m a bit unsatisfied with the results as well. I’ve used UVLayout for my
UVs, and it allows one to ‘locally resize’ areas such as the nostril holes, ear
holes, eye-sockets, etc. so that the size of the UVs in those areas can be
smaller, yet gradually transition to the ‘full-sized’ UVs in the bulk of the face.
Anyhow, for whatever reason, xNormal doesn’t like this, and created empty
areas in these ‘locally resized’ spots, which makes my resultant maps pretty
much unusable. :frowning: So I’ve tried in XSI, and at least got complete normal and
AO maps, but still lots to clean up.

My next attempt is to finally :smiley: try the disp->normal PS technique skarpunin
has generously provided.

Are there any tutorials out there dealing specifically with fixing trouble spots
on normal and displacement maps from within Photoshop? Any assistance
pointing me in the right direction with that would be appreciated…

cheers.

WailingMonkey

Rastaman & WailingMonkey,

Please pop an email to XNormal’s creator Santiago Orgaz and tell him about the issues you’re having so he can improve it. He’s very quick at responding & correcting issues with the program.

Santiago’s email is: granthill76 AT yahoo DOT com

Thanks in advance,
MG

i’m closer than you thing :stuck_out_tongue:
btw, I just uploaded the final 3.11.0 with a new and improved memory manager… should increase bit the polygon limits.

Do you have any photo about the “locally resized” thing? Are you using cages btw?

Hey Skarp thanks for the great tutorial, but I have to be doing something wrong :frowning:

I’ve been going over the tutorial, making sure I did everything right (which I think I am) but my displacment is just one giant grey box…

I really don’t know whats going on here… would appreciate any help I can get!

jogshy…

http://www.uvlayout.com/index.php?option=com_wrapper&Itemid=67

UVLayout-Beta-v1.19.mov (down at the bottom of the page)

this shows what’s going on with local scaling (which is just like it sounds).

I don’t know how it affects the actual UVs upon saving to .obj, though,
but in each of those areas of my mesh, I got ‘empty’ info or holes in the
resultant maps from xNormal. You could download the beta and see for
yourself if you’re really curious. :slight_smile: Perhaps that actual shrinking of the
UV info is making it difficult to interpolate the difference between
high-poly source and low-poly UV-d base mesh and xNormal is throwing out
the data?

I ran Ultimapper in XSI on the same hi/low meshes and those areas where
the holes were had normals info (lesser quality, but not holes)…

WailingMonkey

what you should do is, take this image in to Photoshop and play around with brightness and contrast and also levels, contrast would bring in more detail, but make sure to save your image in the format that supports 16 and 32 bits like tiff, tga or psd

those grey displacement maps contain from 16 -32 million colors, so the information about details is there and it would still get picked up by xnormal.

Hope it was helpfull and let me know if it works :slight_smile:

Hey Skarp, I brought the disp map into photoshop and played around with contrast etc. and still it is the exact same thing. I put it into xNormal again and its showing my my displacment map… as a normal (so basically the exact same thing).

I tried another way of doing it, by crop filling the displacment map in zbrush, then put the ZBnormal material on it and it worked (created the normal) but it was very poor, and something I really wouldn’t use, but it did work.

I really don’t know what to do…

hhm, that’s strange, I really don’t know why you are having this issues :S, the only reason I could think of if there is not much difference in detail between the low rez and a high rez of your model.

I want you to try the following thing, take a model from Zbrush library (a dog would do), subdivide it, add some detail any would do and then try exporting a displacement map for it, to see how it works, this way we would know if the problem lies in your model or in the process that I have described (even thought it works perfectly for me :frowning: ), also make sure that adoptive subdivision is switched on.

hello

im very noob with Zbrush, i have been modeling for 3 years in MAX and since i wanted to make some meshes for a game, i started learning about normal mapping.

i also want to make game modeling my profesion so i decided to investigate… that led me to Zbrush and its amazing way to turn about everything you do to an artist level.

but now i have this issue… get the zbrush2 and zmapper or leave it to disp maps (which i have never used but i understand the logics indeed)

i had this model that wore an armour, in my first attempt to build the normal maps, i wanted to do it quick, wanted to avoid the extra detail modeling with some height maps.

then i built the model, unwrap it and made my textures in photoshop.

i got the height to normal map from nvidia that i used to change a texture of the game, BUT it had a big problem.

when doing the calculation, the plugin didnt knew what was on the left, what on the right, so the back side was thinking that right was one way and the front side the opposite…
making a height for each side, “normalizing” it and then flipping one didnt worked either. tried everything, but never worked.

my model had this metal stripe in the chest that went from the middle front to the middle in the back, all the way around.

but when you looked at it, the one in the front seem to be protruding, while the one in the back was indenting. then in the seam where they got together there was an extrange error.

as far as i see, this method with xnormal uses the same system… so i expect to have the same kind of errors, more so because if you have a rotated UV then you wont even have up and down fixed…

i have this model that uses 500k polys in Zbrush, when i import it in max it appears with normals fliped, and horizontally flipped…

not only that, it has 1kk polys now, and it looks awful, if i want to have the same smoothness as in zbrush i have to put a meshmooth with 1 interpolation

that renders in a 4kk polys model when it was 500k in zbrush.

then i set the original mesh inside it and open the render2texture dialog, set the projection and render… allways crashes…

after i did it once, get errors, fixed it, saved, rendered… each time i place a meshmooth over the mesh it turns plane red, as if with 100% self iluminance (really plane i mean) and that redish devil anihilates my pcs ram and i could render it no more.

tried putting the meshsmooth only for render instance, but it looks as if render to texture doesnt count as render time for this…

it was all very dissapointing really, since i had seen a tut that showed it to be uber easy in zbrush 2 and i expected to be easier in ZB3

if you have payed atention, thank you =)

martin

k first thing, that is the first time that I hear about this issue and I have used xnormal on many occasions and have never encountered this kind of problem.

what you can try is, instead of unwrapping your mesh in 3dsmax, try using gvu tiles in zbrush, also, you might want to delete the first subdivision level in zbrush, so your base model has more poly’s.

also, it would help if you post a few images in this thread with an examples of this error, so then I could see those errors and maybe would be able to help you to resolve those issues.

Hey Guys,

This workflow has been around for awhile generating normal maps from displacement maps but its not accurate. Your displacement only shoots straight up and a normal map goes in all different directions as it relates to the light reflecting off of the higher detailed surface. The one benefit from having a height map with a normal map would be paralax mapping. A lot of game engines like to use the tangents from the surface also along with the normal maps. So again you are going to be running into problems because you can not calculate the tangents of a surface that you did not do calculations on in the first place. Even if you are doing film work this is still more inaccurate than normal mapping. I believe blender has a normal mapping option if you are wanting a free solution. Otherwise I would recommend XSI's Ultimapper because XSI can load billions of polys which is wonderful for generating normal maps and many other maps. There is suppose to be some special options that you can turn on in order to get 3D Studio Max to load high poly models over the 800,000 poly limit approx that seems to normally exist. Then you can generate your normal maps inside of 3D Studio Max. I was told by one of my students that it is covered in the Gnomon Workshop videos on 3D Studio Max with ZBrush workflow from the guys at Blur. If you have not already checked it out it might be worth doing so.

Cheers,
Nate Nesler

hi

look, as for what i have read after posting, there is no way max can handle those 4 mio polys, it looks pretty much lucky to me to have witness them at all

i will look for that gnomon video and for the xsi thingy, but as far as im trying to understand zbrush, and still having trouble with some things back in max, i am quite scared of getting my hands on a new program… maybe its worth it. maybe zbrush will pop up the zmapper sooner than my brain collapses XD

for now, im looking all the beatiful tutos about exporting the disp map and how to make it work (i didnt used MR nor VR before, so its a nightmare here)

seem i cant make this thing work:cry:
can anyone make a tutorial specifically for maya?

hey guys, I have recorded a video version of this tutorial, hopefully it would be much easier to follow, enjoy :slight_smile:

http://www.russianguru.net/blog/?p=7

Skarpunin!!!

I cant find your tutorial! nor the video tutorial!

Hey Slice … it’s on his website.

http://www.smorozov.com/tutorials/engtut.html