ZBrushCentral

Exploding mesh when retoping

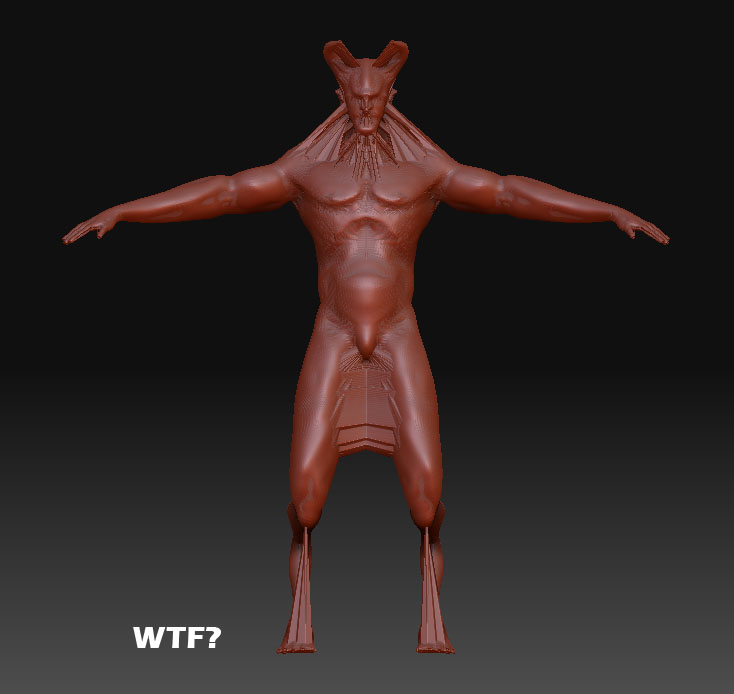
I dont know whats going on here. I know how to retop, and I do most of my editing in maya. I’ve never had my mesh look like this afterwards though. I’ve tried to do Automatic mapping in zbrush and maya thinking it might be the uvs but still I get this. I’m so confused. Please, please help someone this is driving me crazy!

I even tried just exporting at subd1 and importing the low res obj back in to retop without any editing and still I get this. It must be the ztool itself but I don’t know what to do to fix this.

[1.jpg](javascript:zb_insimg(‘155771’,‘3.jpg’,1,0))

Attachments

2.jpg

3.jpg

without having your model its almost impossible to track the source of the problem.
Could be the stregth of the adaptive projection, could be uvs, could be vert order etc…

However why not simply use ‘‘project all’’ to solve the issue?

In 3dsmax this problem is caused by duplicate or un-welded vertexes. I’m not sure what the maya terminology is - though I guess it is the equivalent. I’ve often had similar issues when retopoizing because I didn’t quite select the right vertex when using cntrl select and thus made duplicate overlapping vertexes. It’s strange, it sometime takes the in and out of exporting and reimporting to zbrush for the problem to show up.

Blender has a tremendous time-saver: select all verts then ,ctrl-v, -pick remove doubles - which cleans up your problems, (such as) in one fell swoop.

Lets say if it were duplicate vertices somewhere. If I were to fix this with the low res mesh and then retop would this project a new topology cleaning up the previous errors? I’m thinking it may be that but i’m a little iffy since I usually do a merge vertices in maya on each export. I’ll try another go and play with the strength settings in maya.

I’m guessing zbrush has no such setting to merge duplicate vertices?

import>weld

cleanup in maya will also show you errors.

magbhitu, I installed and got blender running but i’m oblivious to how I turn on vertices (never worked in this environment before) :slight_smile: To save time, could you list the steps?

I tried bring the low poly into maya, did cleanup, merge vertices and auto UV. I imported it back into zbrush and redid the process with my ztool as the rig, and the exported obj low poly as the topology...it persists.

I followed how to project all through ghost666 response here

[http://www.zbrushcentral.com/zbc/showthread.php?t=68360&highlight=retopology+store+morph+target](http://www.zbrushcentral.com/zbc/showthread.php?t=68360&highlight=retopology+store+morph+target) and that solved the problem. Now the question is which one is the technically accurate way? Project all or the Ztool way? At one point I did something where I made a morph target on both the meshes and did retop and it worked but now I cannot remember the steps. :eek: EDIT I believe you were right Morph Division, it didn't have to do with the MT it was the bloody projection settings. I set the ProjectRange to -.30 and the Strength to 1 and the preview looked great. It needed a little smoothing but that was the problem. This thread is an interesting read too in regards to projecting methods. I knew my vertices were ok, but it's these processes we go through to find out the truth. :D [http://www.pixolator.com/zbc/showthread.php?t=56164&page=1&pp=15](http://www.pixolator.com/zbc/showthread.php?t=56164&page=1&pp=15)

Here’s the steps I made while figuring this out.

  1. Store morph target in ztool subD1 + project all

  2. Export options > MRG + Deformation > unify

  3. Export and import to Maya

  4. In Maya (merge .0200 %, cleanup) and edit + export

  5. Import to zbrush > store MT for subD4 + store MT for imported OBJ

  6. Switch to Ztool > Projection > Strength 1 > ProjectRange -.30

  7. Make Adaptive Skin

  8. Display Properties > turn off Double + Unified Skin > Make Unified Skin + Flip (Display Properties)

  9. Geometry > Reproject Higher Subdiv

  10. Done > Save

the adapative skin you did in step 8 would also ‘weld the verts’ since it completely replaces the old mesh with a new one.

i’m still convinced it’s bad verts - in which case its a whole lot easier to fix them in another program. i’m curious if most other people agree with me on this.

ok blender directions 4 the record.

1.import the .obj
2.select your mesh with right click by default (i hate this about blender - you can change to left click select in the user prefs)
3.enter edit mode by pressing Tab,
it will now be in vert mode by default
4.select all the verts by hiting the ‘a’ key
5.now hit: ‘cntrl+v’
6.select the remove double option - if it was necessary it will prompt you to combine verts
7.re-export

give it a try