ZBrushCentral

Etcher_Sketcher

SKYWAYS128: Thank you!!!:sunglasses:small_orange_diamond:+1:small_orange_diamond:+1: well, I can thank Keyshot for those nice effects! -> the metal material is a standard Keyshot material and for the stones, I played a bit with different types of procedural noise and added a bit of translucency -> basically, some fiddling until I got something that looked ok. For the larger jewel, I added a stone texture. ZBrushh is awesome —> someday… ;):sunglasses:small_orange_diamond:+1:!

Thanks for the explanation! Time for me to save up some pennies for Keyshot!

Great work on the assault rifle, BTW. I’ve been studying those pics for a while now, and I’m still wondering where to begin doing sculpting like that! :smiley:

earthtriber: thanks Simon! :sunglasses:small_orange_diamond:+1: ZModeler + KeyShot = awesome --> still so much to explore :D:D

boozie floozie: haha --> I think that ZModeler, especially with QMesh is a more “Hands-On” version of Shadowbox -> when I tested ShadowBox for gun modeling I did some tests with very low-res Shadowboxes to build my basic shapes :D. So glad you like the vids -> they are not very instructional, basically made them for my own entertainment (something hypnotising about those twisting flashing shapes… also, I’m very proud of the fact that I was able to get them at 1080p with a fairly good image quality - I’m really not that good with computers you know…) thank YOU Sir :sunglasses:small_orange_diamond:+1:small_orange_diamond:+1:small_orange_diamond:+1:!

boblebain: Thanks so much for your awesome comment :sunglasses:small_orange_diamond:sunglasses:small_orange_diamond:+1:small_orange_diamond:+1:small_orange_diamond:+1: Still much more to do :smiley: Haha Frenchy will have a bit of work, I hope he’s still up for it, since he has done such an extraordinary job in the past :sunglasses:small_orange_diamond:sunglasses:small_orange_diamond:+1:small_orange_diamond:+1:!

dustbin1_uk: Hi Mark - thanks for stopping by :sunglasses:small_orange_diamond:sunglasses:small_orange_diamond:+1:small_orange_diamond:+1: -> yes still going after all these years, and will be for many years to come -> free time is sparse, but dedicated to working with the awesome ZBrush -> after all, ZBrush IS a piece of art in it’s own right… right? Why am I always doing these weapons for testing??? I did do the jewels, accesories, some clothing etc with ZModeler, but never end up showing that work… probably my autistic brain… .

SKYWAYS128: Yes, I would definitely look into purchasing Keyshot, that is, if you want realistic renders without having to spend too much time adjusting and combining layers in Photoshop -> and $249 is a great deal atm. I hope you got something out of the vids -> basically shows you that a bit of fiddling with extrude, move, bridge gets you somewhere along the way -> my luck that those weapons only have to look like they could work… .:):+1:Backtracker_2015a.jpgBacktracker_2015b.jpg

Attachments

Backtracker_2015a.jpg

Backtracker_2015b.jpg

something hypnotising about those twisting flashing shapes…

I confess I found myself imagining a miniaturized Mr Melis riding on the back on top of the sculpt as if it was a mechanical bull ride.

:+1:small_orange_diamond:+1:love your work,organization and your attitude to share.
I saw your videos and there are 4 to 6 steps that are the basic workflow( i guess) and repetitive…can you put that steps in some basic geometry so follow and practice with them(images or short video)?
thanks in advance

Haha Frenchy will have a bit of work, I hope he’s still up for it, since he has done such an extraordinary job in the past

I guess he will (in fact I’m sure he will) He’s always up to help the CG community, he has made thousands of translation for various software over the years. This man never sleeps, trust me !
Moreover Pilou is one of those exceptionally kind people you rarely meet in your entire life. He deserves a lot of respect.

boozy floozie: :D:D:D:D haha -> in a saloon where everything is constructed out of ZModeler shapes with bright polypaint colors (MineCraft -style?) -> ZModeler competition, the winner being the one who can ride his ZModel until it is completed -> haha awesome or nightmarish? … :sunglasses:small_orange_diamond:+1:small_orange_diamond:sunglasses:

andreseloy: thank you Sir :sunglasses:small_orange_diamond:+1:, glad the vids are of some help! I’m not sure if I can find the time to put something together but basically:

-Polygroup: spend some time getting acustomed to creating polygroups as they are key to isolate areas on which to apply an extrusion, move or scale: you can see in the vid that I don’t use a lot of complicated techniques for polygrouping: I’m a bit emabarassed to say, that most of the time I create polygroups by clicking and adding poly per poly… .
-QMesh to do quick extrusions or punch holes
-Extrude
-Insert edges to create extra geometry
-delete poygons and bridge edges
-You can also see that I use a lot of masking when I move parts of the model -> that’s a workflow that I have become accustomed to and I use a lot -> Mask the points that I don’t want to move and then use Transpose to move, scale or rotate.

–> My best advice would be to start on a simple project and study the basic actions and see how far you get --> you will start to add new techniques or try out new variations as you go along -> this way, you will be able to build a basic workflow which you can expand when moving on to other projects.

hth :sunglasses:small_orange_diamond:+1:

Boblebain: “Moreover Pilou is one of those exceptionally kind people you rarely meet in your entire life. He deserves a lot of respect.” -> so true :sunglasses:small_orange_diamond:+1:

Backtracker_2015a.jpg
Backtracker_2015b.jpg

Attachments

Backtracker_2015a.jpg

Backtracker_2015b.jpg

Hey Geert, awesome stuff as usual :slight_smile:
Just had a look at the vids, very inspirational - thanks for sharing :sunglasses:

This is an exact copy of my posts in the Betatester’s thread but I repost this in my thread to keep things centralized/organized - apologies… :roll_eyes:

@Schieffer: dang, talk about a late reply… apologies man… thanks for your great comment :slight_smile: here’s some new, hope to be able tu update more often :slight_smile:

Hey Gals 'n Guys

This betarun was, again, an awesome experience - but, above all very humbling in the company of so many great artists… just look at all those incredible testresults!!!

The past few years have been so frustrating sculptwise because I am not able to post and paricipate more actively on ZBrushCentral. Hopefully this will change for the better in the near future :slight_smile:

The Character:

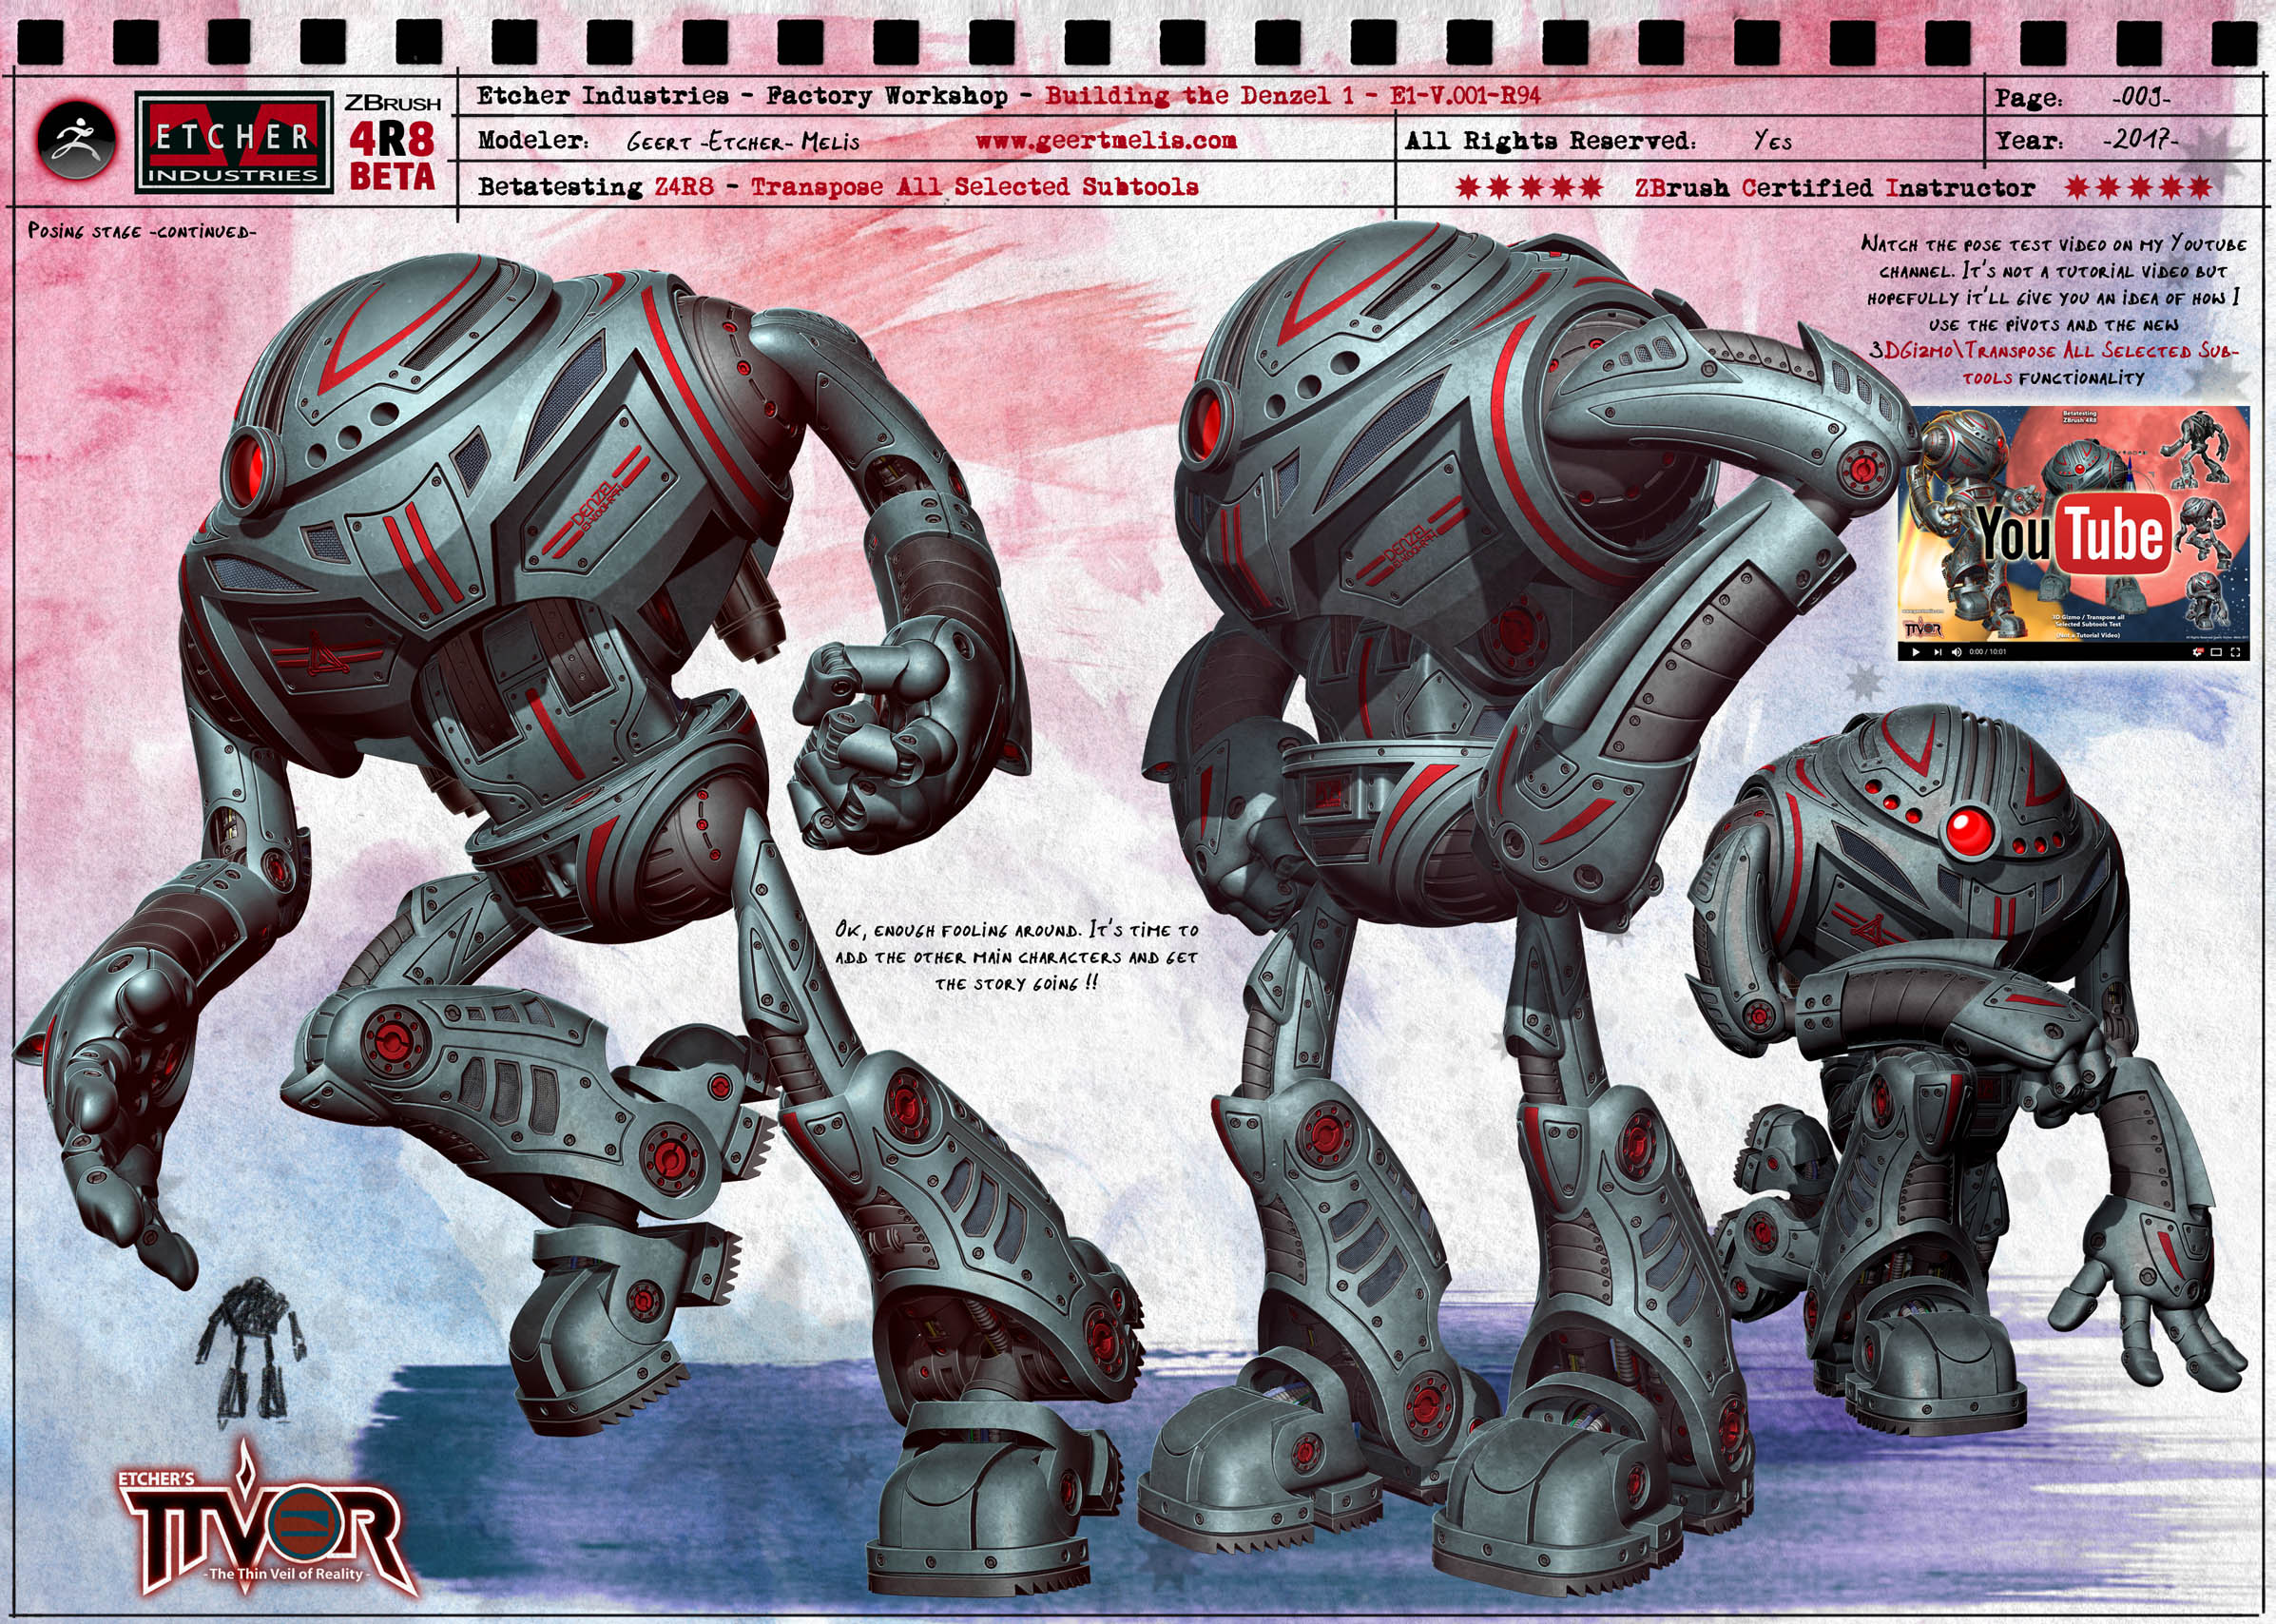
For this test I modeled a “Thin Veil of Reality” character named “DENZEL”.

Built by Julius’s father to protect him, this E1-V.001-R94 model spends most of his time in the garden & the land surrounding Julius’s house (Riverlane 1). On several occasions he teams up with Julius and Ariana in their efforts to constrain the spread of the dark when the Veil opens.
The images below show him as he came out of the workshop, all shiny and new. Props, wear and tear will be added as soon as I get the chance to complete the other characters and depict them together in some storyline scenes.

R8 New Features:

This R8 update provides us with new powerful features, they add to the toolbox and make ZBrush an even more luxurious concepting and creation tool.

I put my main focus on working with the Boolean operators and the 3DGizmo/Transpose All Selected Subtools additions along with the new Transform Types (Deformers) and the 3D Text plug-in.

Following the image below, I posted my beta-notes which I made during testing/modeling.

The notes are not as in-depth as I would have liked them to be, but unfortunately time (or lack thereof) is always an issue. However, I do hope that you will find some use in them.
In an attempt to compensate for the lack of in-depth info, I marked essential new techniques and essential existing techniques red, hoping that this helps new ZBrushers when they want to look up additional info in the ZClassroom, Online Documentation or in the documentation that comes installed with ZBrush.

No Keyshot renders atm - all ZBrush BPR and PS comp.

Attachments

Geert Melis Betatesting Z4R8 - continued

Geert_Melis_Page_009.jpg

VIDEO:

The vid below shows me testing the pivots & the new 3DGizmo/Transpose All Selected Subtools functionalities.

https://youtu.be/d51I5vY-bMU

ADDENDUM:

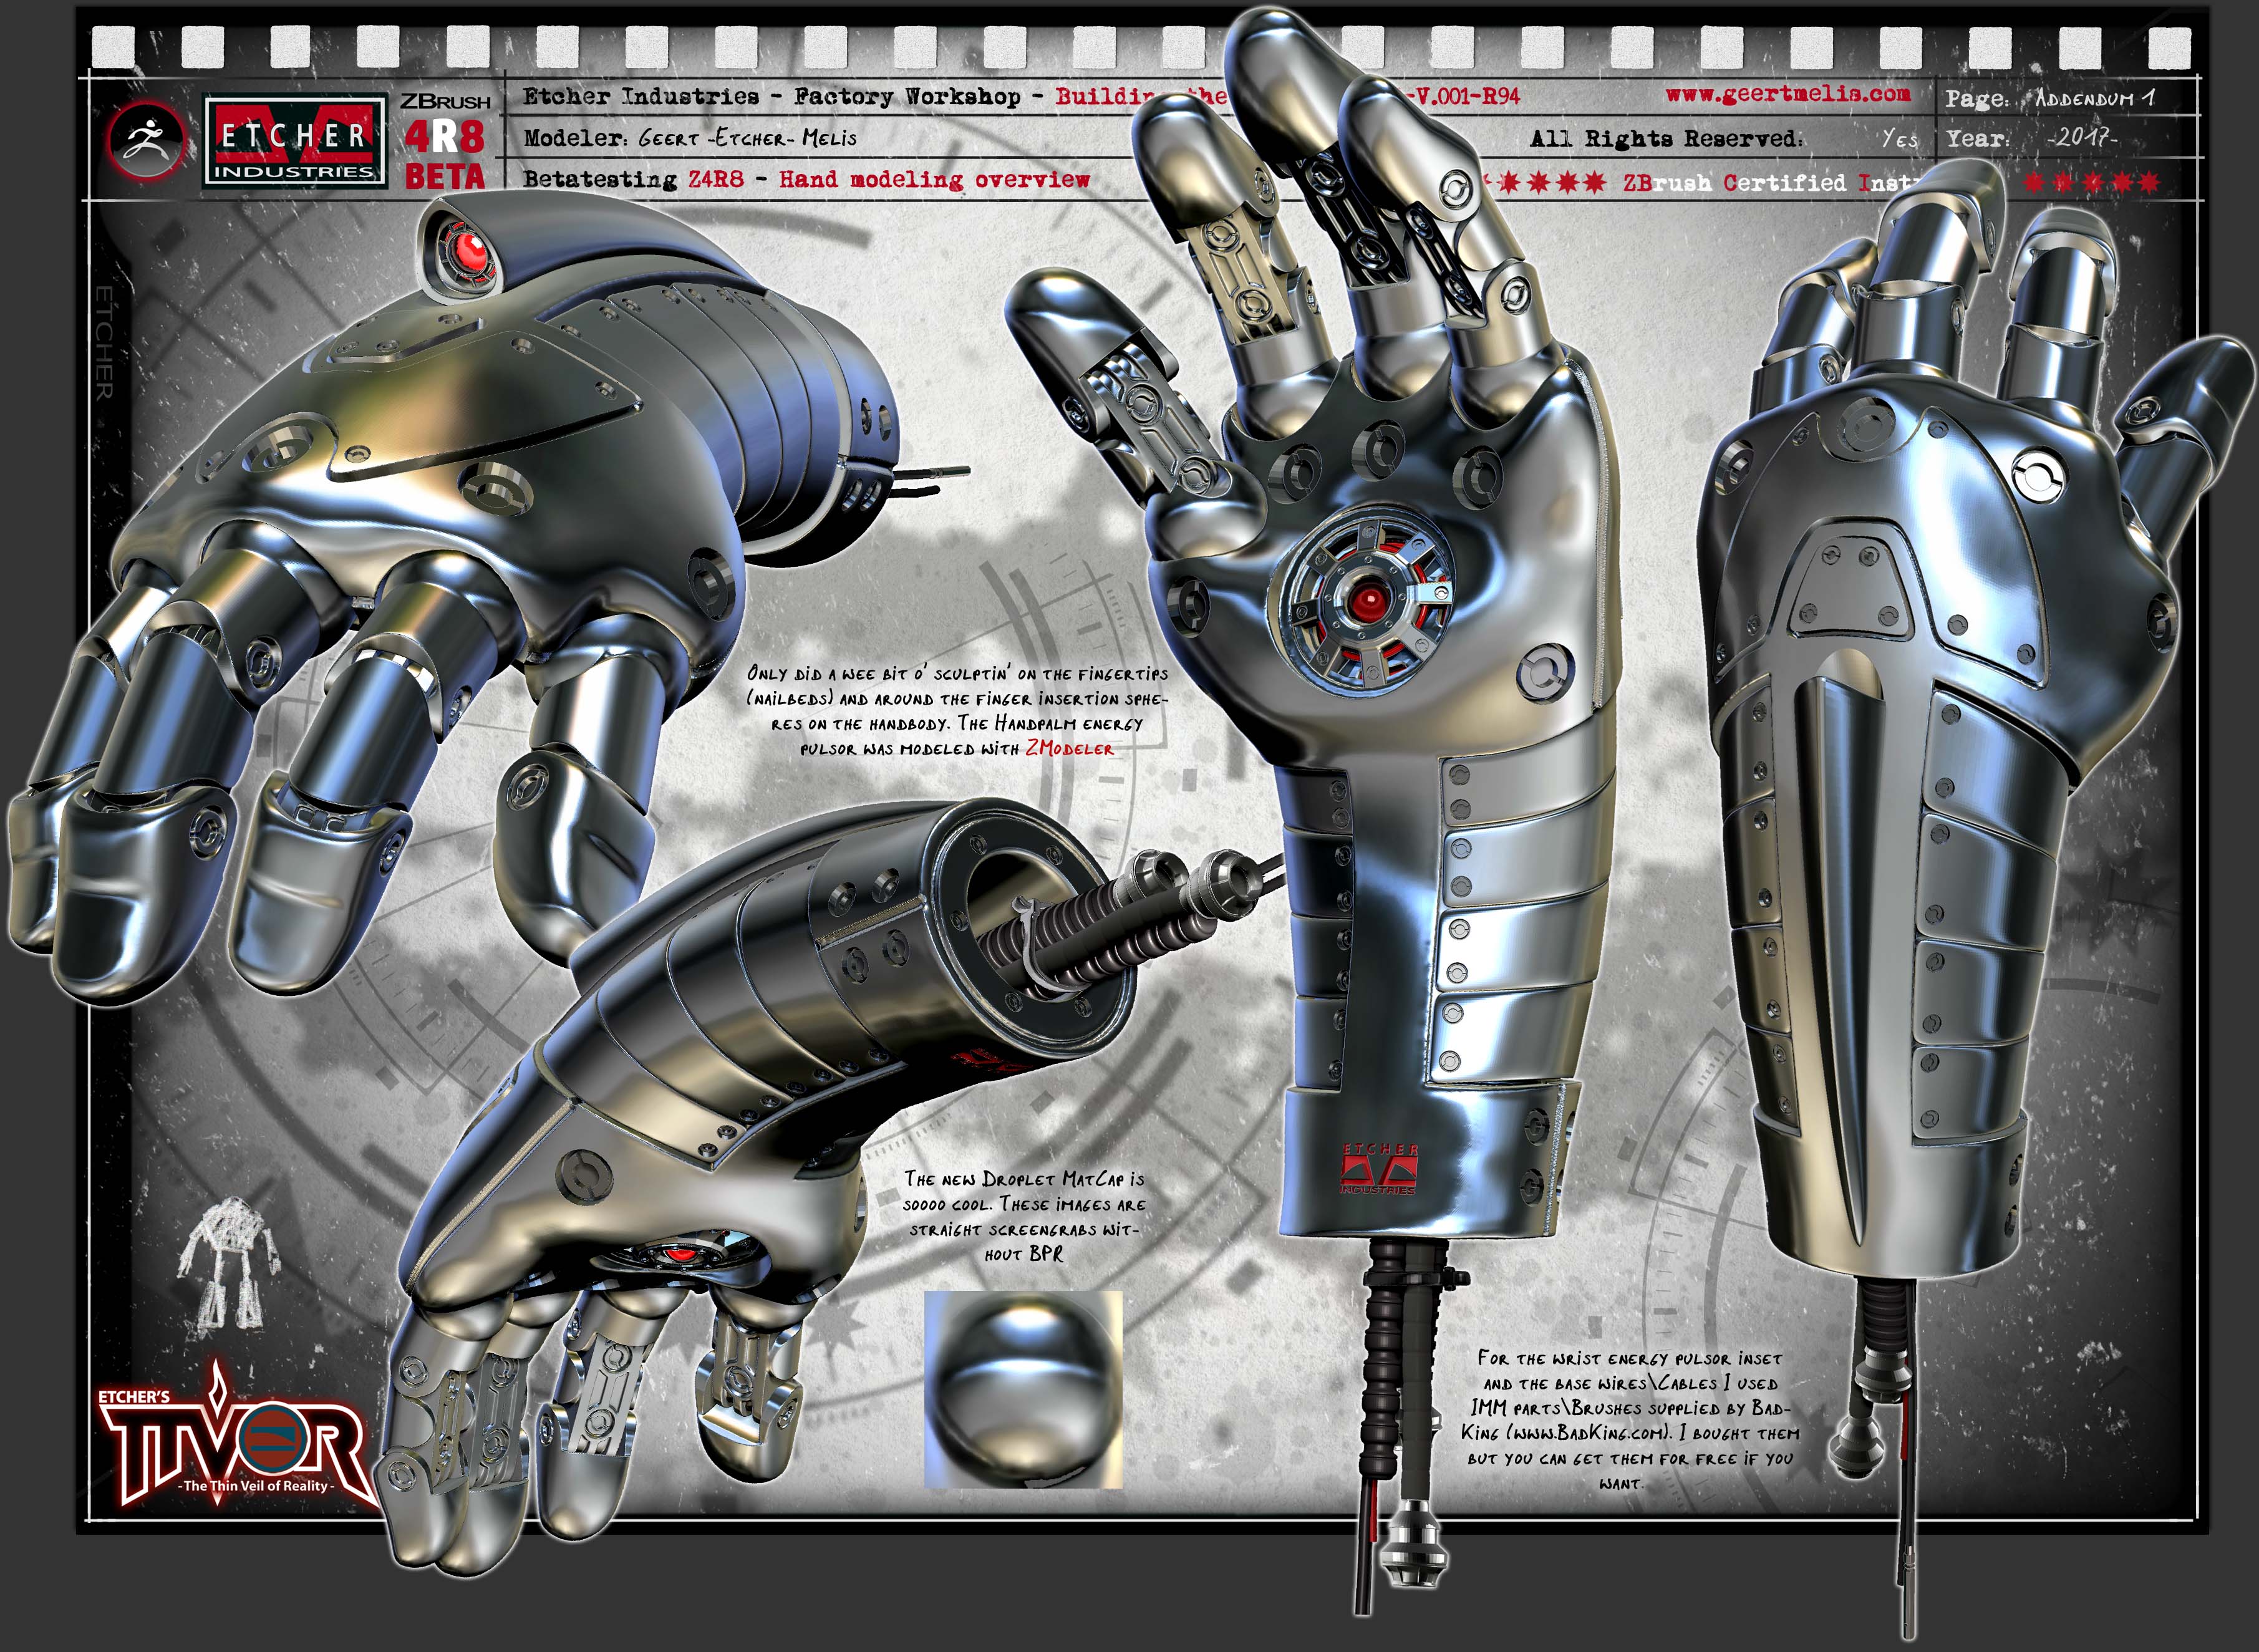
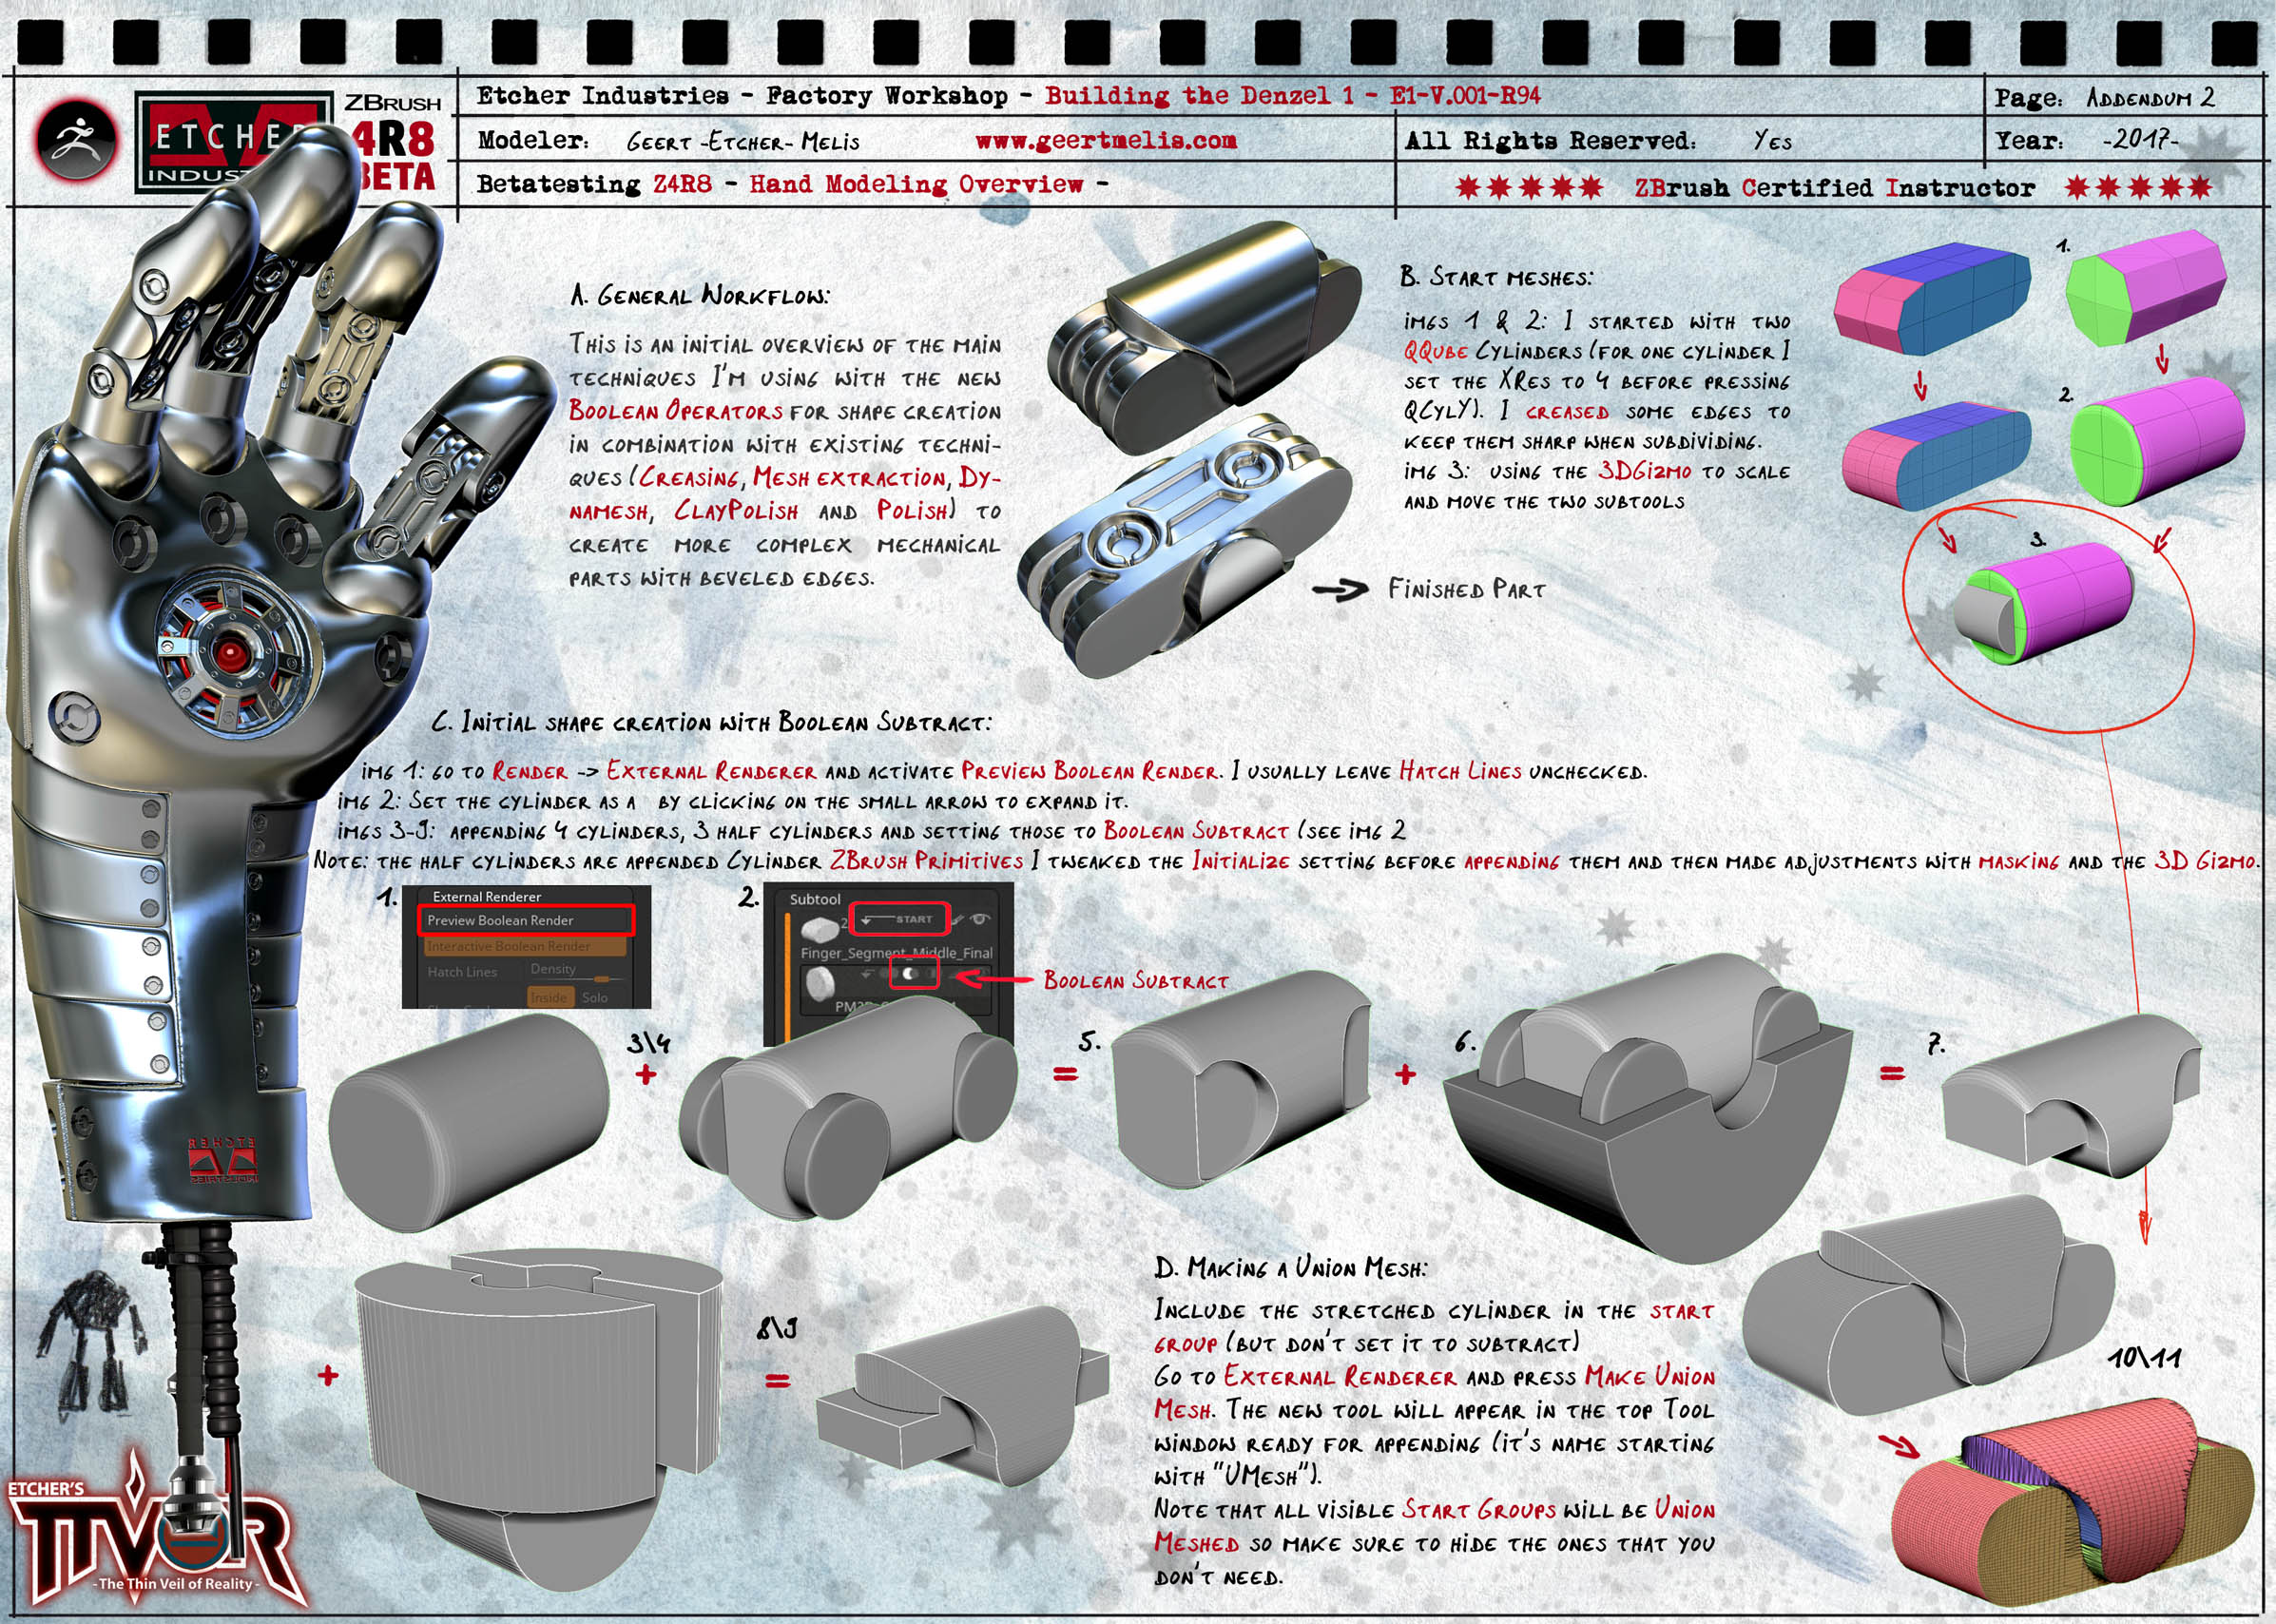
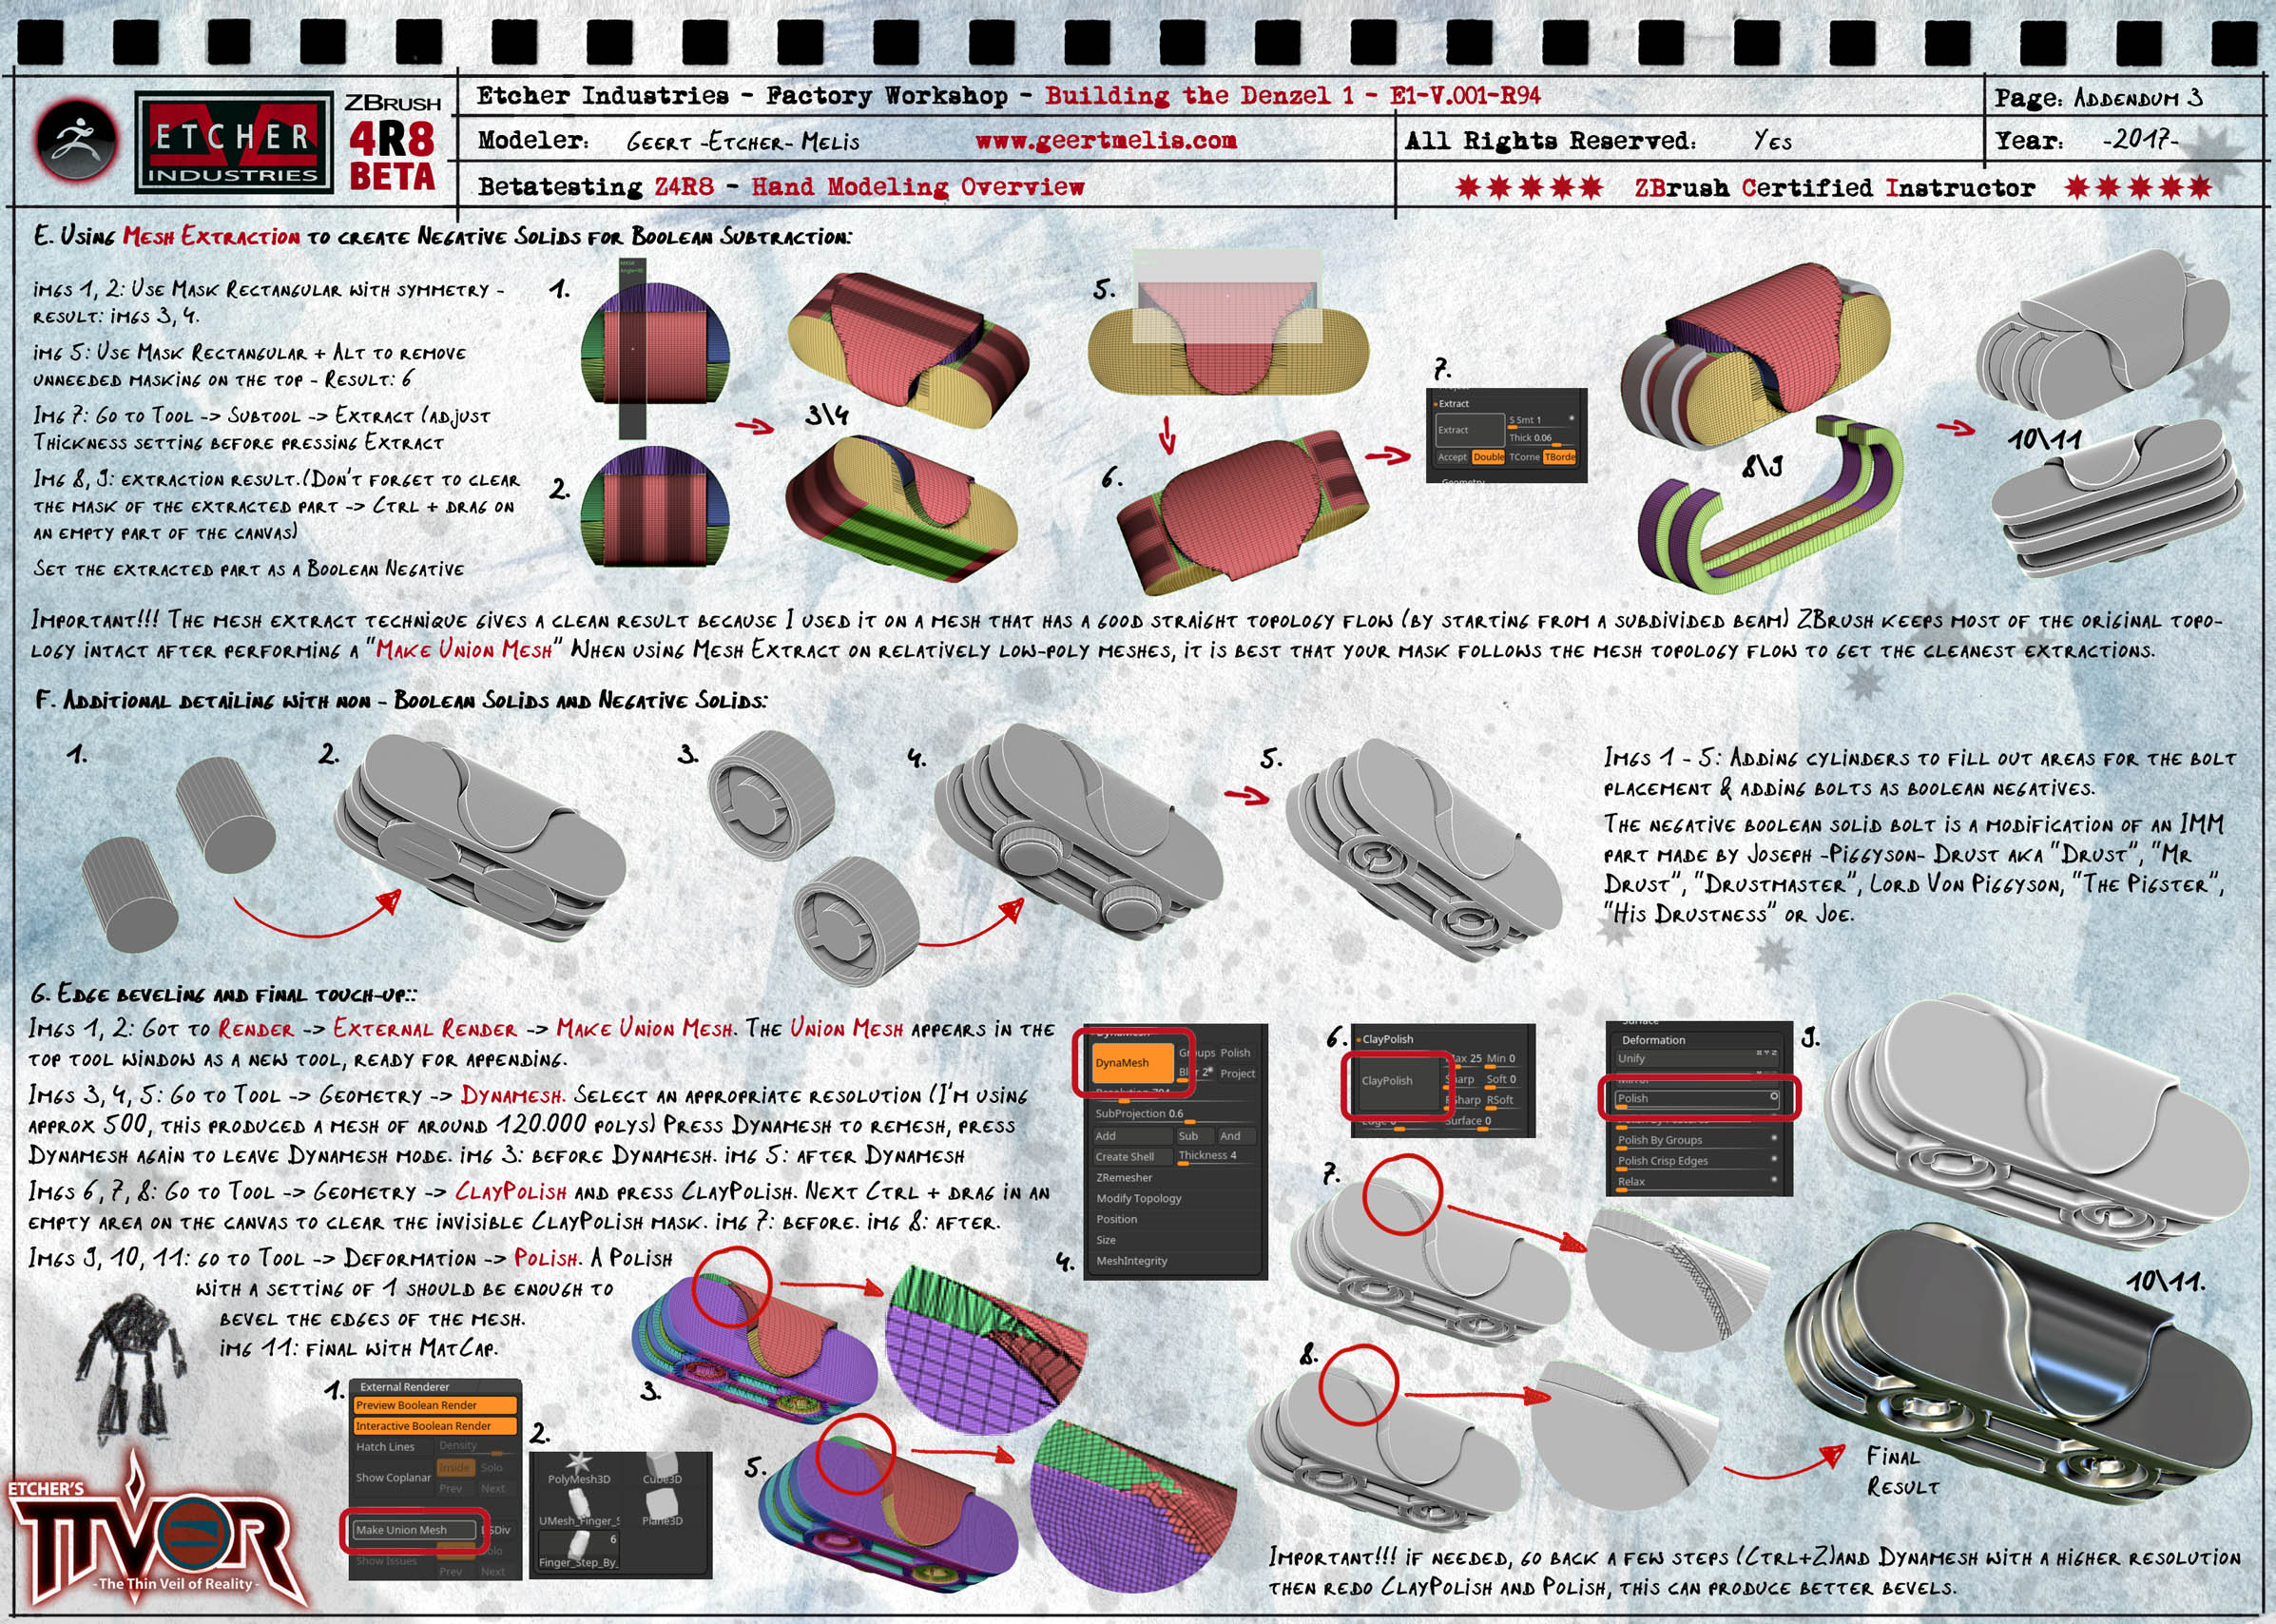
The following addenda focus on the modeling of one small part but hopefully offer a more in depth look at the modeling techniques I mainly used for this guy.

The last step on page three deserves your extra attention since it focuses on applying bevels after boolean modeling.

Geert_Melis_Addendum_1.jpg

Geert_Melis_Addendum_2.jpg

Geert_Melis_Addendum_3.jpgBacktracker_2017_Part_One.jpgBacktracker_2017_Part_Two.jpg

Attachments

Backtracker_2017_Part_One.jpg

Backtracker_2017_Part_Two.jpg

Awesome work!
Love the way you present everything! :+1:

Cheers, Dominiek.

Asecbrush: Woot!! Thanks for the awesome comment Dominiek :slight_smile: Hope to be able to update soon (-ish, at least no 2:+1:small_orange_diamond:sunglasses: year gap!!!) Cheers- Geert

You’ve already given us so much in the way of tutorials, and yet I greedily ask for more - could you show or explain how you achieved that great illustrative quality in the rocket landing title picture when rendering out of Zbrush? Especially the yellow quasi-rim light on the arm - is it a special pass with a non-matcap material? I wish we could adjust lights in matcaps, but I doubt we can do that in 4r8…

Thanks a lot, Geert.

Your enthusiasm literally radiates from my monitor!

CWR63: Thanks so much for your nice comment :slight_smile: don’t bother to ask, the only issue is time… you made a correct observation: I used MatCaps for the base render and made additional passes to add extra lighting: I used the BasicMaterial and tweaked the ambient, diffuse and specular settings and set it as a backlight (I switched of all polypaint so the renders were in black and white) I imported it in Photoshop as a layer and added a Color Filter with the orange/yelowish color and set the layer to Screen. HTH!!:sunglasses:small_orange_diamond:+1:

Erik Heyninck: you are welcome Erik :slight_smile: it was great to be able to work on/with the new features - one can’t be anything but enthousiastic - let’s create!!! :sunglasses:small_orange_diamond:sunglasses:small_orange_diamond:+1:small_orange_diamond:+1:

Backtracker_2017_Part_One.jpg
Backtracker_2017_Part_Two.jpg

Attachments

Backtracker_2017_Part_One.jpg

Backtracker_2017_Part_Two.jpg

Thanks, I appreciate the explanation - as time goes by I am increasingly more interested in non-photorealistic rendering techniques. Excellent technique and results! :stuck_out_tongue:

*Here’s what I did with said technique:

http://archive.zbrushcentral.com/showthread.php?207372-Captain-Marvel-and-Adam-Warlock&p=1211340#post1211340