ZBrushCentral

editing mesh?

hi all… i have a two pieces of geometry that i exported out of Maya into zbrush3. I have individually sculpted each piece of geometry and added them together in a single tool so now i have one subtool. question: i have want to join them together AND/ OR just move the cv’s around to where the two pieces of geometry look like they are one.

thanks if you can help.

heres a picture to help you see what I am dealing with:)

Attachments

Untitled-1.jpg

Did you check out Rastamans tut on object merging?

http://www.zbrushcentral.com/zbc/showthread.php?t=47410

G.

im guessing that there is no way to merge two meshes and keep the levels of subdiv? i moved my project in maya at the level one subdive and snapped the cvs together so that the seams are closed, but when i put it back into zbrush and imported the updated model its only good at the first lvl of sub div because when i go to different lvls of the subdiv the seems com right back apart from the smoothing.

any thoughts on how to fix this?

ive been studying rastamans tut as well as using the make 1 mesh plug in. however none of these keep the sub div history. both my meshes have 6 lvl’s of subdiv. one good thing is i can reconstruct the higher sub divs, working my way down so to speak, but working my way up from the lower sub divs is terrible because i lose all my detail in levels 5 and 6 and mabe 4.

ive figured out how to combine all the sub tools into one tool but i dont know how to sew together open seems. i cant work with topology in the higher sub divs because the program crashes… whats a guy to do!:eek:

anyhelp would be appreciated.

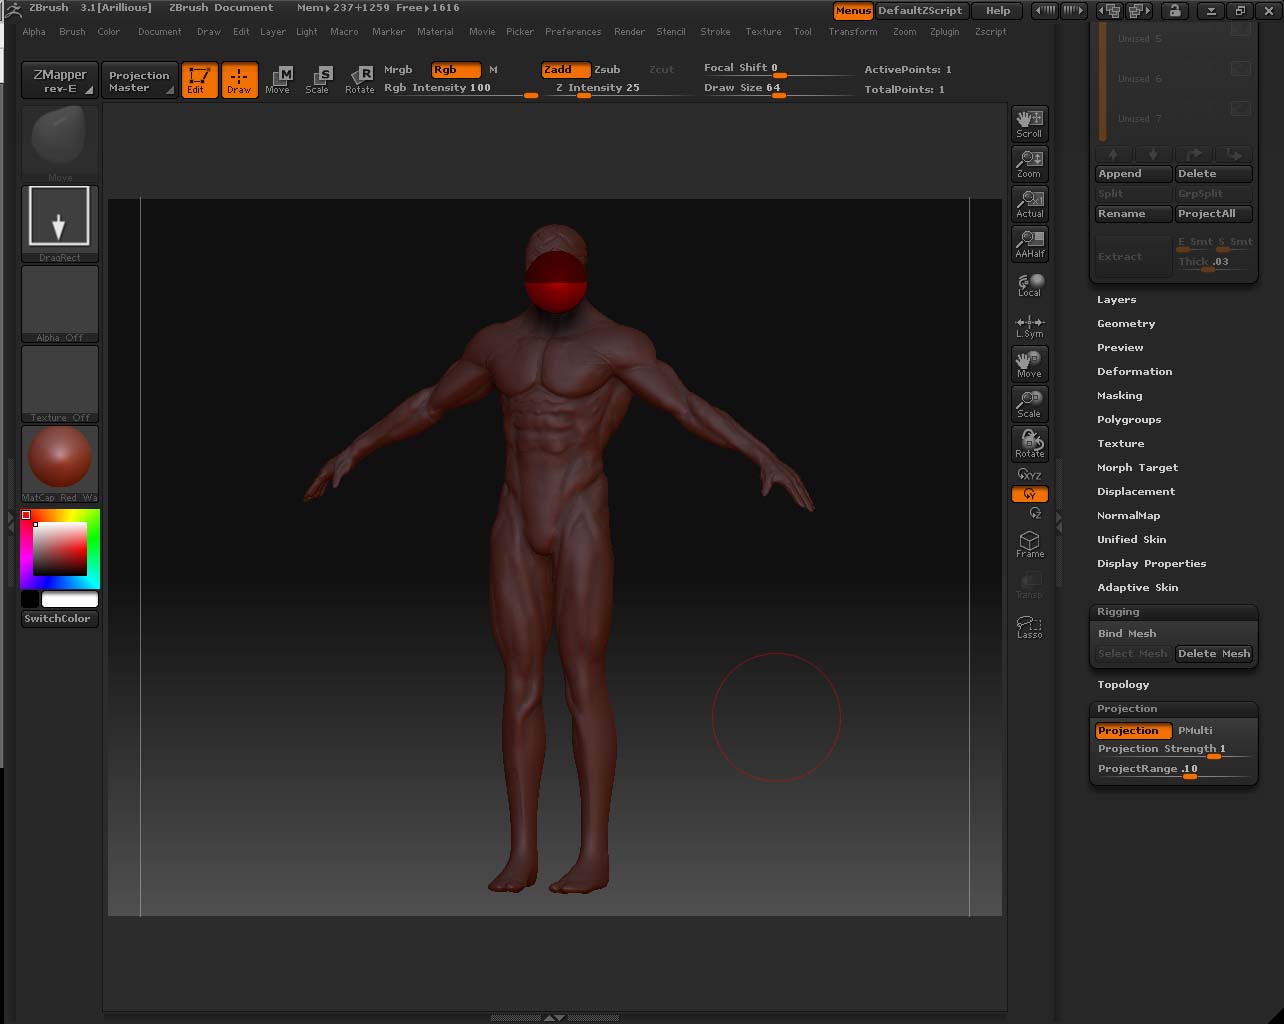
I’ve only used the topo’ stuff to retopo a mesh rather than merge meshes,
so my advice here isn’t worth much…

But as I understand it, you work at (say) subdiv 2, for the retopo/merge,
then use a higher subdiv when you actually make the adaptive skin. The
Projection button is used to recover the detail (in other words the higher
subdivs).

So if you retopo at subdiv 2, and use a “Density” of 4 when you make the
Adaptive Skin, you should get a final mesh at (effectively) 5. Using the
“Projection” option should recover all your detail in that mesh.

I imagine that to preserve detail, you may have to re-arrange topology
in some areas, in addition to welding the two meshes. I’ll admit it’s not
a simple process.

With luck though, you might even be able to recover one subdiv lower by
using Reconstruct Subdiv on the final mesh.

I’m kind of assuming here that your objective is to preserve the higher
level detail rather than the low res mesh?

G.

yea im trying to preserve the higher lvl detail rather than the low mesh. how does one go about welding the two meshes together, through topology? how so? and when i use projection the result is anything but what the high def version looks like.

Hi foreverman.

Maybe you can post an image to give us an idea of how far you are getting?

G.

Something you could do would be to merge the two subtools into one, then use retopology with projection to create a new single mesh with all the details from the original.

ok the firts thing im going to do is use the move brush to tweak the base of the head mesh to look like its merged in with the body mesh (just to fill in the gap):

[]![7.jpg|1200x1024](upload://nTTLdc5pTGoXomDw4jFfZbSPP6v.jpeg)

now this is different from what i have gotten before maybe because i had some masking on and this time i made sure that all masking was off, so now all of my detail is on the head compared to before… no detail at all just some minor bumps and what not, but as you can see the detail from the high res body is not transfered plus the body is looking screwy in certain areas… hmm what could be causing that? head gets all the detail and body gets none PLUS gets messed up??

thanks if you can help me figure out what im doing wrong

Attachments

5.jpg

6.jpg

Hi foreverman.

It looks to me like you have it all worked out pretty well.

Since I felt I was unqualified to comment further, I tried it myself. I used
‘superaverageman’ and a tiger head I’ve been messing with.

Here’s my result with projection turned OFF.

[Image1.jpg]Image4.jpg

I hadn’t done any (intentional) editing down there, but it could just be
the result of those four-sided fingers.

So at the moment, I can’t help much. If I get time, I’ll try again with
a mesh that doesn’t have the finger problem.

G.

Attachments

Image2.jpg

Image3.jpg

OK Tried again. This time I used ‘DemoSoldier’ as a base mesh, adding one subdiv to bring it into line with the cat head. This avoids the dreaded
four-sided digit issue.

Here’s the retopoed model

[Image1.jpg]Image3.jpg

As before (and probably like you), I played with the Projection Range and
ProjectStrength, but nothing worked.

My conclusion…Retopo’ works reasonably (and I’ve used it successfully
before), but the Projection stuff just isn’t useable, and without it
foreverman will be unable to use this method to merge his meshes.

Anyone else out there know what we are doing wrong?

G.

Attachments

Image2.jpg

here’s an idea…

ill try combining the head and the body mesh in maya (where they were origionally made) export them out to zbrush and then and use my hi res zbrush model body as a base mesh to get the body details, then the head. if im being vague its because i dont have it all mapped out ill try it and update you on my results.

ok so i dealy i was just going to go into maya merge the head and body and export the now “one mesh” as an obj file.

then i was going to import the new “one mesh” into zbrush and essentialy project my high res head mesh and high res body mesh (that was modeld in zbrush) on to the “one mesh”.

however, it seems that i can only project one mesh on to another period end of story! so the new idea is to combine the two high res meshs and then project them, but i think ive done this already, but ill give it one more try:confused:

I’ve got a solution for you. See my post in your thread below this one.

You can use a small, yet increasingly convenient freeware program called xNormal, where you can COMBINE THE HI-RES MESHES!! Just make sure they are properly pivoted (the head’s pivot is way-down-below the actual gemetry, matching the body pivot). Or, if you donnow how, another option is to separate the head geometry (keep the same UVs that you have) and bake the normal map for the head onto it (in either xNormal or ZBrush), then do the same for the body, and then SIMPLY COMBINE THE NORMAL MAPS IN PHOTOSHOP OR OTHER 2D EDITOR! It’s that simple!:cool:
Here is the link for xNormal:
http://www.xnormal.net/Downloads.aspx
Its 64 bit version is also very, very nice - if you have a 64-bit system. If not, 32 bit has all the same features, just… Well… Doesn’t work as fast (as all 32-bit verisons of stuff do.)

Then, just export the new LOW-END model from maya AFTER re-uving. Mesh those two in xNormal (the tabs for hi- and low- res models are on the right-hand column, don’t forget to turn off any dilation or other filters, other than that - pretty self explanatory, just don’t forget to right-click on things for options like “load” and similar crap…) and generale your normal map. Shouldn’t take too long (don’t forget to turn all other apps off for this process - like ZBrush, for example) You can do all sorts of other good stuff (i.e. height/displacement maps, ambient occlusion maps, etc.) with xNormal.

P.S.: CHECK NEXT PAGE OUT! I THINK I FOUND AN EVEN BETTER WAY!
Cheers:)

Another way! PROBABLY BETTER! Man, this is soooo simple…
:large_orange_diamond: 
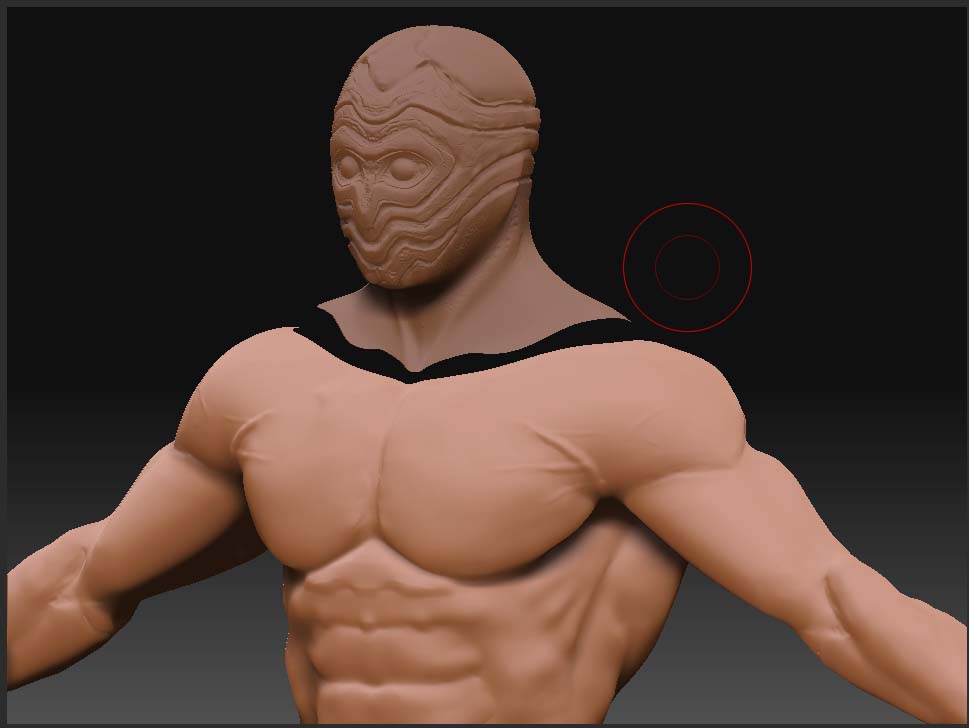
First, keep workin’ in the tool for the head, and generate a displacement map (Tools Pallete -> Displacement Map, go to lowest subdiv, set your resolution, click “Create Displacement Map”). Export the displacement map (that will be in your texture list now) to an image file.
:large_orange_diamond: Then, do same for body. Export this to an image as well.
:large_orange_diamond: Use photoshop to combine the two displacement maps (to fit the same proper UVs of the complete low-poly model you got in Maya.)
Fire up ZBrush again, now import your low-poly model (combined, with proper UVs).
:large_orange_diamond: Subdivide it to as many subdivisions as you have your head and your body at. Go to highest subdivison level. DON’T WORRY ABOUT ANY DETAILING!
:large_orange_diamond: Import your new COMBINED displacement map TO AN ALPHA. Again, go to Tools Pallete -> Displacement Map. Hit “Apply Displacement Map.”
:small_blue_diamond: If not yet satisfied with the effect (too shallow or too deep protrusions/bumps), simply undo and play around with the intensity. Also helps to have “Mode” turned on sometimes, since this will equalize your medium gray on the disp. map to be same as your 0% effect, black = -50% effect, and white = 50% effect. This will make the displacement map “dent into” your model as well as “bumping out” stuff from it, which it wouldn’t do otherwise.

Cheers!

hey thanks megamorph, but i think i found something simpler.

follow along:

went into Maya and combined the origional geometry and sew together the edges… made it all one complete mesh. then i exported it as an obj.

next i imported the new geometry into zbrush AND THEN…

i followed the steps i listed the first time! except when i chose topology i chose the new complete maya export and for the pice to be projected i chose a zbrush subtool high res combined clone of the head and body.

this is what i got… and yes its all one pice of geometry:lol:

[![8.jpg|1200x1024](upload://9IVYtrCExUvMp1BPRpZXxFKYYT7.jpeg)]

however, the hands are still really messed up if you make an adaptive mesh with projection. so to ease the fix i sub divided the maya combined mesh once before i made the adaptive mesh. it only had one level of sub div. so before the high res mesh was projected onto the new maya combined mesh i simply sub divided the maya combined mesh once giving it two levels of sub div and left the division on level 2… THEN i comenced with the projection. after the projection however, the hands can be smoothed out and rebuilt. (if i didn’t sub div once before i made an adaptive mesh everything would have been fine, but instead of only having messed up hands, the hands would have not only been ugly looking, but would have also had wholes in them. so sub dividing the maya combined mesh once made it to where the hands didn’t have wholes when the adaptive mesh was made.)

jeeze i hope im making since:lol:

You did make some good since, man.
If you’re satisfied with the results - that’s all that matters…

is there no way to to get the hands right from the projection??? instead of rebuilding them?

Sure, man, there is.

Like I said before - make a normal map just for the hands - using just the good low-end hands for the base, and just the good high-end hands for the bake-over. Then make a normal map of everything else - use the messed-up-hands model, low and high levels as well. Fire up Phostoshop (or whatever you use for 2D edititing) and just copy over the “good” normal/displacement hand-area into the “bad” normal/diplacement map of the hand-area. Lo-and-behold, you have your complete normal map with fixed-up hand detail.