ZBrushCentral

Ed Cicka Workbook

Welcome to my workbook. I’ve been working with computer based illustration since the mid-90’s but almost all the effort has been based in box modeling tools. On a whim, I downloaded Sculptris four years ago, quickly hit the limit of the tool and realized I wanted more! I bought ZBrush but was overwhelmed by the complexity. I went through the tutorials and even joined Digital Tutors, but could never get really comfortable with it. It wasn’t until I sat through the ZBrush Summit 2014 and saw people really use the tool, and learned a few valuable tricks, that I was able to get some traction. I realized that the only way to get good with this tool is to put hours behind the Cintiq. Now I’m feeling like I’m making progress. I hope to post what I create here. Any constructive feedback is welcome!

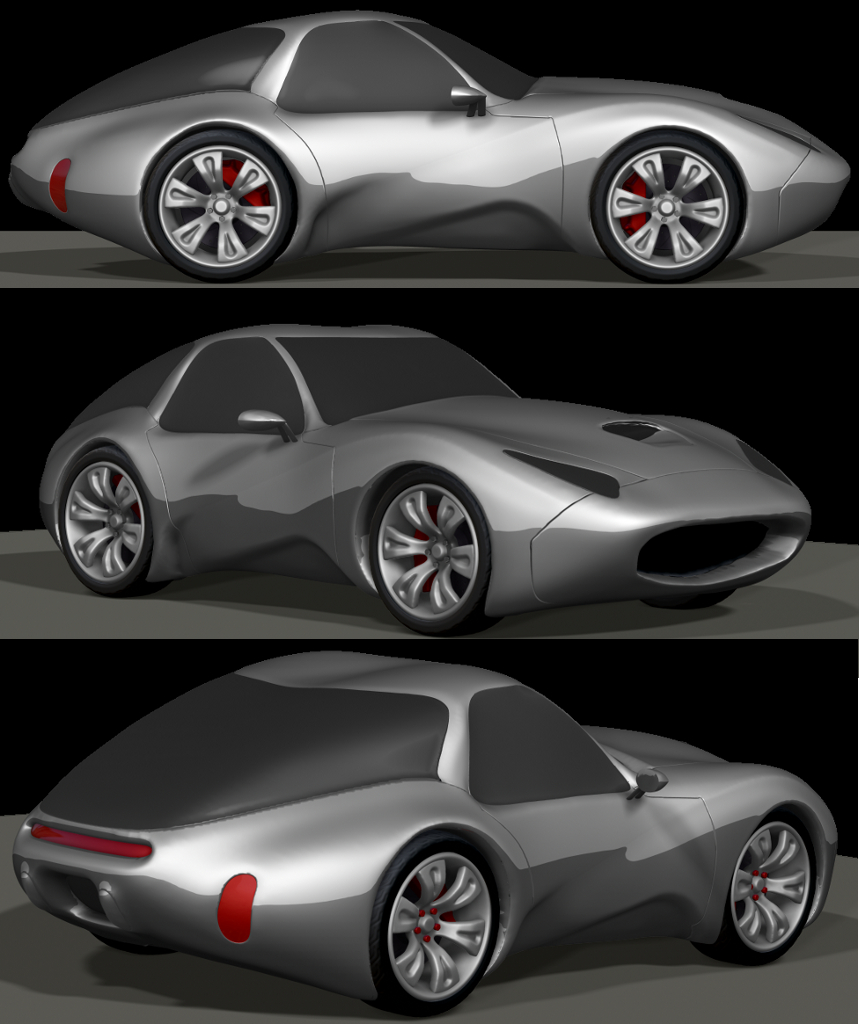
Here is a car I created using ZBrush to learn hard surface modeling. It was my first attempt at using polygroups and I learned a lot about going back and forth between polymesh and dynamesh.

Attachments

sport_concept_01_gallery.jpg

me too :wink:

While watching the ZBrush Summit 2015 last week I worked on this idea and got a chance to finish it up this weekend. First time using NanoMesh and FiberMesh. Talk about making some tasks easier! The sand and compound eyes are both done in NanoMesh. The idea of using NanoMesh for the sand came directly from Jason Martin who did this fantastic crab for the presentaton. Renders done in KeyShot with standard materials and environments with slight tweaking for color.

sea_creature_01_white.jpg

Here is an android idea I have been working on for a couple of weeks. Started with a human form from DAZ|Studio which I posed in that tool, did a GoZ to ZBrush and then cut each of the panels off using Panel Loops and placed it onto a copy of the human form. After getting all the panels done, I worked the form in ZBrush to make it look like it is mechanical underneath. I created the bench in Blender and brought it into ZBrush using a GoZ script from that tool. I then rendered everything in KeyShot using the stock KeyShot materials. I did find a HDRI panorama image on the internet that I used for lighting and background (Attribution: Nikolaus Hoppenthaler, www.openfootage.net, 00262_OpenfootageNET_Beach05_LOW.hdr, Aug 26th, 2015, http://creativecommons.org/licenses/by/4.0/, The image was not modified). I’m really happy with the result and brought the image into Photoshop to color correct and print on my photo printer at 11x14. Very nice results! (BTW - If you are interested in what “U-M” stands for, check out my website listed in my signature.)

Worked this weekend on doing some ideation with ZBrush focused on hard surface modeling. If I had a hexapod alien, what would it ride? I brought a DynaMesh sphere into the tool and stared to pull out shapes using the SnakeHook brush. Once I got a shape I liked, I created the alien to ride it and then started added details. DynaMesh, PolyGroups, Group Loops, Panel Loops, alpha maps, smoothing tools and even ZModeler. I even spend some time creating a custom UI to better support hard surface modeling. Render was done in KeyShot using standard materials. I’m going to add more details to the craft and possibly to the alien. I like were this is going thought!

Working some more ides around the alien transport. I realized the back of this thing looks like an ant head, so trying to add some interest. Not quite done yet though.

Finished work on the Alien Transport. Did a lot of work creating the leather jacket. I’ve also learned how to use Templates in KeyShot to make it easier to place materials after each session. I’m pretty happy with this and ready to move on to something else!

Created a new render, this time of a organic aircraft. Used ZBrush for all modeling except the figures which were done with DAZ|Studio. Used Polypaint to color the ship and KeyShot for rendering. Labels, final touch-up and motion blur effects where done in PhotoShop. I also created some cool animations that can be found at https://www.facebook.com/edcickastudio/.
pod-aircraft-final-1200.jpg

I’d take that thing for a spin! Also, I love the Alien Hover bike. Very form fitting :slight_smile:

Just finished another render. This one is based on an idea for an aircraft I created for my UNIVERSAL-MOTION theme on my website. The XA-71 (http://www.edcicka.com/xa71.html) is an experimental aircraft being created under contract. This depiction is the result of the crew bailing out of the aircraft over the ocean during a flight test in which the aircraft failed critically. I used a lot of different tools to create this. Blender was used to create the ejection pod (I had created it in Blender some time ago so that I could 3D print the aircraft). The pilot used DAZ|Studio and I used the Export to ZBrush feature to get the model seamlessly into ZBrush. The ocean was created using a wave generation modifier in Blender. Everything else was done in ZBrush. The parachute and cords, the dingy, the floats and much of the fine detail. I BPRed everything into KeyShot Pro 6.1 and used Templates to keep everything textured correctly. Lots of labels were used in KeyShot, including the camo on the pod, stenciling, and the parachute on the left side floating in the water. Finally, I rendered the image in 6000x4800, brought it into PhotoShop and added vignetting, smoke, wear on the pod and a few highlights. I found ZBrush to be an amazing tool to get some of the details quickly and learned a few new techniques along the way!sea-rescue-scene-1_smaller.jpg

Awesome! I really like the concept of experimental aircraft.

My favorite’s definitely the red android sitting on the bench though. It looks absolutely photo-realistic.

This is way cool! It reminds me of the old G.I. Joes from the 70’s. Specifically, the space capsule one. Nice work and great rendering.

Started a new project this week, a supercar. I’m learning a lot about zbrush and I use the exercise of creating a supercar as a benchmark for how much easier it is getting. I’ve got a lot of detail to add, but I’m enjoying the results. I’m using the three person package used in the McLaren F1 since I like the solution for how to deal with the drivers feet with huge wheel wells up front. This usually pushes the drivers feet way off toward the center of the car. Uncomfortable for long drives. Here are my first renders. Again ZBrush and KeyShot. Figures are done in DAZ|Studio.

Also, thing for the feedback! Nice to know people are looking and like what I’m doing!